Hey there, friend! Remember those lazy summer afternoons or rainy days when you’d get creative and make things just for the fun of it? Maybe you pressed flowers or collected pretty stones? Well, this project totally brings back those sweet, simple vibes! We’re making beautiful, earth-friendly bioplastic suncatchers that look absolutely magical catching the light.
And guess what? It’s unbelievably easy! Seriously, you probably have most of the ingredients right in your pantry. It’s a fantastic activity for kids, a lovely way to bring a little bit of nature indoors, and they make the sweetest handmade gifts. Plus, they come together surprisingly fast (well, minus the drying time!). Let’s get crafting!
Why You’ll Love Bioplastic Suncatchers
- Fast Prep: Mixing the “bioplastic” takes minutes!
- Super Easy: Simple steps perfect for all ages.
- Giftable: Handmade goodness that people will adore.
- Nature-Friendly: Made from simple, natural materials.
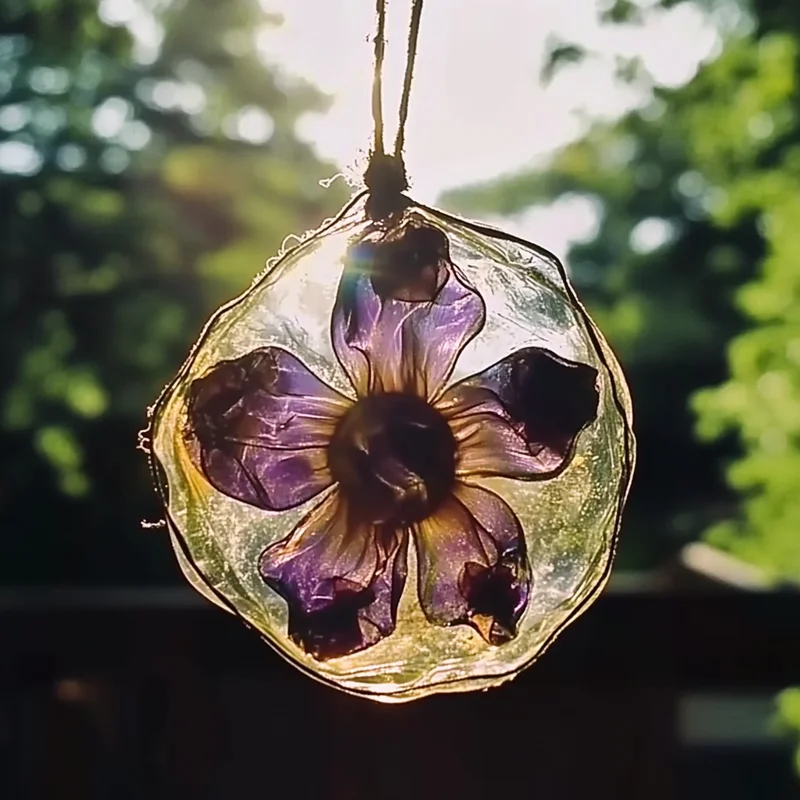
- Beautiful: Catch the light in the most enchanting way!
Ingredients
Gather ’round, here’s what you’ll need for these little bits of sunshine:
- Gelatin powder: The magic ingredient that makes our “plastic”! Any unflavored kind works.
- Boiling water: To dissolve that gelatin and get things mixing.
- String or yarn: For hanging your finished masterpieces. Twine or ribbon works too!
- Loose parts from nature: This is the fun part! Think small leaves, pressed flowers, thin twigs, tiny acorns, even pretty petals. Get outside and explore!
- Molds: Plastic lids are perfect – yogurt lids, sour cream lids, even bottle caps for mini ones! Cookie cutters placed on parchment paper can also work, but lids are the easiest to start with.
How to Make Bioplastic Suncatchers
Ready to get your hands a little crafty? Follow these simple steps:
First things first, head outside or raid your nature stash! You’ll want to collect your “loose parts from nature.” Think about what will look pretty when the light shines through – delicate leaves, vibrant flower petals, or even tiny fern fronds.
Next, grab your molds (plastic lids are great!). Arrange your collected materials inside the lids. Play around with patterns or just scatter them naturally. Don’t overfill – you want them to lay relatively flat.
Now, let’s make the bioplastic mixture. In a heatproof bowl, mix one part gelatin powder with four parts boiling water. For example, if you use 1/4 cup gelatin, you’ll need 1 cup of boiling water. Stir, stir, stir until the gelatin is completely dissolved and the mixture is clear. It might look a little thick or syrupy, and that’s perfect! Just be careful, as it’s hot!
Carefully pour the warm gelatin mixture into each plastic lid. You want a shallow layer, just enough to cover your natural bits and fill the mold about 1/8 to 1/4 inch deep. Make sure the mixture flows around your nature pieces.
While the mixture is still liquid, take a piece of string or yarn (about 6-8 inches long is usually good) and dip one end into the gelatin mixture in each mold. You want to make sure the string is anchored well in the liquid so you can hang your suncatcher later. I sometimes use a toothpick to gently push the string end down a bit.
Now comes the waiting game! Let your suncatchers harden at room temperature for 24-48 hours. They need this time to solidify and dry out properly. Sometimes, they might curl up a little as they dry. If you want them to stay really flat, you can gently place something light on top of them after they’ve started to set a bit (like a book or a cutting board with a little weight) but make sure it doesn’t stick. Once they are firm and dry, gently pop them out of their molds.

Substitutions & Additions
Want to get even more creative? Here are some ideas:
- Shiny bits: Add a sprinkle of fine glitter or biodegradable glitter to the mixture before it sets for some extra sparkle.
- Different molds: Try silicone molds for fun shapes, or even metal cookie cutters placed on parchment paper (though they can be trickier!).
- Food Coloring: A tiny drop of food coloring can tint the bioplastic, but be aware that strong sun might fade the color over time.
- Other inclusions: Small, flat buttons, sequins, or tiny plastic beads could also work, but sticking to natural materials keeps them truly “bioplastic.”
Tips for Success
A few pointers to make your suncatcher crafting smooth sailing:
- Measure Accurately: Getting the gelatin to water ratio right is key for proper hardening.
- Boiling Water is a Must: The water needs to be hot enough to fully dissolve the gelatin.
- Anchor the String Well: Make sure the string is really embedded in the mixture so your suncatcher doesn’t fall off when hanging.
- Be Patient with Drying: Don’t rush the hardening process. Room temperature for 24-48 hours is usually needed for them to be sturdy enough.
- Humidity Matters: If you live in a very humid climate, they might take longer to dry, or not get quite as hard. A drier spot in the house is best.
- Embrace Imperfection: Part of the charm is how unique each one is!
If you enjoy simple, creative projects like this, you might also like making easy homemade worry stones or even trying your hand at DIY borax crystals!
How to Store Bioplastic Suncatchers
Since these are made from gelatin, they aren’t really meant for long-term storage like traditional crafts. They are best enjoyed hanging in a window where they can catch the light! They are sensitive to moisture and extreme heat. If you need to store them temporarily, keep them flat between layers of parchment paper in a cool, dry place. Over time, they may become brittle or degrade, which is part of their cool bioplastic nature!
FAQs
Q: Are these truly “bioplastic”?
A: Yes, in a simple sense! They are made from natural, renewable materials (gelatin comes from animal collagen) and can break down over time, unlike petroleum-based plastics.
Q: How long do they last?
A: It depends on the environment! In a window, they can last for several weeks or even months. Avoid getting them wet, as they will dissolve. Over time, they might become brittle.
Q: Can kids make these?
A: Absolutely! This is a fantastic kid-friendly craft, especially the collecting and arranging parts. Adults should handle the boiling water and pouring steps.
Q: Can I use dried flowers?
A: Yes, dried or pressed flowers and leaves work wonderfully and hold their shape nicely in the gelatin.
Looking for more fun ideas for kids or just simple, joyful activities? Check out how to make easy clear glue suncatchers for a different texture!
Be sure to follow Food Knight on Pinterest for more easy recipes and fun ideas!

DIY Bioplastic Suncatchers
Equipment
- Heatproof Bowl
- Molds (Plastic lids or cookie cutters)
- Toothpick (optional)
Ingredients
- 1/4 cup gelatin powder Any unflavored kind
- 1 cup boiling water To dissolve gelatin
- string or yarn For hanging; twine or ribbon works too
- loose parts from nature small leaves, pressed flowers, thin twigs, tiny acorns, pretty petals
- molds Plastic lids (yogurt, sour cream, bottle caps) or cookie cutters on parchment paper
Instructions
- Step 1: Collect loose parts from nature, like delicate leaves, vibrant flower petals, or tiny fern fronds.
- Step 2: Grab your molds (plastic lids work great!) and arrange the collected natural materials inside them. Avoid overfilling; aim for a relatively flat layer.
- Step 3: In a heatproof bowl, mix one part gelatin powder with four parts boiling water (e.g., 1/4 cup gelatin with 1 cup boiling water). Stir until completely dissolved and the mixture is clear and slightly thick. Be careful, as it's hot!
- Step 4: Carefully pour the warm gelatin mixture into each mold, creating a shallow layer (about 1/8 to 1/4 inch deep) just enough to cover your natural bits. Ensure the mixture flows around the nature pieces.
- Step 5: While the mixture is still liquid, dip one end of a 6-8 inch piece of string or yarn into the gelatin mixture in each mold. Make sure the string is well anchored in the liquid to allow for hanging later (a toothpick can help push it down).
- Step 6: Let the suncatchers harden at room temperature for 24-48 hours. They need this time to solidify and dry properly. Once firm and dry, gently pop them out of their molds.