
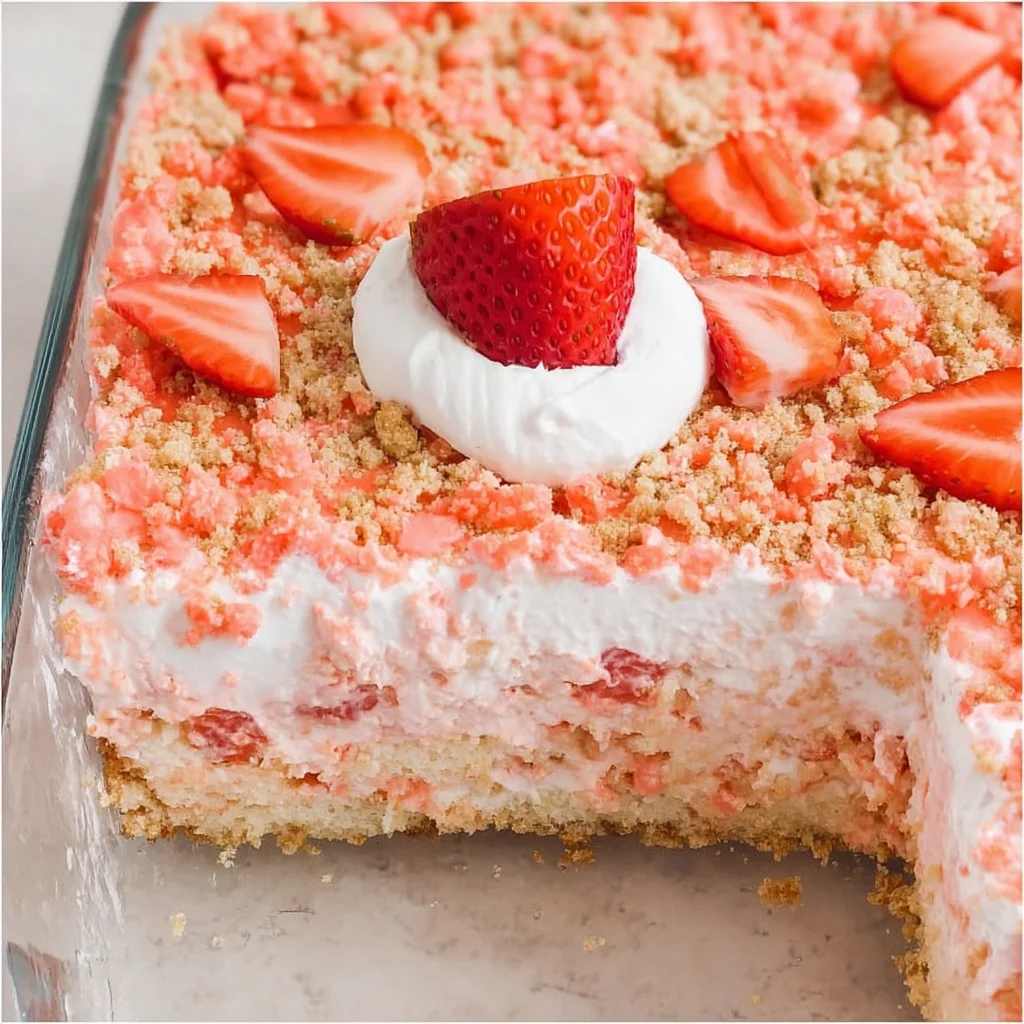
Oh sweet friend, do you remember that amazing strawberry crunch ice cream bar from when you were a kid? That creamy vanilla, the bright strawberry swirl, and that irresistible crunchy coating? Pure bliss, right? Well, get ready to bring that feeling right into your kitchen with this absolutely dreamy Easy Strawberry Crunch Poke Cake!
This isn’t just a cake; it’s a trip down memory lane in every single bite. It’s moist, it’s creamy, it’s bursting with strawberry flavor, and it has that iconic crunchy topping that just makes you smile. Plus, and here’s the best part, it’s ridiculously easy to make. Seriously, if you can bake a simple cake mix, you can make this showstopper. It’s perfect for potlucks, birthdays, holidays, or just because you need a little dose of happy in your day. Let’s bake some magic!
Why You’ll Love This Recipe
- Fast: Seriously, most of the time is passive waiting for the cake to cool and soak.
- Easy: We’re talking simple steps, minimal fuss, and maximum reward.
- Giftable: This cake is always a hit! Box it up and share the love.
- Crowd-pleasing: Kids and adults alike go wild for that nostalgic flavor and amazing texture.
Ingredients
Gather ’round, sweet baker! Here’s what you’ll need to whip up this gorgeous cake. Most of these are pantry staples, which makes this even easier!
- 1 white sheet cake (baked in a 9×13 dish): You can use your favorite box mix or even a homemade recipe if you’re feeling fancy! A simple white or vanilla cake mix works perfectly here.
- 12 ounces evaporated milk: This is key for the creamy, rich soak that goes into the cake.
- 3 ounces strawberry jello (divided in half): That little box holds the magic for both the cake soak and the crunchy topping!
- 14 ounces sweetened condensed milk: Oh hello, sweetness and creamy texture! This is another crucial part of our delicious milk soak.
- ½ cup whole milk: Adds a little extra liquid to our soak mixture.
- 8 ounce Cool Whip or frozen whipped topping (thawed): The perfect light and fluffy topping that holds our crunch layer. Make sure it’s thawed but still nice and cold.
- 25 golden Oreos (about 1 package): The secret to our “crunch”! These vanilla sandwich cookies crush beautifully and pair perfectly with the strawberry.
- ¼ cup salted butter (melted): Helps bind the cookie crumbs and make that crunch layer irresistible.
How to Make It
Alright, let’s get our hands a little sticky and create this masterpiece. Follow these simple steps, and you’ll be enjoying a slice of heaven in no time!
1. First things first, you need a baked cake! Preheat your oven to 350°F (or whatever temperature your cake mix package says) and mix up your white cake batter. Pour it into a 9×13-inch glass baking dish and bake according to the box instructions. The most important part here? Let that cake cool completely. Seriously, don’t rush this part! A warm cake will fall apart and won’t soak up the goodness properly.
2. While the cake is cooling, let’s make our amazing milk soak. Grab a small saucepan and pour in the evaporated milk. Heat it over medium heat. Once it’s warming up, whisk in half of that small package of strawberry gelatin powder. Keep stirring and heating gently until you see the gelatin completely dissolved. It should look smooth and combined. Then, take it off the heat and set it aside to cool down. We don’t want to pour hot liquid on our cake!
3. Once the evaporated milk mixture has cooled a bit (it doesn’t have to be cold, just not hot), whisk in the entire can of sweetened condensed milk and the whole milk. Whisk it really well until everything is beautifully combined and smooth. This is your magical soak mixture!
4. Now for the “poke” part! Once your cake is completely cool, grab a bamboo skewer, a chopstick, or even the handle of a wooden spoon. Gently poke holes all over the cake. Try to make them fairly evenly spaced, maybe about an inch apart. Don’t go all the way to the bottom of the dish, just poke down about halfway or a little more. You’re creating little tunnels for that delicious milk mixture to seep into.
5. Carefully and evenly spoon that amazing strawberry milk mixture all over the poked cake. Take your time and try to get it into all those holes. Once the liquid is distributed, cover the dish tightly with plastic wrap. Pop the cake into the refrigerator for at least 1 hour. This gives the cake time to soak up all that creamy, sweet, strawberry goodness. The longer it sits, the more moist and flavorful it gets!
6. After the cake has had a good soak, take it out of the fridge. Gently spread the thawed Cool Whip evenly over the top of the cake, right up to the edges. This is our creamy base for the crunch!
7. Time to make the glorious crunch topping! Place your golden Oreos into a sturdy plastic bag (like a Ziploc bag). Use a rolling pin, a heavy can, or even your hands to crush them into crumbs. You want a mix of fine crumbs and some slightly larger pieces for texture – that’s where the real crunch comes from!
8. Transfer the crushed cookie crumbs to a medium bowl. Pour the melted salted butter over the crumbs. Then, sprinkle in the remaining half of the strawberry gelatin powder. Yes, straight from the packet! This is what gives the crunch its signature pink color and extra burst of strawberry flavor.
9. Stir everything together with a spoon or fork until the cookie crumbs are evenly coated with butter and the pink gelatin powder is distributed. It should look like delightfully pink, buttery crumbs.
10. Now for the grand finale! Sprinkle the entire cookie mixture evenly over the layer of Cool Whip on the cake. You can gently press down on the crumbs with the back of a spoon or spatula to make a relatively smooth and flat top, ensuring the crunch sticks nicely to the whipped topping. Slice it up and get ready for pure joy!
Substitutions & Additions
One of the best things about a simple cake like this is how easy it is to play with! Here are a few ideas if you want to mix things up:
- Cake Mix: Swap the white cake for a vanilla or even a strawberry cake mix for extra strawberry power!
- Gelatin Flavor: Try raspberry, cherry, or even strawberry-banana jello for a different fruity twist.
- Cookies: Don’t have golden Oreos? Vanilla wafers, shortbread cookies, or even graham crackers would work for the crunch layer, though the flavor profile will change slightly.
- Whipped Topping: If you prefer homemade, you can use stabilized whipped cream (add a little cream cheese or gelatin) but Cool Whip tends to hold up better with the wet poke cake base and the heavy crunch topping.
- Add Fresh Fruit: Garnish slices with fresh strawberries right before serving for a burst of freshness and color.
Tips for Success
Even though this cake is super easy, a few pointers can ensure yours turns out absolutely perfect every single time:
- Cool That Cake: I know I said it before, but seriously, let the cake cool completely before poking and adding the milk mixture. Warm cake + liquid = mush. We want moist, not mushy!
- Don’t Skimp on the Poke Holes: The more holes you have (evenly spaced, of course!), the more that delicious milk mixture can soak in, resulting in a super moist cake.
- Let it Soak: Give the cake at least an hour in the fridge to soak up the liquid. Overnight is even better if you have the time! The texture and flavor deepen beautifully.
- Crush Those Cookies Right: You don’t want powder, but you also don’t want huge chunks. Aim for a mix of fine crumbs and small pieces for the best texture contrast.
- Prep Ahead: You can bake the cake and make the crunch topping a day in advance. Store the cooled cake covered at room temperature and the crunch topping in an airtight container at room temperature. Prepare the milk soak and assemble the cake the day you plan to serve it.
How to Store It
Got leftovers? Lucky you! This cake stores beautifully. Simply cover the baking dish tightly with plastic wrap or transfer individual slices to an airtight container. Keep the cake stored in the refrigerator. It will stay delicious and moist for 3-4 days.
FAQs
Q: Can I use homemade cake instead of a mix?
A: Absolutely! Just bake your favorite 9×13-inch cake recipe and let it cool completely before proceeding with the poking and soaking steps.
Q: Why do you poke holes in the cake?
A: Poking holes creates tunnels that allow the liquid mixture (the evaporated milk, condensed milk, and jello) to soak deep into the cake, making it incredibly moist, flavorful, and tender.
Q: Can I make the entire cake the day before?
A: Yes! This cake is actually better the next day after the flavors have melded and the liquid has fully soaked in. Just make sure it’s covered well in the refrigerator.
Q: Can I use fresh whipped cream?
A: You can, but it might not hold up as well against the moisture from the cake and the weight of the crunch topping compared to stabilized whipped topping like Cool Whip. If you use fresh, I recommend stabilizing it with a little cream cheese or gelatin for best results.
Easy Strawberry Crunch Poke Cake Recipe
Equipment
- 9x13 Baking Dish
- Small saucepan
- whisk
- Tool for poking (skewer, chopstick, spoon handle)
- Sturdy Plastic Bag
- Tool for crushing (rolling pin, can)
- Medium bowl
- oven
- Refrigerator
Ingredients
- 1 baked 9x13 white cake
- 12 ounces evaporated milk
- 3 ounces strawberry jello divided in half
- 14 ounces sweetened condensed milk
- 0.5 cup whole milk
- 8 ounce Cool Whip or frozen whipped topping thawed
- 25 golden Oreos about 1 package
- 0.25 cup salted butter melted
Instructions
- Step 1: First things first, you need a baked cake! Preheat your oven to 350°F (or whatever temperature your cake mix package says) and mix up your white cake batter. Pour it into a 9x13-inch glass baking dish and bake according to the box instructions. Let that cake cool completely.
- Step 2: While the cake is cooling, let's make our amazing milk soak. Grab a small saucepan and pour in the evaporated milk. Heat it over medium heat. Once it's warming up, whisk in half of that small package of strawberry gelatin powder. Keep stirring and heating gently until you see the gelatin completely dissolved. Then, take it off the heat and set it aside to cool down.
- Step 3: Once the evaporated milk mixture has cooled a bit (it doesn't have to be cold, just not hot), whisk in the entire can of sweetened condensed milk and the whole milk. Whisk it really well until everything is beautifully combined and smooth. This is your magical soak mixture!
- Step 4: Now for the "poke" part! Once your cake is completely cool, grab a bamboo skewer, a chopstick, or even the handle of a wooden spoon. Gently poke holes all over the cake. Try to make them fairly evenly spaced, maybe about an inch apart. Don't go all the way to the bottom of the dish, just poke down about halfway or a little more.
- Step 5: Carefully and evenly spoon that amazing strawberry milk mixture all over the poked cake. Take your time and try to get it into all those holes. Once the liquid is distributed, cover the dish tightly with plastic wrap. Pop the cake into the refrigerator for at least 1 hour. This gives the cake time to soak up all that creamy, sweet, strawberry goodness.
- Step 6: After the cake has had a good soak, take it out of the fridge. Gently spread the thawed Cool Whip evenly over the top of the cake, right up to the edges. This is our creamy base for the crunch!
- Step 7: Time to make the glorious crunch topping! Place your golden Oreos into a sturdy plastic bag (like a Ziploc bag). Use a rolling pin, a heavy can, or even your hands to crush them into crumbs. You want a mix of fine crumbs and some slightly larger pieces for texture.
- Step 8: Transfer the crushed cookie crumbs to a medium bowl. Pour the melted salted butter over the crumbs. Then, sprinkle in the remaining half of the strawberry gelatin powder. Stir everything together with a spoon or fork until the cookie crumbs are evenly coated with butter and the pink gelatin powder is distributed.
- Step 9: Sprinkle the entire cookie mixture evenly over the layer of Cool Whip on the cake. You can gently press down on the crumbs with the back of a spoon or spatula to make a relatively smooth and flat top, ensuring the crunch sticks nicely to the whipped topping. Slice it up and get ready for pure joy!
Notes
A: Absolutely! Just bake your favorite 9x13-inch cake recipe and let it cool completely. Q: Why do you poke holes in the cake?
A: Poking holes creates tunnels that allow the liquid mixture to soak deep into the cake, making it incredibly moist, flavorful, and tender. Q: Can I make the entire cake the day before?
A: Yes! This cake is actually better the next day after the flavors have melded and the liquid has fully soaked in. Just make sure it's covered well in the refrigerator. Q: Can I use fresh whipped cream?
A: You can, but it might not hold up as well. Stabilize with a little cream cheese or gelatin for best results.