
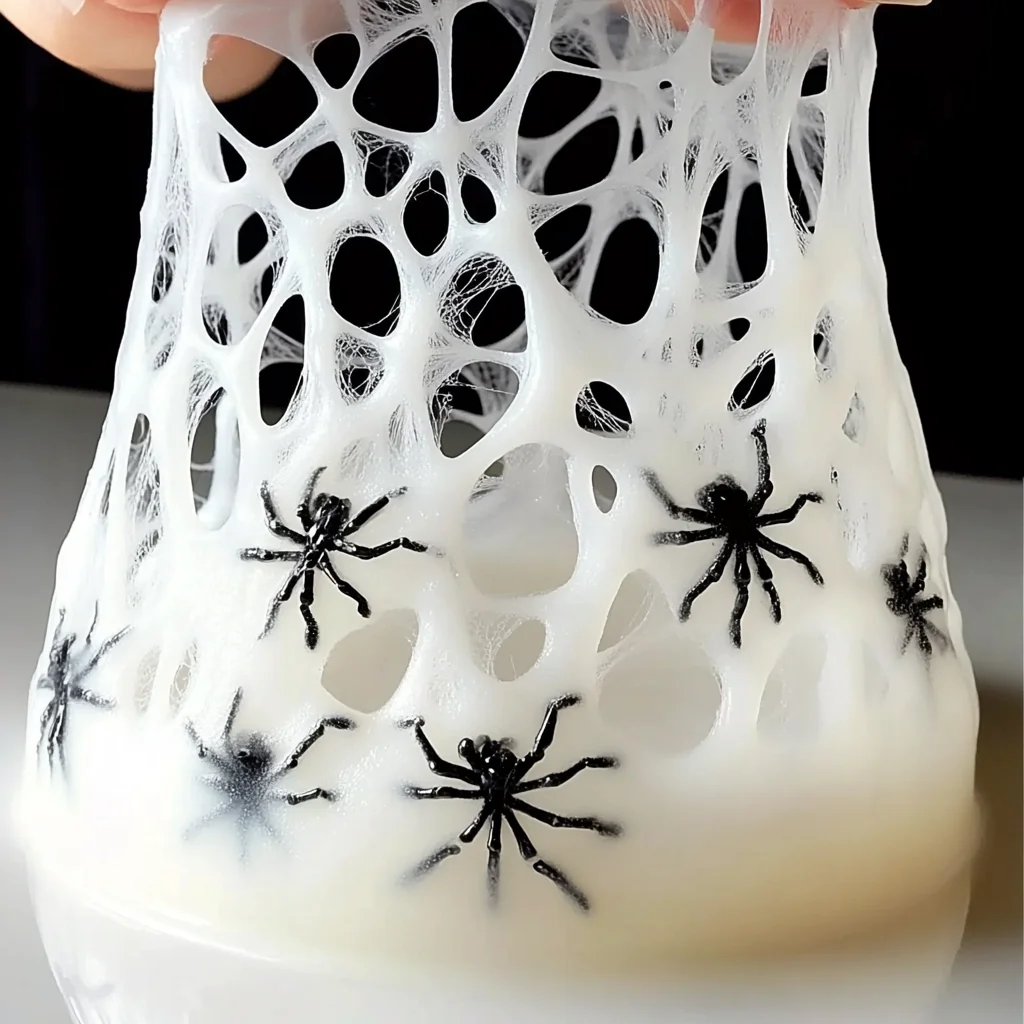
Welcome to the delightful world of DIY crafting! Today, we are diving into a project that is not only fun but also brings out our inner child: Baking Soda Spider Web Slime! This enchanting slime is perfect for Halloween decorations or just a spooky playtime treat. Imagine the joy of creating something squishy, stretchy, and oh-so-satisfying with your own hands. As we mix, knead, and play, we’re not just crafting; we’re making memories filled with laughter and creativity. So grab your supplies, and let’s embark on this gooey adventure together!
Why You’ll Love Baking Soda Spider Web Slime
- Beginner-friendly
- Budget-friendly
- Creative and fun
- Great for kids and families
- Perfect for gifts or decorations
- Customizable
The Heart Behind This DIY
There’s something magical about slime. It encourages exploration and creativity while providing a sensory experience that’s truly unique. As you stretch and squish the slime between your fingers, you’ll find yourself completely immersed in the moment, leaving behind the day’s worries. Crafting this slime together can be a wonderful bonding experience for families, fostering connections and laughter. Plus, it’s educational! You’ll learn about mixing solutions and the science behind slime. Each squish brings a smile, reminding us that the joy of creation is what truly matters.
A Gentle Look at the Process
As we prepare to create our Baking Soda Spider Web Slime, envision the smooth, glossy texture that will soon be in your hands. Picture the excitement as the ingredients blend together, transforming into something extraordinary. You’ll feel the satisfaction of kneading the slime until it reaches the perfect consistency, and the anticipation builds as you see it come together. This process is all about enjoying the journey, so let’s savor each step as we bring our spooky creation to life!
Materials You’ll Need
- 1 cup white school glue – This is the base of our slime, providing that delightful stretch.
- 1 cup water – Helps to dilute the glue, making it easier to mix.
- 1 teaspoon baking soda – This ingredient adds thickness and helps the slime hold its shape.
- 1 tablespoon contact lens solution – Contains boric acid, which activates the slime and makes it less sticky.
- Optional: black food coloring or glitter – Adds a spooky touch or some sparkle to your slime!
Step-by-Step Directions
Step 1
In a mixing bowl, combine 1 cup of white school glue and 1 cup of water. Stir gently until the mixture is well blended. You’ll notice the smoothness of the glue and the way the water makes it a bit more liquidy. It’s like creating a magical potion!
Step 2
Add 1 teaspoon of baking soda to the mixture. Stir until fully incorporated. You’ll see the mixture start to thicken slightly, which is a great sign that your slime is on its way to being fabulous!
Step 3
If you’d like, now is the time to add a few drops of black food coloring or glitter. Mix thoroughly to achieve the color and sparkle you desire. The transformation is so much fun to witness!
Step 4
Slowly add 1 tablespoon of contact lens solution to the mixture while stirring continuously. You’ll see the slime beginning to form, pulling away from the sides of the bowl and becoming less sticky. How exciting!
Step 5
Now it’s time to knead the slime with your hands! This is where the magic happens. If the slime feels too sticky, just add a little more contact lens solution until it reaches your desired consistency. Enjoy the squishy texture!
Step 6
Once you’re satisfied with your slime, store it in an airtight container when not in use. Now you can enjoy your Baking Soda Spider Web Slime anytime you like!
Creative Ways to Use Baking Soda Spider Web Slime
The fun doesn’t stop once your slime is made! You can use it in various ways. For Halloween, decorate your home by placing it in spider-web-like patterns. Or, create spooky gifts for friends and family to share the joy of crafting! Kids will love to play with it, stretching and squishing it to their heart’s content. Imagine the giggles as they create their own spooky scenes with the slime. You can even use it as a stress reliever; just take a moment to knead and squish away your worries!
How to Store, Preserve, or Reuse Baking Soda Spider Web Slime
To keep your slime fresh and ready for play, store it in an airtight container. This will help preserve its stretchy quality and prevent it from drying out. If the slime begins to lose its elasticity, a quick addition of contact lens solution can bring it back to life. Remember to keep it out of direct sunlight to maintain the best quality!
Creative Variations and Customizations
- Color variations – Experiment with different colors like orange for Halloween or green for a monster theme.
- Theme ideas – Create themed slimes for different occasions, such as pastel colors for spring or bright colors for summer.
- Seasonal adaptations – Make glittery slime for winter holidays or spooky black and orange for Halloween.
- Kid-friendly modifications – Use non-toxic glitter and colors to ensure safety for younger kids.
- Advanced creative upgrades – Try incorporating scents or textures like beads for an extra sensory experience!
Tips for Success
- Common mistakes to avoid – Be careful not to add too much contact lens solution at once; it can make the slime too firm.
- Safety tips – Always supervise young children during the crafting process, especially when using small items like glitter.
- Preparation suggestions – Gather all your materials before starting to make the process smoother and more enjoyable.
- Cleanup recommendations – Use a tablecloth or newspaper during the crafting session to make cleanup easier.
- Expert crafting tips – If you want a different texture, try adjusting the amount of baking soda or contact lens solution.
FAQs About Baking Soda Spider Web Slime
Can beginners make this?
Absolutely! This project is beginner-friendly and perfect for anyone looking to dive into crafting.
Can children participate?
Yes! Kids will love helping to mix and knead the slime, making it a fantastic family activity.
How long does it last?
When stored properly in an airtight container, your slime can last for several weeks!
Can I customize it?
Definitely! Feel free to experiment with colors, scents, and textures to make it uniquely yours.
A Final Creative Note
As we wrap up our journey into the world of Baking Soda Spider Web Slime, I hope you feel inspired to explore your creativity and enjoy the process of making something special. Remember, crafting is about the joy of self-expression and the memories we create along the way. For more delicious recipes, check out Blueberry Lemon Ricotta Pancakes or Grilled Chicken Creamy Pasta Bowl Recipe for treats you will love! Happy crafting, and may your slime adventures be filled with laughter and joy!
For more DIY inspiration, follow our Pinterest page!
Baking Soda Spider Web Slime
Ingredients
Materials You'll Need
- 1 cup white school glue This is the base of our slime, providing that delightful stretch.
- 1 cup water Helps to dilute the glue, making it easier to mix.
- 1 teaspoon baking soda This ingredient adds thickness and helps the slime hold its shape.
- 1 tablespoon contact lens solution Contains boric acid, which activates the slime and makes it less sticky.
Optional ingredients
- black food coloring Adds a spooky touch to your slime!
- glitter Adds some sparkle to your slime!
Instructions
- Step 1: In a mixing bowl, combine 1 cup of white school glue and 1 cup of water. Stir gently until the mixture is well blended.
- Step 2: Add 1 teaspoon of baking soda to the mixture. Stir until fully incorporated.
- Step 3: If you'd like, now is the time to add a few drops of black food coloring or glitter. Mix thoroughly to achieve the color and sparkle you desire.
- Step 4: Slowly add 1 tablespoon of contact lens solution to the mixture while stirring continuously.
- Step 5: Now it’s time to knead the slime with your hands! If the slime feels too sticky, just add a little more contact lens solution until it reaches your desired consistency.
- Step 6: Once you’re satisfied with your slime, store it in an airtight container when not in use.
