

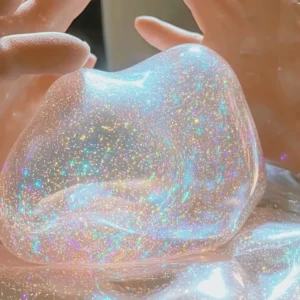
Have you ever felt the joy of creating something magical with your own hands? Picture this: sitting with your loved ones, laughter filling the air as you mix, knead, and watch a simple concoction transform into a mesmerizing blob of crystal clear slime! This DIY project is not just a fun activity; it’s a delightful way to bond, explore creativity, and unleash your inner child. Imagine the squishy texture, the gleaming surface, and the endless possibilities of play. Let’s dive into the world of slime-making and discover how truly satisfying it is to craft something so squishy and fun!
Why You’ll Love Crystal Clear Slime
- Beginner-friendly
- Budget-friendly
- Creative and fun
- Great for kids and families
- Perfect for gifts or decorations
- Customizable
The Heart Behind This DIY
Creating crystal clear slime is more than just a craft; it’s a wonderful way to encourage creativity and mindfulness. As you mix the ingredients, you’ll find yourself fully present in the moment, focusing on the textures and colors. This project is a fantastic opportunity for kids and adults alike to express themselves artistically. It fosters confidence as you experiment with different colors, textures, and even glitter! Plus, the tactile experience of kneading and playing with slime is incredibly soothing. You’ll find that crafting together can strengthen bonds, spark conversations, and create lasting memories.
A Gentle Look at the Process
When you begin your slime-making journey, expect to feel a mix of excitement and curiosity. The process is simple and inviting. You’ll start by combining a few basic ingredients that you likely have on hand. As you stir and knead, watch as the ingredients come together in a satisfying way, slowly transforming into something extraordinary. The joy is in the journey, and I promise, the end result will be worth every moment spent mixing and creating!
Materials You’ll Need
- 1 cup clear school glue: This is the base of your slime, providing that lovely transparent quality.
- 1/2 cup water: To help combine the glue and activate the slime.
- 1/2 teaspoon baking soda: This helps to firm up your slime, giving it the right texture.
- 1 tablespoon contact lens solution: This is the magical ingredient that makes your slime stretchy!
- Optional: food coloring or glitter: Add a splash of personality to your slime!
Step-by-Step Directions
Step 1
In a mixing bowl, combine the clear school glue and water. Stir until the mixture is well blended. The glossy appearance should already start to feel inviting!
Step 2
Add the baking soda to the mixture and stir until fully dissolved. This step is crucial for achieving that perfect slime consistency, so take your time and enjoy the transformation.
Step 3
If you want to add a touch of flair, now is the time! Add a few drops of food coloring or a sprinkle of glitter, and mix thoroughly. Imagine the vibrant colors swirling together as you create your unique masterpiece.
Step 4
Now, here comes the fun part! Slowly add the contact lens solution to the mixture, stirring continuously. You’ll notice the slime beginning to form, pulling away from the edges of the bowl. It’s like watching a magic spell come to life!
Step 5
Knead the slime with your hands for a few minutes until it reaches your desired consistency. Feel the elastic texture as you stretch and squish it. This is where the sensory joy truly comes alive!
Step 6
Once you are satisfied with your creation, store the slime in an airtight container when not in use. This will keep it fresh and ready for your next crafting session.
Creative Ways to Use Crystal Clear Slime
Your crystal clear slime is not only a joy to make but also a delightful addition to your playtime! Here are some fun ways to use your slime:
- Use it as a stress-relief tool: Squishing and stretching the slime can be incredibly calming.
- Decorate your workspace: Place your slime in a clear container on your desk as a fun decoration.
- Gift it to friends or family: Everyone loves a unique, handmade gift!
- Explore textures: Add different materials like beads or foam balls for a sensory experience.
- Engage in playtime: Use it as a part of imaginative play or even in homemade sensory bins.
How to Store, Preserve, or Reuse Crystal Clear Slime
To keep your slime in top shape, always store it in an airtight container when not in use. You can also add a few drops of water if it starts to feel dry. Just knead it a bit, and it should regain its delightful texture. I love to keep a stash of slime handy for rainy days or cozy nights in!
Creative Variations and Customizations
- Color variations: Experiment with different colors for each batch.
- Theme ideas: Create themed slimes for holidays or special occasions.
- Seasonal adaptations: Add festive elements like sparkles for winter or pastel shades for spring.
- Kid-friendly modifications: Use non-toxic materials to ensure safety for little ones.
- Advanced creative upgrades: Try adding essential oils for a scented slime experience.
Tips for Success
- Avoid overmixing your slime, as it can become too stiff.
- Always supervise younger children, especially when using contact lens solution.
- Prepare your workspace to make cleanup easier.
- Use a tablecloth or old newspaper to catch any spills.
- If your slime feels too sticky, add a little more contact lens solution while kneading.
FAQs About Crystal Clear Slime
Can beginners make this?
Absolutely! This slime recipe is perfect for crafters of all skill levels. Just follow the steps, and you will be amazed by how easy it is!
Can children participate?
Yes! Kids will love helping to mix and knead the slime. Just be sure to supervise them when using the contact lens solution.
How long does it last?
When stored properly in an airtight container, your slime can last for weeks! Just make sure to check its texture occasionally.
Can I customize it?
Definitely! From colors to glitter, the possibilities are endless. Let your imagination run wild!
A Final Creative Note
As you embark on your slime-making adventure, remember that the process is just as important as the finished product. Celebrate your creativity and the joy of self-expression through crafting. I hope this project inspires you to explore your artistic side and share the experience with others. For more delicious recipes, check out Blueberry Lemon Ricotta Pancakes or Kool-Aid Gummy Treats for treats you will love! Happy crafting!
For more DIY inspiration, be sure to follow our Pinterest!
Craft Your Own Crystal Clear Slime
Equipment
- Mixing Bowl
- Spoon or Stirring Stick
- airtight container
Ingredients
For the Slime
- 1 cup clear school glue This is the base of your slime, providing that lovely transparent quality.
- 1/2 cup water To help combine the glue and activate the slime.
- 1/2 teaspoon baking soda This helps to firm up your slime, giving it the right texture.
- 1 tablespoon contact lens solution This is the magical ingredient that makes your slime stretchy!
Optional Add-ins
- food coloring Add a splash of personality to your slime!
- glitter Add a splash of personality to your slime!
Instructions
- Step 1: In a mixing bowl, combine the clear school glue and water. Stir until the mixture is well blended.
- Step 2: Add the baking soda to the mixture and stir until fully dissolved.
- Step 3: If you want to add a touch of flair, now is the time! Add a few drops of food coloring or a sprinkle of glitter, and mix thoroughly.
- Step 4: Slowly add the contact lens solution to the mixture, stirring continuously.
- Step 5: Knead the slime with your hands for a few minutes until it reaches your desired consistency.
- Step 6: Once you are satisfied with your creation, store the slime in an airtight container when not in use.
