
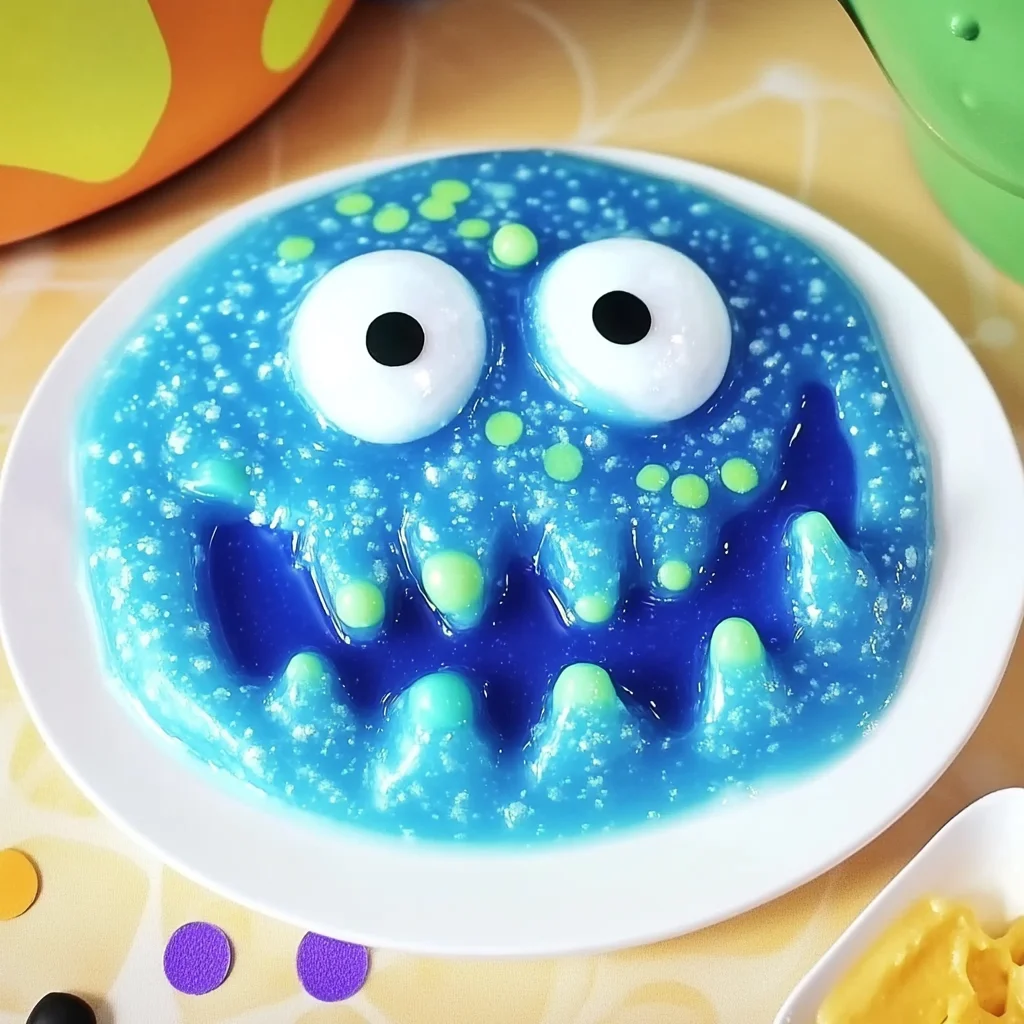
Ah, the joy of crafting! There’s something truly magical about rolling up your sleeves, gathering your materials, and letting your imagination run wild. Today, I invite you to join me in a delightful DIY adventure that will not only spark joy but also unleash your inner child. We’re going to make Monster Slime! Imagine a gooey, stretchy creation that you can mold and play with, bringing a world of sensory fun right to your fingertips. This project is special not just for the fun you’ll have but also for the memories you’ll create with your loved ones. So grab your supplies, and let’s dive into the colorful universe of slime-making!
Why You’ll Love Monster Slime
- Beginner-friendly
- Budget-friendly
- Creative and fun
- Great for kids and families
- Perfect for gifts or decorations
- Customizable
The Heart Behind This DIY
Making Monster Slime is more than just a crafting activity; it’s an opportunity to explore creativity, relax, and bond with family and friends. The squishy texture and vibrant colors stimulate our senses, making each moment spent crafting incredibly enjoyable. As you mix and knead, you may notice how crafting encourages mindfulness, allowing you to focus on the present moment. Plus, there’s something so satisfying about creating something with your own hands, boosting your confidence and sparking your imagination. Whether you’re a seasoned crafter or a curious beginner, this project is bound to bring a smile to your face.
A Gentle Look at the Process
Picture this: You gather your materials, the sound of glue pouring into a bowl fills the air, and as you mix, the colors swirl together like a beautiful abstract painting. The anticipation builds as you add the baking soda, transforming the mixture into a magical concoction. With every stir and knead, you’ll feel the texture shift, becoming that perfect slime consistency. This process is all about exploration and joy—allowing your creativity to flow freely as you create something uniquely yours.
Materials You’ll Need
- 1 cup white school glue: This will form the base of your slime.
- 1 cup water: To mix with the glue, creating a smooth texture.
- 1 teaspoon baking soda: This helps to thicken the slime.
- 2 tablespoons contact lens solution: The magic ingredient that brings your slime to life!
- Food coloring: Choose your favorite colors to make your slime vibrant.
- Optional: Glitter or foam beads for added texture and sparkle.
Step-by-Step Directions
Step 1
In a mixing bowl, combine 1 cup of white school glue and 1 cup of water. Stir until well blended. The consistency should be smooth, and you can already start to see the base of your slime forming.
Step 2
Add 1 teaspoon of baking soda to the mixture and stir until fully dissolved. You’ll notice the mixture becoming a bit thicker, which is exactly what you want!
Step 3
Incorporate a few drops of food coloring to achieve your desired color, mixing thoroughly. This is where the fun begins—don’t be shy! Go bold and create a monster slime that reflects your personality!
Step 4
Gradually add 2 tablespoons of contact lens solution to the mixture, stirring continuously. You’ll see the slime start to form right before your eyes. It’s like magic!
Step 5
Knead the slime with your hands until it reaches the desired consistency. If it feels too sticky, add a bit more contact lens solution to get that perfect stretch.
Step 6
For extra fun, mix in optional glitter or foam beads. This adds texture and a little sparkle, making your slime even more special!
Step 7
Store the monster slime in an airtight container when not in use. This will keep it fresh and ready for your next adventure!
Creative Ways to Use Monster Slime
Now that you have your colorful creation, you may wonder how to enjoy it! Monster Slime is perfect for sensory play; let the kids squish it, stretch it, and mold it into fun shapes. You can also use it as a unique decoration for parties or gifts—imagine giving a jar of homemade slime to a friend! Additionally, it makes for a fun stress reliever for adults too. Just squish away your worries and let the fun unfold!
How to Store, Preserve, or Reuse Monster Slime
To keep your Monster Slime in top shape, store it in an airtight container. Make sure to keep it away from direct sunlight and heat, as this can affect its texture. When you’re ready to play again, simply take it out, give it a good knead, and enjoy! If it starts to dry out, a little water can help revive it.
Creative Variations and Customizations
- Color variations: Experiment with different colors to create a rainbow of slimes.
- Theme ideas: Make holiday-themed slimes using colors like red and green for Christmas or orange and black for Halloween.
- Seasonal adaptations: Create slimes inspired by the seasons—pastels for spring or deep jewel tones for fall.
- Kid-friendly modifications: Let the kids choose their colors and add-ins for a personal touch.
- Advanced creative upgrades: Consider adding essential oils for a sensory experience, giving the slime a lovely scent.
Tips for Success
- Common mistakes to avoid: Make sure to measure your ingredients carefully for the best results.
- Safety tips: Always supervise young children during the slime-making process, especially when using contact lens solution.
- Preparation suggestions: Gather all your materials before you start to make the process smooth and organized.
- Cleanup recommendations: Keep some paper towels handy for easy cleanup of any spills.
- Expert crafting tips: Don’t be afraid to experiment with different textures and colors—this is your creation, after all!
FAQs About Monster Slime
Can beginners make this?
Absolutely! This project is designed to be beginner-friendly, making it perfect for anyone looking to dive into crafting.
Can children participate?
Yes! This project is great for kids, but adult supervision is recommended, especially with the contact lens solution.
How long does it last?
When stored properly in an airtight container, Monster Slime can last for several weeks.
Can I customize it?
Definitely! You can change the colors, add glitter, or even incorporate scents to make it uniquely yours.
A Final Creative Note
As we wrap up our Monster Slime adventure, I hope you feel inspired to unleash your creativity and dive into this fun project. Remember, crafting is all about self-expression and joy. So gather your loved ones, share your slime creations, and celebrate the magic of making something with your own hands! For more delicious recipes, check out Blueberry Lemon Ricotta Pancakes or Apricot Almond Shortbread Cookies for treats you will love! And if you’re looking for more DIY inspiration, be sure to follow us on Pinterest!
Monster Slime
Equipment
- Mixing Bowl
- spoon
- airtight container
Ingredients
For the Monster Slime
- 1 cup white school glue This will form the base of your slime.
- 1 cup water To mix with the glue, creating a smooth texture.
- 1 teaspoon baking soda This helps to thicken the slime.
- 2 tablespoons contact lens solution The magic ingredient that brings your slime to life!
- Food coloring
- Optional: Glitter or foam beads
Instructions
- Step 1: In a mixing bowl, combine 1 cup of white school glue and 1 cup of water. Stir until well blended.
- Step 2: Add 1 teaspoon of baking soda to the mixture and stir until fully dissolved.
- Step 3: Incorporate a few drops of food coloring to achieve your desired color, mixing thoroughly.
- Step 4: Gradually add 2 tablespoons of contact lens solution to the mixture, stirring continuously.
- Step 5: Knead the slime with your hands until it reaches the desired consistency.
- Step 6: For extra fun, mix in optional glitter or foam beads.
- Step 7: Store the monster slime in an airtight container when not in use.
