
Remember those vibrant, crunchy pickles from Grandma’s kitchen? The ones that just added something special to every meal? Well, get ready to recapture that magic because today, we’re diving into a super simple way to make your own homemade pickled vegetables right at home! It’s one of those recipes that feels a little old-fashioned and incredibly rewarding, and honestly, it’s so much easier than you might think.
Why You’ll Love Homemade Pickled Vegetables
- Fast: You can have these ready to eat in just a couple of hours!
- Easy: Seriously, minimal effort for maximum flavor.
- Giftable: Jar these up for a thoughtful homemade gift.
- Crowd-pleasing: Everyone loves a good pickle!
Ingredients
Gathering your ingredients is half the fun! Think of it as assembling a colorful party for your pantry. Here’s what you’ll need:
- 2 cups white vinegar: This is our tangy base that does all the brining magic.
- 2 cups water: To balance out that vinegar punch.
- 1/4 cup sugar: Just a touch to balance the acidity and bring out the natural sweetness of the veggies.
- 2 tablespoons salt: Essential for preserving and flavor. Kosher or sea salt works best!
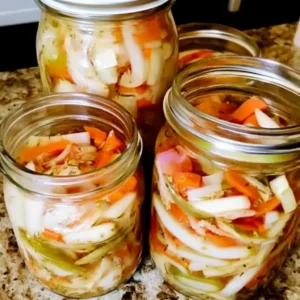
- 6 cups mixed vegetables (e.g., carrots, cucumbers, bell peppers, onions, radish, green papaya), julienned: This is where you get creative! I love a mix of colors and textures. Think crunchy carrots, crisp bell peppers, sharp red onions, and maybe even some radishes for a peppery bite. You can find a great starter for flavorful meals with my quick pickled cucumber and red onion recipe, which uses a similar brine!
- 4 cloves garlic, sliced: Adds a wonderfully aromatic depth.
- 2 tablespoons black peppercorns: For a subtle warmth and zing.
How to Make Homemade Pickled Vegetables
Alright, let’s get pickling! This process is straightforward, and you’ll be amazed at how quickly these transform.
- Make the Brine: First things first, grab a saucepan. Pour in your white vinegar and water. Add the sugar and salt. Now, pop it over medium heat. Give it a good stir every now and then until you see all that sugar and salt has completely dissolved. You want a nice, clear brine.
- Prep Your Jars: While your brine is heating up, get your clean jars ready. You can use mason jars or any sturdy glass jars with tight-fitting lids. Think of these as cozy homes for your veggies!
- Pack the Jars: Now for the fun part – packing! Lay your colorful, julienned vegetables into the jars. Don’t be shy; pack them in there, but leave a little room at the top. Tuck in your sliced garlic and scatter the black peppercorns amongst the veggies.
- Pour the Brine: Carefully pour that hot vinegar mixture over your packed vegetables. Make sure everything is completely submerged. This is crucial for proper pickling! If needed, you can trim some veggies to make them fit better.
- Seal and Cool: Screw the lids on tight. Let the jars sit on the counter and cool down to room temperature. This is like letting them take a little nap before their big transformation.
- Chill Out: Once they’ve cooled, pop those jars into the refrigerator. For the best flavor and crunch, let them chill for at least 2 hours, but honestly, overnight is even better. The longer they sit, the more the flavors meld! You’ll find that a good pickle can elevate even a simple dish, much like how a perfectly seasoned easy chicken scampi with rice can turn a weeknight dinner into something special.

Substitutions & Additions
This recipe is a fantastic starting point, but the possibilities are endless!
- Spicy Kick: Add a few red pepper flakes or a sliced jalapeño to the jar for some heat.
- Herbal Notes: Fresh dill sprigs, coriander seeds, or mustard seeds are wonderful additions.
- Other Veggies: Feel free to experiment with cauliflower florets, broccoli florets, snap peas, or even thinly sliced beets for a gorgeous color. If you’re looking for more vibrant flavor combinations, you might enjoy my blueberry jalapeño jam – it’s a delightful sweet and spicy surprise!
- Vinegar Variety: Apple cider vinegar can be used for a slightly different flavor profile.
Tips for Success
A few little secrets to ensure your pickled veggies are perfect every time:
- Cleanliness is Key: Always use clean jars and utensils to prevent spoilage.
- Submerge Everything: Make sure all the vegetables are fully covered by the brine. If any bits are sticking out, they might not pickle properly.
- Taste and Adjust: The brine ratio is a classic, but feel free to adjust the sugar and salt to your personal preference.
- Prep Ahead: You can chop and prepare all your vegetables a day in advance and store them in the fridge until you’re ready to pickle.
How to Store Homemade Pickled Vegetables
These beauties will last quite a while in the fridge! Keep your sealed jars in the refrigerator, and they should stay delicious for up to 3 weeks. The flavors will continue to develop over time, so don’t be afraid to let them sit for a bit before digging in.
FAQs
Q: Can I use any kind of jar?
A: It’s best to use glass jars with tight-fitting lids. Mason jars are ideal because they’re designed for preserving and sealing. Just ensure they are clean and free of any cracks.
Q: How long until they are ready to eat?
A: While you can technically eat them after just 2 hours in the fridge, they’re truly at their best after at least a few hours, or preferably overnight, to allow the flavors to meld.
Q: Can I reuse the pickling liquid?
A: Once the vegetables are gone, you can try reusing the brine for another batch, but it’s best to make a fresh batch of brine each time to ensure optimal flavor and safety.
Happy pickling, friends! I hope you enjoy these bright, tangy additions to your meals as much as I do. Don’t forget to follow along for more delicious recipes and culinary adventures on Pinterest!
The Easiest Homemade Pickled Vegetables Recipe
Equipment
- saucepan
- Glass Jars with Lids
- Measuring cups
- Measuring spoons
- Stirring Utensil
Ingredients
For the Brine
- 2 cups white vinegar
- 2 cups water
- 1/4 cup sugar
- 2 tablespoons salt Kosher or sea salt recommended
For the Pickling
- 6 cups mixed vegetables julienned (e.g., carrots, cucumbers, bell peppers, onions, radish, green papaya)
- 4 cloves garlic sliced
- 2 tablespoons black peppercorns
Instructions
- Step 1: Make the Brine: In a saucepan, combine white vinegar, water, sugar, and salt. Heat over medium heat, stirring until sugar and salt are completely dissolved. Remove from heat.
- Step 2: Prep Your Jars: Ensure your glass jars (mason jars are ideal) are clean and have tight-fitting lids.
- Step 3: Pack the Jars: Fill the clean jars with the julienned mixed vegetables, tucking in sliced garlic and scattering black peppercorns amongst the vegetables. Leave a little room at the top.
- Step 4: Pour the Brine: Carefully pour the hot vinegar mixture over the vegetables in the jars, ensuring all vegetables are completely submerged.
- Step 5: Seal and Cool: Screw the lids on tightly. Let the jars cool to room temperature on the counter.
- Step 6: Chill Out: Once cooled, refrigerate the jars for at least 2 hours, or preferably overnight, for the best flavor development.