
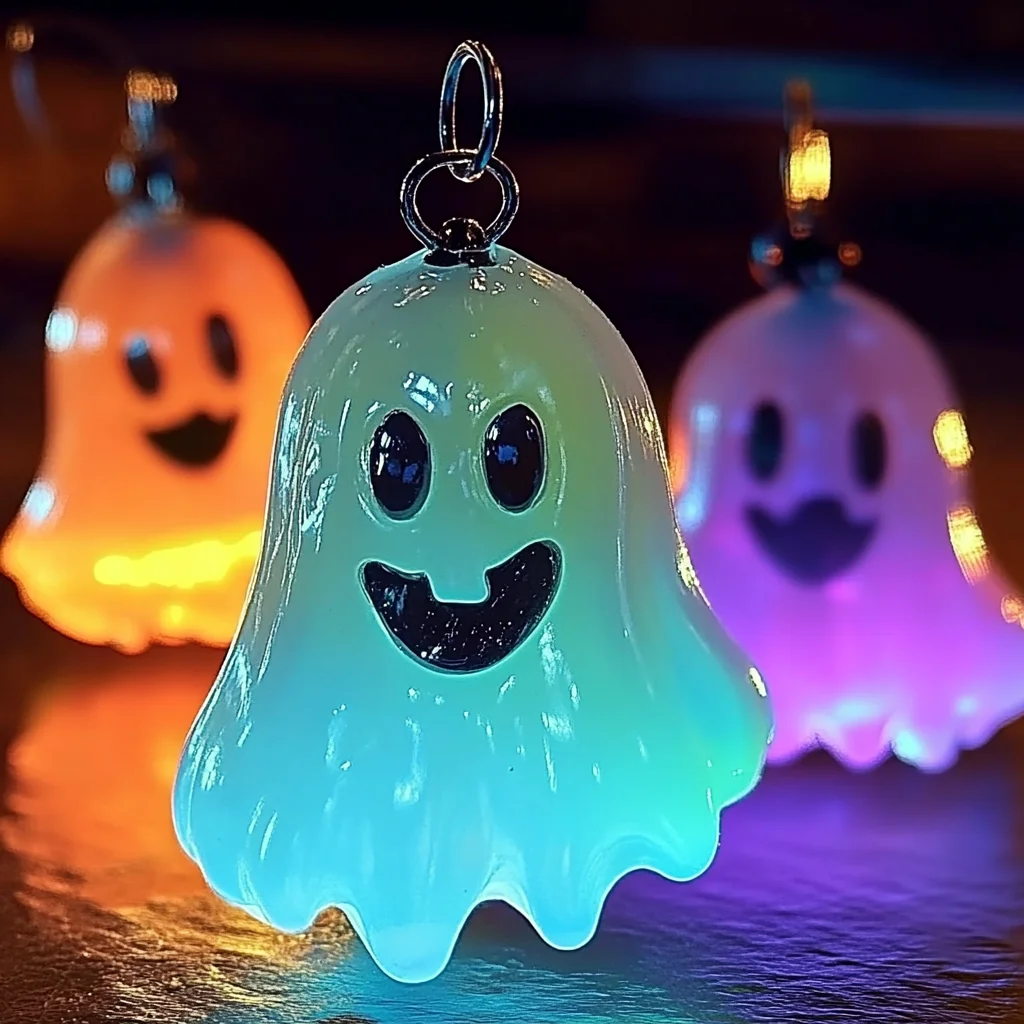
Do you remember the thrill of Halloween as a child? The excitement of dressing up, the smell of autumn leaves, and the joy of creating spooky decorations that would bring your home to life? Today, I invite you to revisit that magic with a delightful DIY project: Glow-tastic Resin Ghosts! This project is not only a fun way to bring a bit of spookiness into your home but also offers a wonderful opportunity to spend quality time with family and friends. Imagine the satisfaction of crafting something that glows in the dark, twinkling with a soft light as it enhances your Halloween decor. Let’s dive into this enchanting world of resin crafting together!
Why You’ll Love Glow-tastic Resin Ghosts
- Beginner-friendly
- Budget-friendly
- Creative and fun
- Great for kids and families
- Perfect for gifts or decorations
- Customizable
The Heart Behind This DIY
Creating Glow-tastic Resin Ghosts is more than just a craft; it’s an experience that brings joy and fosters creativity. As you mix colors and watch the resin come to life, you’ll find yourself immersed in the moment, leaving behind the stresses of the day. Crafting encourages mindfulness, allowing you to focus on the here and now, which can be especially therapeutic. Plus, the laughter shared with loved ones while creating these cheerful ghosts is a memory that will linger long after Halloween ends. So gather your supplies and let’s embark on this delightful journey together!
A Gentle Look at the Process
As you prepare for this DIY adventure, you can expect a few steps that will lead you to your glowing creations. First, we will mix the resin, a tactile experience that feels satisfying as you stir the components together. Next, you’ll add the magical glow-in-the-dark powder, watching as the resin transforms into a luminous mixture. Finally, pouring the resin into ghost-shaped molds will ignite your imagination, as you visualize where these charming spirits will find their home. Let’s embrace the creative process, and soon enough, you’ll have a batch of glowing ghosts ready to light up your space!
Materials You’ll Need
- Clear epoxy resin: This is the base for your glowing ghosts.
- Hardener: This works in tandem with the resin to create your finished piece.
- Ghost-shaped silicone mold: Perfect for crafting your spooky shapes.
- Glow-in-the-dark powder: This adds the magical glowing effect.
- Mixing cups: Essential for combining your resin and hardener.
- Stirring sticks: Helps you mix everything together thoroughly.
- Gloves: Keep your hands safe and clean during the process.
- Protective mask (optional): If you prefer an additional layer of safety, especially in a well-ventilated space.
- Sandpaper (optional): For smoothing out any rough edges after demolding.
Step-by-Step Directions
Step 1
Start by preparing your workspace. Cover your surfaces with a protective layer, like newspaper or a plastic sheet, to catch any spills. Ensure you’re in a well-ventilated area, as this will make the crafting process more enjoyable.
Step 2
Put on your gloves and, if you choose, a protective mask. I always find it comforting to take these precautions while working with resin.
Step 3
Measure equal parts of clear epoxy resin and hardener into separate mixing cups according to the manufacturer’s instructions. This step is crucial, as the right ratio ensures your ghosts will cure properly.
Step 4
Combine the resin and hardener in one mixing cup, and stir thoroughly for the recommended time. As you mix, you’ll notice a change in texture; it’s such a rewarding feeling!
Step 5
Add a desired amount of glow-in-the-dark powder to the mixed resin and stir until it is evenly distributed. Watch as the mixture transforms into a dreamy, luminescent concoction.
Step 6
Carefully pour the glowing resin mixture into the ghost-shaped silicone mold, filling each cavity. Take your time with this step; it’s where your ghosts begin to take shape!
Step 7
Allow the resin to cure according to the product instructions. This is a great time to clean up any mess you may have made and get excited for the next step!
Step 8
Once cured, gently remove the ghosts from the mold. You’ll feel a wave of accomplishment as you unveil your creations!
Step 9
If needed, use sandpaper to smooth any rough edges. This will give your ghosts a polished look and make them even more charming.
Step 10
To maximize the glow effect, charge your ghosts under a light source before displaying them in a dark area. The soft glow will create an enchanting ambiance that is perfect for Halloween!
Creative Ways to Use Glow-tastic Resin Ghosts
Once your Glow-tastic Resin Ghosts are ready, the fun doesn’t stop there! You can place them in your garden to add a whimsical touch to your outdoor decor. They also make excellent night lights for kids, bringing a comforting glow to bedtime. Consider gifting them to friends or using them as unique table decorations for your Halloween party. The possibilities are endless, so let your creativity shine!
How to Store, Preserve, or Reuse Glow-tastic Resin Ghosts
To preserve your glowing ghosts, keep them in a cool, dry place away from direct sunlight. If you want to reuse them, just give them a quick clean and charge them under a light source again before displaying. They are durable and can last for many seasons of spookiness!
Creative Variations and Customizations
- Color variations: Experiment with different shades of glow-in-the-dark powder.
- Theme ideas: Create ghosts with different expressions for a fun twist.
- Seasonal adaptations: Make other glowing shapes like pumpkins or bats for Halloween.
- Kid-friendly modifications: Use non-toxic materials for a child-friendly version.
- Advanced creative upgrades: Add embellishments like glitter or stickers before pouring the resin.
Tips for Success
- Avoid common mistakes like not mixing the resin and hardener thoroughly.
- If using protective gear, remember that ventilation is key for safety.
- Prepare all your materials in advance to streamline the crafting process.
- For easy cleanup, use disposable mixing cups and stir sticks.
- Trust your instincts; crafting is all about exploration and enjoying the journey!
FAQs About Glow-tastic Resin Ghosts
Can beginners make this?
Absolutely! This project is designed to be beginner-friendly, and I’m here to guide you every step of the way.
Can children participate?
Yes, with adult supervision, children can enjoy helping with the mixing and pouring, making it a wonderful family activity.
How long does it last?
When stored properly, your Glow-tastic Resin Ghosts can last for many years, providing joy for many Halloweens to come.
Can I customize it?
Definitely! Feel free to play with colors, shapes, and embellishments to make your ghosts uniquely yours.
A Final Creative Note
As you wrap up your crafting session, take a moment to appreciate the journey you’ve embarked on. Each Glow-tastic Resin Ghost holds a piece of your creativity and love. Remember, crafting is not just about the final product; it’s about the joy of creation and the memories made along the way. For more delicious recipes, check out the delightful Blueberry Cheesecake Swirl Rolls or Easy Key Lime Pie Cookies for treats you will love! So gather your supplies, bring out the glow, and let your creativity shine!
For more DIY inspiration, follow us on Pinterest!
Ingredients
Materials You'll Need
- Clear epoxy resin
- Hardener
- Ghost-shaped silicone mold
- Glow-in-the-dark powder
- Mixing cups
- Stirring sticks
- Gloves
- Protective mask (optional)
- Sandpaper (optional)
Instructions
- Step 1: Start by preparing your workspace. Cover your surfaces with a protective layer, like newspaper or a plastic sheet, to catch any spills. Ensure you're in a well-ventilated area, as this will make the crafting process more enjoyable.
- Step 2: Put on your gloves and, if you choose, a protective mask. I always find it comforting to take these precautions while working with resin.
- Step 3: Measure equal parts of clear epoxy resin and hardener into separate mixing cups according to the manufacturer’s instructions. This step is crucial, as the right ratio ensures your ghosts will cure properly.
- Step 4: Combine the resin and hardener in one mixing cup, and stir thoroughly for the recommended time. As you mix, you’ll notice a change in texture; it’s such a rewarding feeling!
- Step 5: Add a desired amount of glow-in-the-dark powder to the mixed resin and stir until it is evenly distributed. Watch as the mixture transforms into a dreamy, luminescent concoction.
- Step 6: Carefully pour the glowing resin mixture into the ghost-shaped silicone mold, filling each cavity. Take your time with this step; it’s where your ghosts begin to take shape!
- Step 7: Allow the resin to cure according to the product instructions. This is a great time to clean up any mess you may have made and get excited for the next step!
- Step 8: Once cured, gently remove the ghosts from the mold. You’ll feel a wave of accomplishment as you unveil your creations!
- Step 9: If needed, use sandpaper to smooth any rough edges. This will give your ghosts a polished look and make them even more charming.
- Step 10: To maximize the glow effect, charge your ghosts under a light source before displaying them in a dark area. The soft glow will create an enchanting ambiance that is perfect for Halloween!
