
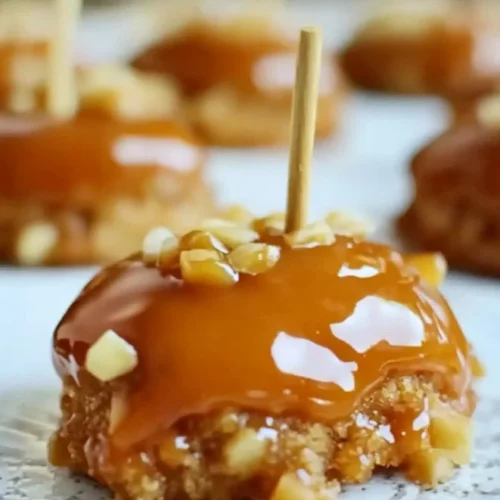
There’s something truly magical about the crisp air of autumn, the crunch of fallen leaves underfoot, and of course, the irresistible scent of apples and caramel. It just screams cozy, doesn’t it? Well, get ready to bring that comforting, nostalgic feeling right into your kitchen with these incredible Caramel Apple Cookies! I’ve got a recipe for you today that’s so unbelievably easy, ridiculously quick to whip up, and utterly unforgettable. Imagine a soft, buttery cookie infused with a hint of apple, topped with a luscious, gooey caramel glaze, and finished with a satisfying crunch of walnuts. Pure bliss!
These aren’t just any cookies; they’re a little bite of autumn happiness, perfect for sharing, gifting, or simply enjoying with a warm cup of cider. So, grab your apron, my friend, and let’s bake up some joy!
Why You’ll Love Caramel Apple Cookies
- Fast: From mixing bowl to warm, delicious cookies in under 30 minutes!
- Easy: No fancy techniques, just simple steps anyone can follow.
- Giftable: These beautiful, flavor-packed cookies make the perfect homemade gift for friends, family, or teachers.
- Crowd-pleasing: Seriously, who can resist the classic combo of apple and caramel in cookie form? They disappear quickly!
Ingredients
Gathering your ingredients is the first step to deliciousness! Here’s what you’ll need:
- ¾ cup confectioners’ sugar: Also known as powdered sugar, this gives our cookies a wonderfully delicate and melt-in-your-mouth crumb.
- ⅔ cup butter, softened: Make sure your butter is nice and soft, but not melted, for that perfect creamy texture when you beat it. It makes all the difference!
- 3 tablespoons frozen apple juice concentrate, thawed, divided: This is our secret weapon for infusing that amazing, intense apple flavor right into the cookies and the caramel glaze.
- 1 ½ cups all-purpose flour: Just your everyday flour, nothing fancy, to give our cookies their structure.
- ¼ teaspoon salt: A little pinch to balance all that sweetness and enhance the other flavors.
- Flat toothpicks: Essential for dipping and handling these beauties without getting too sticky!
- 30 individually wrapped caramels, unwrapped: The chewy, gooey heart of our cookies. I love using the classic Kraft square caramels for this recipe!
- 2 tablespoons water: To help our caramels melt down into that dreamy, smooth sauce.
- ¾ cup finely chopped walnuts (Optional): These add a lovely crunch and nutty flavor, but they’re totally optional if nuts aren’t your thing, or if you prefer a smoother topping.
How to Make Caramel Apple Cookies
Alright, let’s get baking! Follow these simple steps and you’ll have these delicious cookies in no time.
- First things first, let’s preheat your oven to 350 degrees F (175 degrees C). This ensures it’s nice and hot when your cookies are ready to go in.
- In a large mixing bowl, get out your electric mixer (or a strong arm!) and beat together the confectioners’ sugar, your softened butter, and 1 tablespoon of that wonderful apple juice concentrate. You want to beat it until the mixture is light, fluffy, and beautifully creamy.
- Now, gently stir in the all-purpose flour and salt. Mix just until the dough is combined. A little tip from me: resist the urge to overmix! Overmixing can make your cookies tough, and we want them soft and tender.
- Once your dough is ready, roll it into ¾-inch balls. They’re little bites of deliciousness! Arrange them on ungreased baking sheets, giving them a little space, though they don’t spread too much.
- Pop your baking sheets into the preheated oven and bake for 12 to 17 minutes. You’re looking for the edges to be just lightly golden brown.
- This next step is super important! Immediately after you take the cookies out of the oven, while they’re still warm, carefully insert a flat toothpick into the center of each cookie. This makes dipping them in caramel so much easier later on.
- Transfer the cookies to a wire rack to cool completely. They need to be cool before you add that warm caramel, or it’ll just slide right off!
- While your cookies are cooling, let’s make that glorious caramel sauce. In a small saucepan, combine the unwrapped caramels, the remaining 2 tablespoons of apple juice concentrate, and 2 tablespoons of water. Place it over low heat and cook, stirring constantly, until the mixture is completely smooth and lusciously melted. This should take about 5 to 10 minutes. Speaking of delicious sauces, if you ever want to make a truly homemade caramel sauce from scratch, it’s a game-changer for so many desserts!
- Now for the fun part! Hold each cooled cookie by its toothpick and spoon the warm caramel sauce generously over it. Allow any excess sauce to drip off back into the saucepan. It can get a little messy, but trust me, it’s worth every sticky finger!
- If you’re using them, pour your finely chopped walnuts onto a plate. Gently press the bottom of each caramel-coated cookie into the walnuts, rotating to coat evenly.
- Finally, transfer your gorgeous caramel apple cookies to a sheet of waxed paper to set. Let that caramel cool and firm up a bit. Patience, my friend, patience!
Substitutions & Additions
This recipe is already amazing, but there’s always room to play and customize! Here are some ideas:
- Nutty Alternatives: Not a walnut fan? You can easily swap them for finely chopped pecans or even slivered almonds for a different texture and flavor profile. Or, omit them entirely for a pure caramel experience.
- Caramel Shortcuts: While I truly believe the melted caramel mixture here is divine, if you’re in an absolute time crunch, you could use a good quality store-bought caramel ice cream topping or dip. Just warm it slightly for easier dipping.
- Spice it Up: For an even deeper “fall” flavor, try adding a tiny pinch of apple pie spice or cinnamon to your cookie dough along with the flour.
- Extra Toppings: Get creative! Before the caramel sets, sprinkle on some mini chocolate chips, a touch of flaky sea salt (hello, salted caramel!), or a dusting of cinnamon sugar.
- Gluten-Free Option: If you need a gluten-free version, simply substitute the all-purpose flour with your favorite 1:1 gluten-free baking blend.
Tips for Success
Even the simplest recipes can benefit from a few insider tips to ensure perfection every time!
- Softened Butter is Key: I can’t stress this enough! Make sure your butter is truly softened, but not melted. Cold butter won’t cream properly, and melted butter will make your dough too greasy and spread too much. Take it out of the fridge an hour or two before you start.
- Don’t Overmix the Dough: Once the flour goes in, mix only until just combined. Overmixing develops the gluten in the flour, leading to tougher cookies instead of light, tender ones.
- Toothpick Timing: Inserting the toothpicks immediately after baking is crucial. The cookies are still warm and soft, so the toothpick will slide in easily without cracking them.
- Caramel Consistency Control: Keep an eye on your caramel sauce. If it seems too thick to dip easily, add another ½ teaspoon of water and stir until smooth. If it’s too thin, continue to cook and stir on low heat for a minute or two until it thickens up a bit.
- Prep Ahead: You can make the cookie dough ahead of time! Form the balls and chill them in the refrigerator for up to 2 days, or even freeze them for up to a month. Just add a few extra minutes to your baking time if baking from frozen.
How to Store Caramel Apple Cookies
These cookies are best enjoyed fresh, but they store beautifully!
Store your Caramel Apple Cookies in an airtight container at room temperature for up to 3-4 days. The caramel will remain soft and chewy. If you need to keep them longer, you can store them in an airtight container in the refrigerator for up to a week. Just be aware that the caramel might firm up a bit when chilled, so letting them come to room temperature for a few minutes before eating will bring back that lovely chewiness.
FAQs
Got questions? I’ve got answers!
Q: Can I use fresh apple juice instead of concentrate?
A: While you could, I highly recommend sticking with the frozen apple juice concentrate. It provides a much more intense apple flavor without adding too much extra liquid to the cookie dough or caramel, which could throw off the texture. If you only have fresh, try reducing it down a bit on the stovetop first, or add a tiny drop of apple extract for a boost.
Q: My caramel is too thick/thin. What do I do?
A: If your caramel is too thick for dipping, simply add a teaspoon of water at a time back to the saucepan, stirring constantly over low heat, until it reaches your desired consistency. If it’s too thin, let it simmer on low heat, stirring frequently, for another 2-5 minutes until it thickens up. Remember, it will thicken slightly as it cools too!
Q: Can I skip the toothpicks for dipping?
A: You certainly could try, but those toothpicks are a real lifesaver! They make dipping each cookie in the caramel so much cleaner and easier, preventing sticky fingers and maintaining the cookie’s shape. If you skip them, you’ll likely need to use a small spoon to drizzle the caramel, or embrace the sticky fun!
Q: What kind of apples are best for the apple flavor in these cookies?
A: Since the apple flavor comes from the juice concentrate, you don’t need actual apple pieces in these specific cookies. However, if you were to add a tiny amount of very finely diced, dehydrated apples to the dough (rehydrated first, of course), a tart apple like Granny Smith would offer a lovely contrast to the sweet caramel. If you’re looking for more fun cookie ideas, you might love these Apricot Sugar Cookie Hand Pies, or for a festive twist, try some Easy Christmas Pinwheel Cookies.
For more delicious recipes and kitchen inspiration, be sure to follow us on Pinterest!
Chewy Caramel Apple Cookies
Equipment
- Electric mixer
- Large mixing bowl
- Baking sheets
- Wire rack
- Small saucepan
- Flat Toothpicks
- Waxed paper
Ingredients
- 0.75 cup confectioners' sugar also known as powdered sugar
- 0.66 cup butter softened
- 3 tbsp frozen apple juice concentrate thawed, divided
- 1.5 cups all-purpose flour
- 0.25 tsp salt
- Flat toothpicks
- 30 individually wrapped caramels unwrapped
- 2 tbsp water
- 0.75 cup finely chopped walnuts Optional
Instructions
- Step 1: Preheat your oven to 350 degrees F (175 degrees C).
- Step 2: In a large mixing bowl, beat together the confectioners' sugar, softened butter, and 1 tablespoon of apple juice concentrate until light, fluffy, and creamy.
- Step 3: Gently stir in the all-purpose flour and salt. Mix just until the dough is combined, resisting the urge to overmix.
- Step 4: Roll the dough into ¾-inch balls and arrange them on ungreased baking sheets, giving them a little space.
- Step 5: Bake for 12 to 17 minutes, or until the edges are just lightly golden brown.
- Step 6: Immediately after you take the cookies out of the oven, while they’re still warm, carefully insert a flat toothpick into the center of each cookie.
- Step 7: Transfer the cookies to a wire rack to cool completely.
- Step 8: While your cookies are cooling, make the caramel sauce. In a small saucepan, combine the unwrapped caramels, the remaining 2 tablespoons of apple juice concentrate, and 2 tablespoons of water. Place it over low heat and cook, stirring constantly, until the mixture is completely smooth and lusciously melted (about 5 to 10 minutes).
- Step 9: Hold each cooled cookie by its toothpick and spoon the warm caramel sauce generously over it. Allow any excess sauce to drip off back into the saucepan.
- Step 10: If using, pour your finely chopped walnuts onto a plate. Gently press the bottom of each caramel-coated cookie into the walnuts, rotating to coat evenly.
- Step 11: Finally, transfer your gorgeous caramel apple cookies to a sheet of waxed paper to set. Let that caramel cool and firm up a bit.