
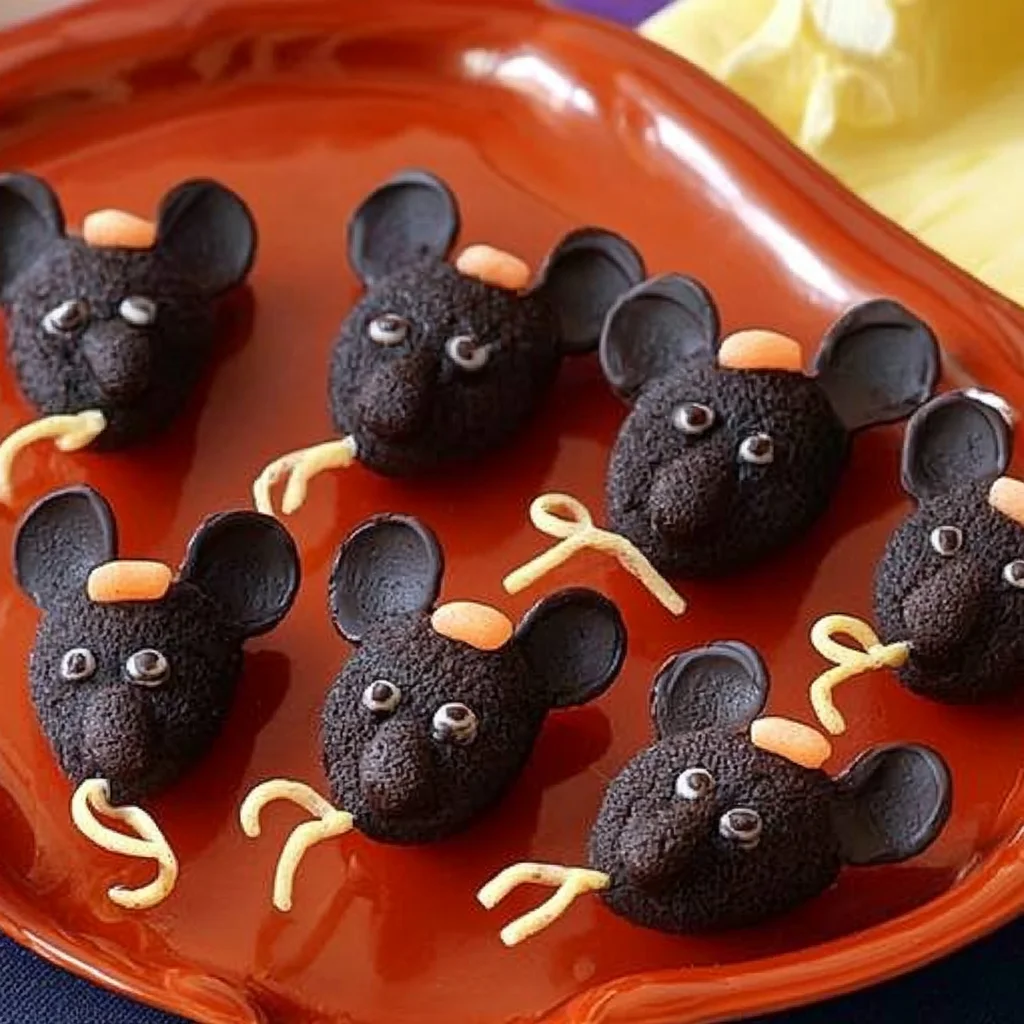
Oh, the memories! Does anything bring back that cozy feeling of childhood baking quite like simple, fun treats? Today, we’re diving into a recipe that’s sure to bring a smile to your face and a delicious sweetness to your kitchen: Chocolate Mice! These aren’t just any candies; they’re little characters made with love, perfect for parties, holidays, or just a spontaneous afternoon delight. I remember making these with my grandma, and the joy they brought was just as sweet as their chocolatey goodness.
What I love most about these chocolate mice is how incredibly easy and quick they are to put together. You don’t need any fancy equipment or tricky techniques. Plus, they look so adorable! They’re the kind of treat that makes everyone feel special, whether you’re sharing them with your family or gifting them to friends.
Why You’ll Love Chocolate Mice
- Fast: Ready in a flash, perfect for last-minute sweet cravings.
- Easy: Simple steps that even the youngest bakers can help with.
- Giftable: Package them up in a cute tin or bag for a delightful homemade present.
- Crowd-pleasing: Who can resist a charming chocolate treat?
Ingredients
Gather these simple goodies to create your adorable chocolate mice:
- 4 ounces semisweet chocolate: The star of our show! You can use chocolate chips or a baking bar, just make sure it’s good quality.
- ⅓ cup sour cream: This adds a wonderful creaminess and helps the chocolate mixture firm up nicely.
- 1 cup chocolate cookie crumbs: Think Oreos (filling removed!) or any chocolate sandwich cookie. These make the base of our mice.
- ⅓ cup chocolate cookie crumbs: Extra crumbs for rolling – your choice for dark or light mice!
- ⅓ cup confectioners’ sugar: For those who prefer a snowy white coat for their mice.
- 24 silver dragees decorating candy: These are perfect for little mouse eyes!
- ¼ cup sliced almonds: Our cute little ears.
- 12 (2-inch) pieces long red vine licorice: The essential tails that give our mice their signature look.
How to Make Chocolate Mice
Ready to get your hands a little sticky and create some magic? Let’s do this!
- Melt and Mix: Gently melt the semisweet chocolate. You can do this in a microwave-safe bowl in 30-second intervals, stirring in between, or over a double boiler. Once smooth, stir in the sour cream until it’s well combined and creamy. Then, add the first cup of chocolate cookie crumbs and mix everything together until it forms a thick dough-like consistency.
- Chill Out: Cover your bowl tightly and pop it into the refrigerator. Let it chill for about 30 minutes to an hour, or until it’s firm enough to handle without being too sticky. This step is key for easy shaping!
- Shape the Critters: Once the mixture is firm, take a level tablespoonful at a time and roll it into a ball. Gently mold each ball into a slightly elongated shape, tapering one end to create a cute little nose.
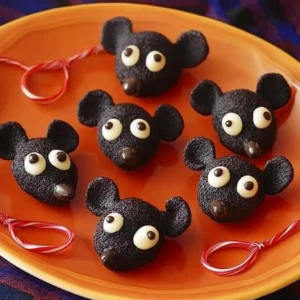
- Give Them a Coat: Now for the fun part! You have two options: Roll the formed mice in confectioners’ sugar for adorable white mice, or roll them in the remaining ⅓ cup of chocolate cookie crumbs for a darker, richer look. I sometimes do a mix of both!
- Accessorize!: Time to bring our mice to life! Gently press two silver dragees into each mouse for its eyes. Then, carefully insert two sliced almonds on either side of the head for the ears. Finally, tuck a 2-inch piece of red vine licorice into the back for a jaunty tail.
- Firm Them Up: Place your finished chocolate mice on a baking sheet lined with parchment paper. Refrigerate them for at least two hours to ensure they are nice and firm before serving or packaging.
Substitutions & Additions
Feel free to get creative with your chocolate mice! Here are a few ideas:
- Different Chocolates: Try milk chocolate or dark chocolate for a different flavor profile.
- Cookie Crumb Variations: Graham cracker crumbs or even finely crushed pretzels can offer a unique twist.
- Other Ears: Small slivers of pretzels or even tiny edible pearls can work as ears.
- Spice It Up: A pinch of cinnamon or a tiny bit of espresso powder in the chocolate mixture can add an extra layer of flavor. Thinking about other fun flavor combinations makes me excited, like the ones in my apricot sugar cookie hand pies.
- For a Touch of Color: If you’re making these for a special occasion, consider rolling some in colorful sprinkles or edible glitter! It’s like adding a little sparkle to your day, much like how my DIY rainbow bouncing balls craft brings a pop of color.
Tips for Success
A few little tricks to make your chocolate mice perfect every time:
- Don’t Overheat Chocolate: Melt chocolate slowly and gently to prevent it from seizing or burning.
- Sticky Situation? If the mixture is too sticky to roll, pop it back in the fridge for another 15-20 minutes.
- Uniform Size: Using a tablespoon measure helps ensure your mice are all roughly the same size, making them look even more cohesive.
- Prep Ahead: You can make the chocolate mixture and chill it overnight. Just let it soften slightly at room temperature before shaping.
- Presentation Matters: Arrange them on a platter with a few extra cookie crumbs or a dusting of powdered sugar. They look fantastic next to some of my other simple treats, like these chocolate-covered strawberry popcorn clusters!
How to Store Chocolate Mice
Once your little mice have firmed up, you can store them in an airtight container in the refrigerator for up to a week. They also freeze beautifully! Just place them in a freezer-safe container or bag, separating layers with parchment paper. They should be good in the freezer for about a month. Let them thaw in the refrigerator before enjoying.
FAQs
Q: Can I use white chocolate instead of semisweet?
A: Yes, you can! White chocolate will give you a lighter colored mouse base, and you might want to roll it in crushed graham crackers or white cookie crumbs for a cohesive look.
Q: How do I keep the dragees from falling off?
A: Press them gently but firmly into the chocolate mixture while it’s still slightly soft after shaping. If the mixture is too firm, you can dab a tiny bit of water or melted chocolate on the back of the dragee.
Q: Can kids make these independently?
A: Yes, with supervision! The melting of chocolate and handling of small pieces like dragees might require an adult’s help, but the mixing and rolling are great fun for kids.
Q: What if I don’t have red vine licorice?
A: You can use thin strips of fruit leather, red string candy, or even pipe a little red icing for the tails!
I hope you have as much fun making and eating these chocolate mice as I do! Happy baking!
For more delicious recipes and fun DIYs, be sure to follow us on Pinterest!
Whimsical Chocolate Mice
Equipment
- Microwave-safe bowl or double boiler
- Refrigerator
- baking sheet
- parchment paper
Ingredients
For the Chocolate Mice
- 4 ounces semisweet chocolate chips or a baking bar
- ⅓ cup sour cream
- 1 cup chocolate cookie crumbs e.g., Oreos, filling removed
For Rolling and Decorating
- ⅓ cup chocolate cookie crumbs
- ⅓ cup confectioners' sugar
- 24 silver dragees decorating candy for eyes
- ¼ cup sliced almonds for ears
- 12 2-inch pieces long red vine licorice for tails
Instructions
- Step 1: Gently melt the semisweet chocolate in a microwave-safe bowl in 30-second intervals, stirring in between, or over a double boiler. Once smooth, stir in the sour cream until well combined and creamy.
- Step 2: Add the first cup of chocolate cookie crumbs to the chocolate mixture and mix until it forms a thick dough-like consistency.
- Step 3: Cover the bowl and refrigerate for about 30 minutes to an hour, until firm enough to handle.
- Step 4: Take a level tablespoonful of the mixture and roll it into a ball, then mold into a slightly elongated shape, tapering one end for the nose.
- Step 5: Roll the formed mice in confectioners' sugar for white mice or the remaining chocolate cookie crumbs for darker mice.
- Step 6: Gently press two silver dragees into each mouse for eyes, insert two sliced almonds for ears on either side of the head, and tuck a piece of licorice into the back for a tail.
- Step 7: Place the finished chocolate mice on a baking sheet lined with parchment paper and refrigerate for at least two hours to firm up before serving or packaging.