
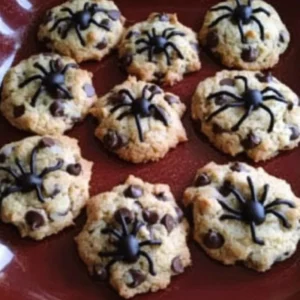
Remember those magical Halloween nights? The crisp air, the thrill of costumes, and that unforgettable smell of freshly baked cookies wafting from the kitchen? We’re bringing that cozy, nostalgic feeling back with a recipe that’s as fun to make as it is to eat: Halloween Chocolate Chip Cookies with Spiders! These aren’t just any cookies; they’re little edible works of art, perfect for your next spooky gathering or just a treat to brighten a fall afternoon. Plus, they’re incredibly simple, meaning you can whip up a batch in no time!
Why You’ll Love Halloween Chocolate Chip Cookies with Spiders
- Fast: Get your Halloween treats ready in a flash!
- Easy: Perfect for bakers of all skill levels, even little helpers.
- Giftable: Package them up for spooky party favors or neighborly treats.
- Crowd-pleasing: Who can resist a classic chocolate chip cookie, especially one with a creepy-crawly twist?
Ingredients
- 2 ½ cups all-purpose flour: The sturdy foundation for our perfect cookie.
- 1 teaspoon baking soda: For that essential lift and chewiness.
- 1 teaspoon salt: Balances the sweetness and enhances all the flavors.
- ½ teaspoon baking powder: Gives our cookies a little extra puff.
- 1 cup unsalted butter, at room temperature: Softened butter is key for that creamy texture.
- ¾ cup white sugar: For sweetness and that classic crisp edge.
- ¾ cup packed brown sugar: Adds moisture and a lovely caramel note.
- 2 eggs: The binders that hold our delicious dough together.
- 1 teaspoon vanilla extract: A touch of pure vanilla goodness.
- 2 ½ cups semisweet chocolate chips, divided: The stars of our chocolate chip cookie show!
How to Make Halloween Chocolate Chip Cookies with Spiders
Get ready for some serious cookie magic! This recipe is straightforward and oh-so-satisfying.
- Preheat your oven: First things first, get your oven nice and toasty at 350 degrees F (175 degrees C). This ensures they bake up perfectly.
- Mix the dry ingredients: In a large bowl, whisk together your flour, baking soda, salt, and baking powder. A quick stir with a fork is all you need to combine them evenly.
- Cream the wet ingredients: In a separate large bowl, beat your softened butter with both the white and brown sugars until you have a smooth, creamy dream. Then, add in the eggs and vanilla extract, beating until everything is light and fluffy. It’s starting to smell good already, isn’t it?
- Combine wet and dry: Now, gradually add the flour mixture to your butter mixture, about a third at a time. Use a spatula to gently fold it in until it’s just incorporated. Don’t overmix – we want tender cookies!
- Add most of the chocolate: Fold in 1 ½ cups of those lovely semisweet chocolate chips. Make sure they’re evenly distributed throughout the dough.
- Scoop the dough: Drop rounded tablespoons of your cookie dough onto ungreased baking sheets. Give them a little space, as they will spread as they bake.
- Create the spider bodies: For the fun part! Pour ½ cup of chocolate chips into a small bowl. Gently press 3 to 4 chocolate chips, tip-side down, into the surface of each cookie dough ball. These will be our spooky spider bodies!
- Bake to golden perfection: Pop those baking sheets into your preheated oven for 10 to 15 minutes, or until the edges are beautifully golden brown. Keep an eye on them; ovens can be a little quirky!
- Cool down: Let the cookies cool on the baking sheets for just a minute before carefully transferring them to a wire rack to cool completely. This prevents them from breaking.
- Melt for the legs: While your cookies are cooling, melt the remaining ½ cup of chocolate chips. Pop them in a microwave-safe bowl and heat in 15-second intervals, stirring well after each one, until smooth and melty. This usually takes about 1 to 3 minutes total.
- Pipe those creepy legs: Spoon your melted chocolate into a piping bag fitted with a small tip (or a Ziploc bag with a tiny corner snipped off). Now, pipe those delicate spider legs extending from the chocolate chip “bodies” on your cooled cookies. Voila! You’ve got an army of edible spiders!

Substitutions & Additions
Feeling creative? You can totally make these cookies your own!
- Chocolate Variations: Swap the semisweet chips for milk chocolate, dark chocolate, or even white chocolate chips for a different flavor profile.
- Candy Eyes: For extra spooky spiders, add a couple of candy eyeballs to the chocolate chip “bodies” before baking.
- Nutty Crunch: If you love nuts, stir in ½ cup of chopped pecans or walnuts along with the chocolate chips.
- Spiced Up: A pinch of cinnamon or nutmeg in the dough can add a warm, autumnal spice.
- Gluten-Free: Use your favorite gluten-free all-purpose flour blend for a gluten-free version.
Tips for Success
A few little tricks to ensure your Halloween cookies are absolutely perfect:
- Room Temperature Butter: Make sure your butter is truly softened, not melted. This is crucial for achieving that light and airy cookie texture.
- Don’t Overmix: Overmixing the dough can lead to tough cookies. Mix until just combined for the best results.
- Chill the Dough (Optional but Recommended): If you have a little extra time, chilling the dough for at least 30 minutes can help prevent excessive spreading and result in thicker, chewier cookies.
- Cool Completely Before Piping: Patience is key here! Make sure your cookies are completely cool before piping the spider legs. Otherwise, the melted chocolate will just slide off.
- Prep Ahead: You can make the cookie dough a day in advance and store it in the refrigerator. Just let it sit at room temperature for a bit before scooping.
How to Store Halloween Chocolate Chip Cookies with Spiders
Once your spooky creations have cooled completely, storing them is a breeze. Place them in an airtight container at room temperature. They’ll stay wonderfully fresh and delicious for about 3-5 days. If you find yourself with an abundance of cookies (is that even possible?), you can also freeze them! Layer them between parchment paper in a freezer-safe container. They’ll last for up to 3 months. Just let them thaw at room temperature before enjoying.
FAQs
Q: Can I make these cookies without the spider decorations?
A: Absolutely! They are delicious classic chocolate chip cookies on their own. The spider decoration is just a fun Halloween touch.
Q: How do I make sure my spider legs look realistic?
A: Practice makes perfect! Start with a few simple lines for each leg. You can also experiment with different piping tip sizes to achieve various leg thicknesses.
Q: Can I use candy melts instead of chocolate chips for the spider legs?
A: Yes, you can! Candy melts melt easily and set up nicely, making them a great alternative for piping spider legs.
Q: My cookies spread too much. What did I do wrong?
A: This can happen if your butter was too soft, if you used too much sugar, or if you didn’t chill the dough. Chilling the dough for at least 30 minutes before baking often helps prevent excessive spreading.
These cookies are perfect for parties, bake sales, or just a fun afternoon baking project. If you’re looking for other fun baking ideas, you might enjoy our Kool-Aid Gummy Treats or these delightful Apricot Sugar Cookie Hand Pies. Happy baking, and have a spooktacular Halloween!
Don’t forget to follow us on Pinterest for more delicious recipes and inspiration!
Halloween Chocolate Chip Cookies with Spiders
Equipment
- large bowl
- Separate Large Bowl
- Spatula
- Baking sheets
- Wire rack
- Small bowl
- Piping Bag (or Ziploc bag)
Ingredients
- 2.5 cups all-purpose flour The sturdy foundation for our perfect cookie.
- 1 teaspoon baking soda For that essential lift and chewiness.
- 1 teaspoon salt Balances the sweetness and enhances all the flavors.
- 0.5 teaspoon baking powder Gives our cookies a little extra puff.
- 1 cup unsalted butter, at room temperature Softened butter is key for that creamy texture.
- 0.75 cup white sugar For sweetness and that classic crisp edge.
- 0.75 cup packed brown sugar Adds moisture and a lovely caramel note.
- 2 eggs The binders that hold our delicious dough together.
- 1 teaspoon vanilla extract A touch of pure vanilla goodness.
- 2.5 cups semisweet chocolate chips, divided The stars of our chocolate chip cookie show!
Instructions
- Step 1: Preheat your oven to 350 degrees F (175 degrees C). This ensures they bake up perfectly.
- Step 2: In a large bowl, whisk together your flour, baking soda, salt, and baking powder. A quick stir with a fork is all you need to combine them evenly.
- Step 3: In a separate large bowl, beat your softened butter with both the white and brown sugars until you have a smooth, creamy dream. Then, add in the eggs and vanilla extract, beating until everything is light and fluffy. It’s starting to smell good already, isn’t it?
- Step 4: Now, gradually add the flour mixture to your butter mixture, about a third at a time. Use a spatula to gently fold it in until it's just incorporated. Don't overmix – we want tender cookies!
- Step 5: Fold in 1 ½ cups of those lovely semisweet chocolate chips. Make sure they're evenly distributed throughout the dough.
- Step 6: Drop rounded tablespoons of your cookie dough onto ungreased baking sheets. Give them a little space, as they will spread as they bake.
- Step 7: For the fun part! Pour ½ cup of chocolate chips into a small bowl. Gently press 3 to 4 chocolate chips, tip-side down, into the surface of each cookie dough ball. These will be our spooky spider bodies!
- Step 8: Pop those baking sheets into your preheated oven for 10 to 15 minutes, or until the edges are beautifully golden brown. Keep an eye on them; ovens can be a little quirky!
- Step 9: Let the cookies cool on the baking sheets for just a minute before carefully transferring them to a wire rack to cool completely. This prevents them from breaking.
- Step 10: While your cookies are cooling, melt the remaining ½ cup of chocolate chips. Pop them in a microwave-safe bowl and heat in 15-second intervals, stirring well after each one, until smooth and melty. This usually takes about 1 to 3 minutes total.
- Step 11: Spoon your melted chocolate into a piping bag fitted with a small tip (or a Ziploc bag with a tiny corner snipped off). Now, pipe those delicate spider legs extending from the chocolate chip "bodies" on your cooled cookies. Voila! You've got an army of edible spiders!