
There’s something truly magical about the holidays, isn’t there? The twinkling lights, the cozy sweaters, and of course, all the delicious treats that bring back a flood of childhood memories. For me, watching “How the Grinch Stole Christmas” with a warm mug of cocoa and a plate of homemade sweets is a non-negotiable tradition. This year, I wanted to capture that whimsical, Grinchy spirit in a treat that’s as easy to make as it is delightful to eat. And that’s exactly how this vibrant, utterly charming Grinch Fudge came to be!
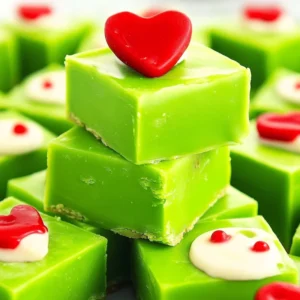
Imagine a rich, creamy fudge, dyed a cheerful Grinch-green, dotted with adorable little red hearts. It’s a showstopper, a conversation starter, and honestly, one of the easiest holiday treats you’ll ever whip up. No candy thermometer, no complicated steps, just pure, festive joy. It’s perfect for gifting, cookie exchanges, or simply enjoying with your family while cuddled up watching your favorite holiday movie. You’re going to fall in love with how quickly this comes together and how much it brightens any holiday spread! If you’re as obsessed with Whoville as I am, you might also adore these Grinch Cake Mix Cookies for another festive treat!
Why You’ll Love Grinch Fudge
- Fast
- Easy
- Giftable
- Crowd-pleasing
Ingredients
Gathering your ingredients for this Grinchy delight is a breeze! Here’s what you’ll need:
- 3 cups white chocolate chips: These are the creamy foundation of our fudge. Make sure you use good quality chips for the best flavor and melt.
- 14 ounce can sweetened condensed milk: This magical ingredient not only sweetens our fudge but also helps it set beautifully and adds that luscious, smooth texture we all crave.
- 4 tablespoons salted butter, chilled and cubed: A little butter adds richness and helps the fudge achieve that perfect melt-in-your-mouth consistency. Chilled and cubed helps it melt evenly.
- ¾ teaspoon clear vanilla extract: This is a key player in keeping our fudge truly Grinch-green! Regular vanilla can sometimes tint your beautiful green a little brownish, and we definitely don’t want that.
- ¼-½ teaspoon gel green food coloring: Get ready for the Grinch transformation! Gel food coloring is fantastic because it’s super concentrated, meaning you get vibrant color without adding a lot of liquid to your fudge. Start with a quarter teaspoon and add more if you want a deeper green.
- 25 extra-large red heart candy sprinkles: These are the iconic touch that makes this fudge instantly recognizable as Grinch-themed! Don’t skip these; they add so much character and fun.
How to Make Grinch Fudge
Making this Grinch Fudge is truly a walk in the park. You’ll be amazed at how quickly you can create such a festive and delicious treat!
1. Prep Your Pan: First things first, grab an 8×8-inch pan. You’ll want to line it with aluminum foil, making sure you leave a generous overhang on the sides. This overhang acts as little handles later, making it super easy to lift your set fudge out of the pan. Give the foil a light spray with non-stick spray, just to be extra sure nothing sticks, and then set your pan aside. You’re already off to a great start!
2. Melt and Combine: Now, let’s get cooking! In a medium saucepan, over medium-low heat, combine your white chocolate chips, that can of sweetened condensed milk, and your cubed, chilled salted butter. Keep stirring often to prevent anything from sticking or burning on the bottom. Patience is a virtue here – you want a smooth, creamy melt, which usually takes about 5-6 minutes. If you’ve ever made other simple fudges, like my easy 3-ingredient lemon fudge, you’ll find the process quite familiar.
3. Grinchy Color & Flavor: Once your mixture is perfectly smooth and fully melted, take it off the heat. Immediately stir in your clear vanilla extract. Then, add your green gel food coloring. Stir, stir, stir until all the green streaks are gone and your fudge is a uniform, vibrant Grinchy green! Isn’t that color just fantastic?
4. Spread It Out: You’ll need to work quickly here, as fudge sets up pretty fast once it’s off the heat. Pour or spread the beautiful green fudge into your prepared 8×8-inch pan. Use a spatula to gently spread it into an even layer, making sure it reaches all the corners.
5. Add the Hearts: This is the fun part! While the fudge is still soft, arrange your 25 extra-large red heart candy sprinkles. I like to place them in five neat rows of five each, spacing them about ½-¾ inches apart. This way, when you slice the fudge, almost every single piece will have its own little Grinch heart, which is just adorable.
6. Chill Out: Now for the hardest part – waiting! Let the fudge cool down on your counter for a bit, then transfer the pan to the refrigerator to chill and set completely. This usually takes a couple of hours, but I often leave it in there longer, even overnight, to ensure it’s perfectly firm.
7. Slice and Serve: Once your fudge is beautifully set, gently lift it out of the pan using those handy aluminum foil overhangs. Place it on a cutting board. Grab a sharp knife and slice the fudge into 25 perfect pieces. You can cut it into a 5×5 grid to ensure each piece gets a heart! Now, stand back and admire your festive masterpiece!
Substitutions & Additions
One of the best things about fudge is how wonderfully adaptable it is! Here are some ideas to make this Grinch Fudge your very own:
- Flavor Boosts: Instead of, or in addition to, vanilla, try adding a few drops of peppermint extract for a minty holiday twist. Almond extract could also be lovely!
- Spice It Up: A tiny pinch of cinnamon or a dash of nutmeg could add a warm, cozy undertone.
- Mix-Ins: Fold in some mini chocolate chips, chopped walnuts, pecans, or even some crushed candy canes (after chilling slightly, so they don’t melt) into the fudge before spreading it.
- Toppings Galore: Before the fudge sets, you could drizzle melted white chocolate or dark chocolate over the top for an extra layer of decadence. A sprinkle of edible glitter would also make it extra magical!
- Different Holidays: Swap the green food coloring for red and use white sprinkles for Valentine’s Day, or orange and black sprinkles for Halloween!
Tips for Success
Even though this Grinch Fudge recipe is incredibly easy, a few little tips can ensure your batch turns out perfectly every time:
- Low and Slow is the Way to Go: When melting the chocolate, sweetened condensed milk, and butter, keep the heat on medium-low. This prevents the white chocolate from seizing or burning, which can make your fudge grainy. Stir constantly!
- Clear Vanilla is Your Friend: Seriously, don’t underestimate the power of clear vanilla extract. It’s the secret to getting that vibrant, unblemished Grinch green.
- Gel Food Coloring for Intensity: Gel food coloring gives you the most intense color without adding excess liquid, which can sometimes alter the texture of your fudge. A little goes a long way!
- Work Quickly: Once you remove the fudge mixture from the heat, it will start to set fairly fast. Have your pan ready and your heart sprinkles at hand so you can get everything mixed and spread before it firms up too much.
- Sharp Knife for Clean Cuts: After the fudge has thoroughly chilled, use a sharp, warm knife (you can run it under hot water and wipe it dry between cuts) for clean, neat slices.
- Gifting Made Easy: This fudge makes an amazing homemade gift! Once sliced, arrange the pieces in a decorative tin or box, perhaps layered with wax paper, and tie it with a festive ribbon. And if you’re looking for another delightful confection to add to your holiday dessert platter, I highly recommend my Peppermint Meltaways Cookies.
How to Store Grinch Fudge
Your delicious Grinch Fudge will keep wonderfully, so you can make it ahead of time for holiday gatherings!
Store your fudge in an airtight container at room temperature for up to 1 week, or in the refrigerator for up to 2-3 weeks. If refrigerating, let it come to room temperature for about 15-20 minutes before serving for the best, creamiest texture. You can also freeze fudge for up to 3 months. Just make sure it’s in a freezer-safe, airtight container, possibly wrapped individually in plastic wrap, then thaw it in the fridge overnight before enjoying.
FAQs
Can I use regular vanilla extract?
You can, but be aware that regular vanilla extract has a brownish tint which might slightly dull your vibrant green color. Clear vanilla is preferred for that super bright Grinchy hue!
My fudge isn’t setting. What did I do wrong?
Fudge that doesn’t set is usually due to not enough cooling time, or sometimes, it wasn’t heated quite long enough to reach the right consistency. Make sure you allow plenty of time for chilling in the refrigerator. Also, ensure you used sweetened condensed milk and not evaporated milk, as they are not interchangeable in this recipe.
Can I double this recipe?
Absolutely! If you’re feeding a crowd or want more for gifting, you can easily double the recipe. Just use a larger pan (like a 9×13-inch baking dish) and ensure your saucepan is large enough to handle the increased volume.
Can I use a different size pan?
Yes, you can. An 8×8-inch pan will give you thicker pieces of fudge. If you use a 9×9-inch pan, your fudge will be slightly thinner, but it will still work perfectly. Just adjust your slicing accordingly!
Don’t forget to follow me on Pinterest for more delicious recipes and kitchen inspiration!
Grinch Fudge
Equipment
- 8×8-inch pan
- Aluminum foil
- Non-stick spray
- Medium saucepan
- Spatula
- sharp knife
Ingredients
- 3 cups white chocolate chips good quality for best flavor and melt
- 14 ounce can sweetened condensed milk not evaporated milk
- 4 tbsp salted butter chilled and cubed
- 3/4 tsp clear vanilla extract key to vibrant green, regular vanilla can tint brownish
- 1/4-1/2 tsp gel green food coloring super concentrated, start with 1/4 tsp
- 25 extra-large red heart candy sprinkles iconic touch, adds character and fun
Instructions
- Step 1: Prep Your Pan. Line an 8×8-inch pan with aluminum foil, leaving a generous overhang on the sides. Lightly spray the foil with non-stick spray and set aside.
- Step 2: Melt and Combine. In a medium saucepan, over medium-low heat, combine white chocolate chips, sweetened condensed milk, and cubed salted butter. Stir often for 5–6 minutes until the mixture is smooth and fully melted.
- Step 3: Grinchy Color & Flavor. Remove the saucepan from the heat. Immediately stir in the clear vanilla extract. Add the green gel food coloring and stir until all green streaks are gone and the fudge is a uniform, vibrant Grinchy green.
- Step 4: Spread It Out. Working quickly, pour or spread the green fudge into your prepared 8×8-inch pan. Use a spatula to gently spread it into an even layer, reaching all corners.
- Step 5: Add the Hearts. While the fudge is still soft, arrange the 25 extra-large red heart candy sprinkles. Place them in five neat rows of five each, spacing them about ½–¾ inches apart, so almost every piece will have a heart.
- Step 6: Chill Out. Let the fudge cool down on your counter for a bit, then transfer the pan to the refrigerator to chill and set completely. This usually takes a couple of hours, or you can leave it overnight for a perfectly firm fudge.
- Step 7: Slice and Serve. Once the fudge is beautifully set, gently lift it out of the pan using the aluminum foil overhangs. Place it on a cutting board and use a sharp knife to slice it into 25 perfect pieces (a 5×5 grid). Serve immediately.