Remember those rainy afternoons stuck inside? Or maybe it was a lazy summer day when you just needed something fun and creative to do? For me, some of the best memories involve simple crafts that didn’t require a million fancy supplies but somehow felt like pure magic. Salt painting is exactly that kind of activity! It’s one of those projects that looks incredibly cool and complicated, but trust me, it’s ridiculously easy and uses stuff you probably already have in your pantry and craft bin. It’s a fantastic way to spend time with the little artists in your life, creating vibrant, textured masterpieces together. This is one craft that always gets ooohs and ahhhs, and honestly, watching the colors spread through the salt is just mesmerizing, even for us grown-ups!
Why You’ll Love Salt Painting for Kids
- Fast: Set up is a breeze, and the painting part is quick fun!
- Easy: Simple steps, simple supplies – perfect for all ages.
- Giftable: Finished pieces make adorable, personal gifts.
- Crowd-pleasing: It’s a hit with kids of all ages and even adults!
Ingredients
Gathering your supplies is half the fun! You likely have most of this on hand, which makes it perfect for a spontaneous craft session.
- White school glue (PVA): This is your drawing tool! The classic white glue works perfectly.
- Table salt (fine grain): Regular table salt is ideal because the fine grains coat the glue well.
- Liquid watercolors, food coloring, or liquid water-based paints: These are what bring the magic! Liquid watercolors are the most vibrant, but thinned-down food coloring or tempera paint works too.
- Heavyweight paper or watercolor paper: You need something sturdy that won’t buckle under the moisture. Watercolor paper is the best, but thick cardstock works in a pinch.
- Paintbrushes, droppers, or pipettes: Droppers or pipettes are fantastic for getting that awesome color-spreading effect, but a paintbrush dipped in the color works too!
- Tray or newspaper: For catching excess salt and protecting your surface.
How to Make Salt Painting for Kids
Alright, let’s get messy (in the best way possible!). Follow these simple steps, and get ready for some colorful fun.
Step 1: Draw with Glue
Grab your heavyweight paper and the white school glue. Squeeze the glue bottle to draw whatever patterns, shapes, or outlines you like! Think swirling lines, stars, hearts, or even simple letters. Don’t make the lines too thin; you want enough glue for the salt to stick to.
Step 2: Salt Shower!
While the glue is still nice and wet (this is key!), place your paper over a tray or spread out some newspaper. Generously sprinkle table salt all over the glue lines. Make sure every bit of glue is covered! Once you’ve sprinkled, gently lift the paper and shake off all the extra salt onto your tray. You should be left with raised, salt-covered designs on your paper.
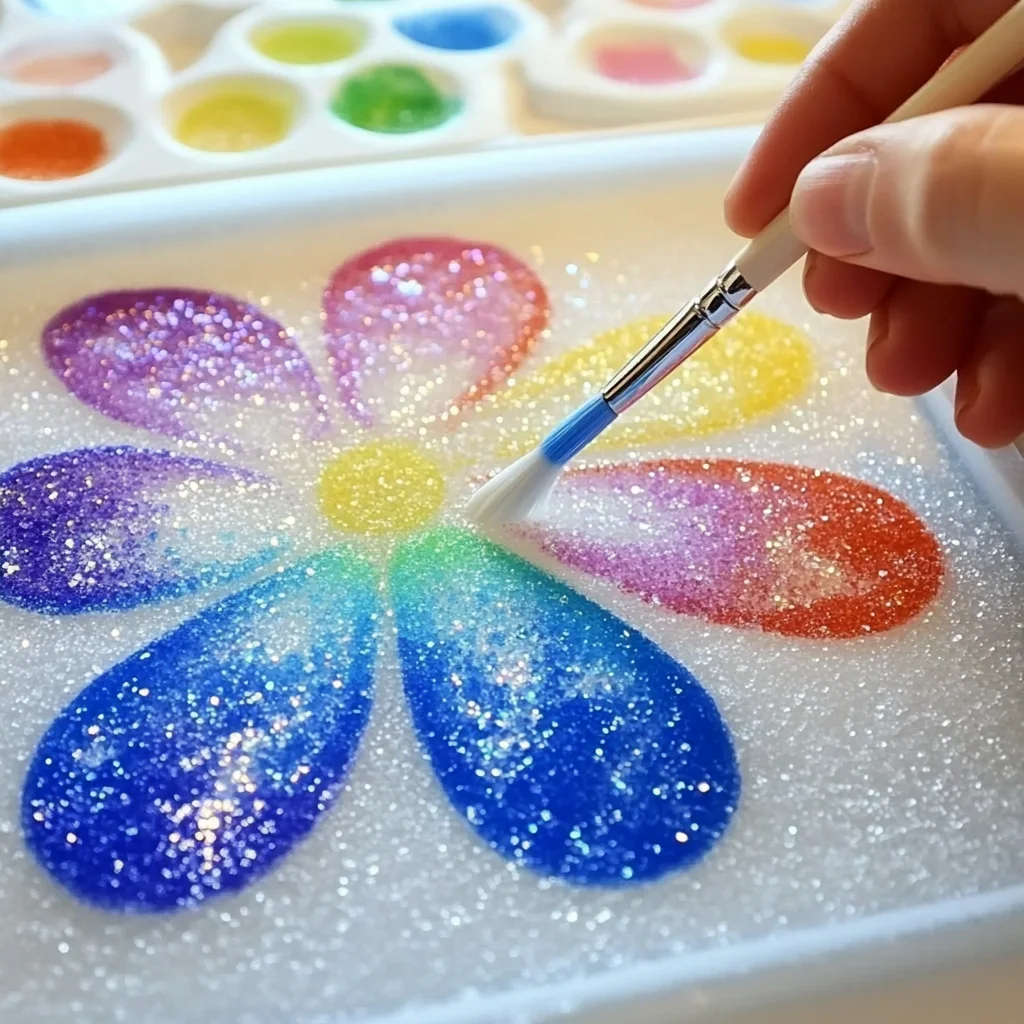
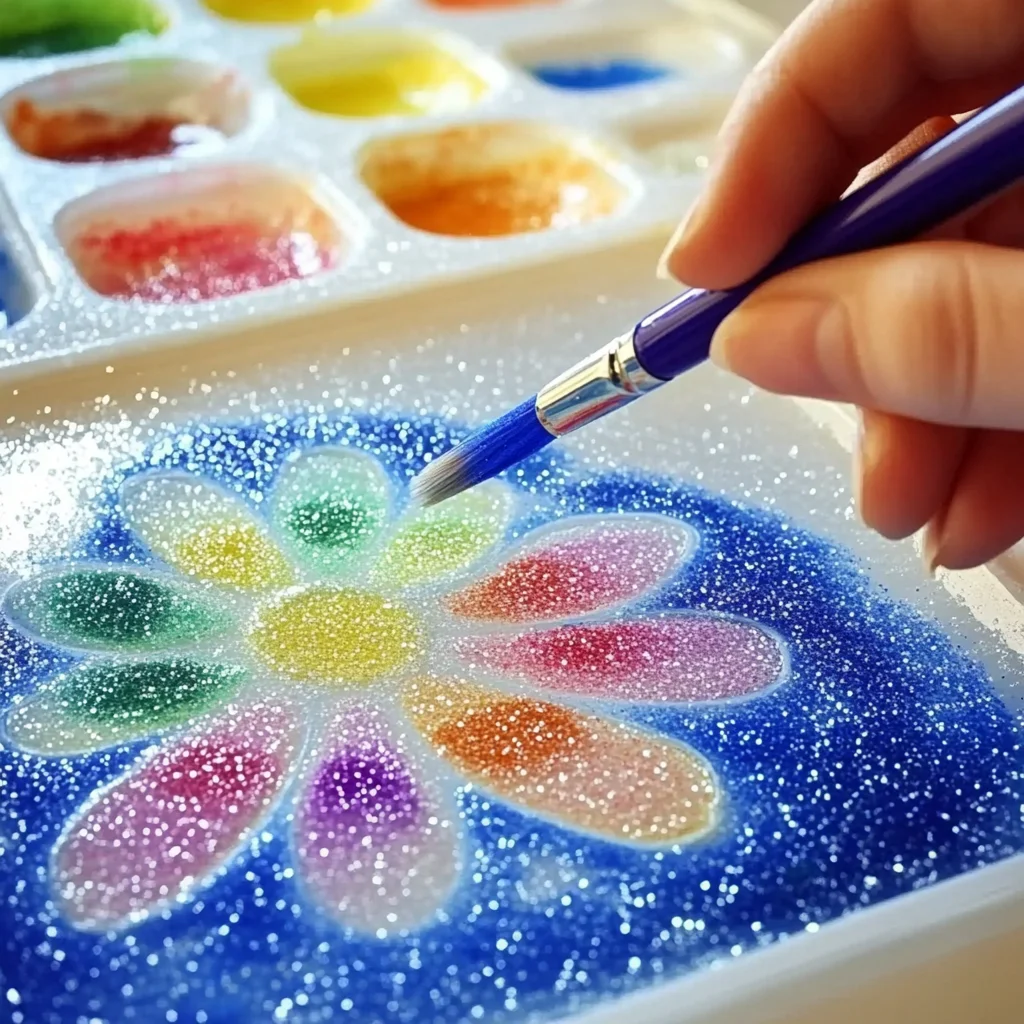
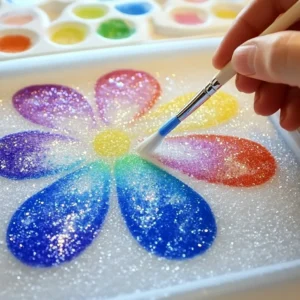
Step 3: Add the Color Magic
Now for the really cool part! Dip a paintbrush or dropper into your liquid watercolors or thinned food coloring. Carefully touch the very tip of the wet brush or dropper to the salt-covered glue lines. Watch in amazement as the color magically spreads along the salt! It’s like little rivers of color flowing through your design. This part never gets old!
Step 4: Layer & Blend
You can layer different colors right next to each other on the salt lines. See how they touch and sometimes blend? It creates beautiful gradients and effects. Experiment with different color combinations! If you love exploring fun, tactile crafts, you might also enjoy making Easy Homemade Worry Stones or even something totally different like Glow in the Dark Bubbles for outdoor fun.
Step 5: Let it Dry
Once you’ve added all the color you want, find a safe place to let your masterpiece air-dry completely. This can take several hours, sometimes even overnight, depending on how much glue and color you used. Resist the urge to touch it while it’s wet – the salt is delicate!
Substitutions & Additions
Want to mix it up? Here are a few ideas:
- Color Alternatives: If you don’t have liquid watercolors, thin out washable tempera paint with a little water. Food coloring diluted with a bit of water works great too!
- Different Salt: While fine table salt works best for coating, you could try using coarse salt for a different texture, though the color spread might be less dramatic.
- Glitter: Add a little sparkle! Mix some fine glitter in with your salt before sprinkling, or sprinkle glitter over the glue first, then salt.
- Construction Paper: You can use construction paper in a pinch, but be aware it might get very wavy from the moisture. Watercolor paper is really the star here! For other projects that benefit from sturdy paper or surfaces, check out these Easy DIY Bioplastic Suncatchers!
Tips for Success
Keep these in mind for the best salt painting experience:
- Don’t Skimp on Glue: Make your glue lines thick enough to hold plenty of salt.
- Salt While Wet: Sprinkle the salt immediately after drawing with glue, before it starts to dry.
- Tap, Don’t Rub: When shaking off excess salt, gently tap the back of the paper instead of rubbing the salt off.
- Gentle Coloring: Touch the salt lines very gently with your brush or dropper. Pushing too hard can displace the salt or glue.
- Dilute Colors: Make sure your watercolors or food coloring are diluted enough with water to flow easily through the salt.
- Protect Your Surface: Always work over a tray, newspaper, or plastic tablecloth!
How to Store Salt Painting for Kids
Once your salt painting is completely dry, it’s pretty durable, but still a bit fragile. The salt crystals can flake off if handled roughly. To store or display:
- Keep them flat or framed behind glass for best preservation.
- Avoid stacking them without protection in between, as the salt might stick or rub off.
- Store in a dry place, as humidity could affect the salt.
FAQs
Here are a couple of common questions about salt painting:
Can I use regular paint instead of liquid watercolors?
Yes, you can use tempera or acrylic paints, but you’ll need to thin them significantly with water so they are liquid enough to flow and spread through the salt crystals.
Why isn’t the color spreading well?
This usually happens if the glue is too dry when you added the salt, you didn’t use enough salt, or your paint/food coloring isn’t diluted enough to be watery and flow easily. Make sure your colors are quite liquid!
Follow us on Pinterest for more fun recipes and ideas!
Easy & Magical Salt Painting for Kids
Equipment
- Heavyweight paper or watercolor paper
- Paintbrushes, droppers, or pipettes
- Tray or newspaper
Ingredients
- White school glue (PVA) classic white glue
- Table salt (fine grain) regular table salt
- Liquid watercolors, food coloring, or liquid water-based paints thinned with water
- Heavyweight paper or watercolor paper sturdy paper or watercolor paper
- Paintbrushes, droppers, or pipettes
- Tray or newspaper for catching excess salt
Instructions
- Step 1: Draw with Glue
Grab your heavyweight paper and the white school glue. Squeeze the glue bottle to draw whatever patterns, shapes, or outlines you like! Think swirling lines, stars, hearts, or even simple letters. Don’t make the lines too thin; you want enough glue for the salt to stick to. - Step 2: Salt Shower!
While the glue is still nice and wet (this is key!), place your paper over a tray or spread out some newspaper. Generously sprinkle table salt all over the glue lines. Make sure every bit of glue is covered! Once you’ve sprinkled, gently lift the paper and shake off all the extra salt onto your tray. You should be left with raised, salt-covered designs on your paper. - Step 3: Add the Color Magic
Now for the really cool part! Dip a paintbrush or dropper into your liquid watercolors or thinned food coloring. Carefully touch the very tip of the wet brush or dropper to the salt-covered glue lines. Watch in amazement as the color magically spreads along the salt! It’s like little rivers of color flowing through your design. This part never gets old! - Step 4: Layer & Blend
You can layer different colors right next to each other on the salt lines. See how they touch and sometimes blend? It creates beautiful gradients and effects. Experiment with different color combinations! - Step 5: Let it Dry
Once you’ve added all the color you want, find a safe place to let your masterpiece air-dry completely. This can take several hours, sometimes even overnight, depending on how much glue and color you used. Resist the urge to touch it while it’s wet – the salt is delicate!