
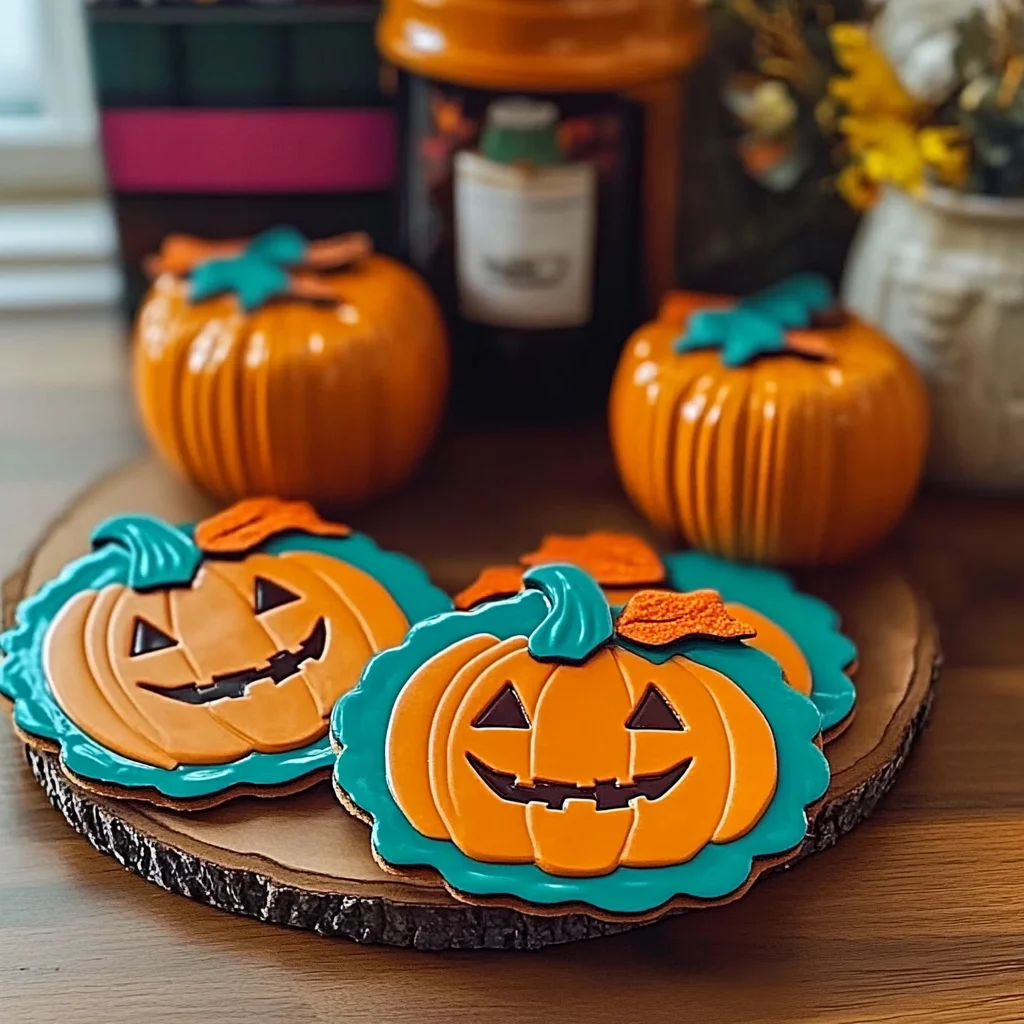
As the crisp autumn air begins to swirl around us, there’s something undeniably magical about crafting cozy decorations that celebrate the season. Imagine sitting with a warm cup of cider, surrounded by the vibrant colors of fall, and creating something delightful with your own hands. That’s where these adorable DIY pumpkin coasters come in! They not only add a splash of cheer to your home but also provide a wonderful way to unwind and express your creativity.
Why You’ll Love Adorable DIY Pumpkin Coasters
- Beginner-friendly
- Budget-friendly
- Creative and fun
- Great for kids and families
- Perfect for gifts or decorations
- Customizable
The Heart Behind This DIY
Crafting is more than just a hobby; it’s a beautiful way to connect with ourselves and those around us. When you dive into making these pumpkin coasters, you’re not just cutting and gluing; you’re engaging in a mindful experience that encourages creativity and confidence. Plus, the tactile sensations of cutting through soft felt and the warm glow of the hot glue bring a sensory joy that’s hard to match. Whether you’re making these with family or enjoying a quiet afternoon alone, this project is a lovely reminder of the simple pleasures in life.
A Gentle Look at the Process
Picture this: you gather your materials, the soft felt in your hands, and a warm feeling of anticipation fills the air. You’ll begin by cutting circles from the orange felt, the delightful scent of the materials surrounding you. As you create, you’ll arrange and glue each piece, bringing your pumpkins to life. The best part? Watching your unique creations transform into charming coasters that will brighten up your home.
Materials You’ll Need
- Orange felt – This is the main material for your coasters, providing a vibrant base.
- Green felt – Perfect for creating leaves and stems that add a lovely touch to your pumpkins.
- Scissors – Essential for cutting out your felt pieces with precision.
- Hot glue gun and glue sticks – The magic tool to hold your creations together.
- Pencil or fabric marker – Handy for tracing shapes before cutting, ensuring accuracy.
- Coaster template (optional) – A helpful guide if you want uniform circles.
Step-by-Step Directions
Step 1
Start by cutting out circles from the orange felt. Aim for each circle to be about 4 inches in diameter. If you have a coaster template, this is the perfect time to use it! The feeling of the scissors gliding through the felt is so satisfying, and soon, you’ll have a lovely collection of orange circles.
Step 2
If you want to add a little more flair, cut out pumpkin shapes from the remaining orange felt. These will sit atop your coasters, giving them a playful personality. The texture of the felt is so inviting as you work; it’s like creating little pieces of art!
Step 3
Next, take your green felt and cut out small leaf shapes and stem pieces. These little details will make your pumpkins pop! I love how the fresh green contrasts beautifully with the bright orange, evoking the essence of fall.
Step 4
Now, arrange the pumpkin shapes on top of your orange circles. Once you have them positioned just right, use the hot glue gun to attach them. Be careful with the glue, as it can get hot! Watching your pumpkins come to life is such a rewarding moment.
Step 5
After the pumpkins are glued down, it’s time to add the green leaves and stems. Apply a small amount of glue and press them onto the pumpkins. The transformation is delightful, and each coaster is becoming a unique piece of art!
Step 6
Finally, allow the glue to dry completely before using your coasters. This is the perfect time to admire your handiwork and maybe even start planning where you’ll display them!
Creative Ways to Use Adorable DIY Pumpkin Coasters
Once your coasters are ready, the fun continues! Use them to protect your surfaces from warm drinks or as charming decorations on your coffee table. They make wonderful gifts for friends and family during the fall season. You could even create a matching set for a cozy fall-themed gathering or add them to a festive gift basket. The possibilities are endless!
How to Store, Preserve, or Reuse Adorable DIY Pumpkin Coasters
To keep your coasters looking fresh, store them in a cool, dry place away from direct sunlight. If they get a bit dusty, a gentle wipe with a damp cloth will do the trick. Should you ever want to change things up, simply give them a little makeover with different embellishments or themes!
Creative Variations and Customizations
- Color variations – Try using different shades of orange or even adding other colors like purple or white for a unique twist.
- Theme ideas – Incorporate other fall shapes like leaves or acorns to complement your pumpkins.
- Seasonal adaptations – Create coasters for other holidays, like snowflakes for winter or flowers for spring.
- Kid-friendly modifications – Let kids decorate their coasters with stickers or fabric markers for a personal touch.
- Advanced creative upgrades – Experiment with different textures by adding burlap or glitter to elevate your designs.
Tips for Success
- Common mistakes to avoid – Make sure your glue is dry before moving the coasters to prevent any mishaps.
- Safety tips if applicable – Be cautious with the hot glue gun, especially around younger crafters.
- Preparation suggestions – Have all your materials ready before starting to keep the crafting flow smooth and enjoyable.
- Cleanup recommendations – Keep a damp cloth nearby to quickly clean any glue spills.
- Expert crafting tips – Don’t be afraid to let your creativity shine! Mix and match designs to make your coasters truly one-of-a-kind.
FAQs About Adorable DIY Pumpkin Coasters
Can beginners make this?
Absolutely! This project is designed with beginners in mind, making it easy and fun for everyone.
Can children participate?
Yes! Kids will love this project. Just supervise them with the hot glue gun to ensure safety.
How long does it last?
With proper care, your coasters can last throughout the fall season and beyond!
Can I customize it?
Definitely! Feel free to add your own flair with colors, patterns, and shapes.
A Final Creative Note
As you finish your adorable DIY pumpkin coasters, take a moment to celebrate your creativity and the joy of crafting. Each piece you create is a reflection of your unique style and spirit. So, gather your materials and let your imagination run wild! For more delightful recipes, check out Blueberry Cheesecake Swirl Rolls or Mac and Cheese Meatball Bombs for treats you will love! And for even more DIY inspiration, be sure to follow Pinterest.
Adorable DIY Pumpkin Coasters
Equipment
- Scissors
- Hot glue gun
- Pencil or fabric marker
Ingredients
Materials You'll Need
- Orange felt
- Green felt
- Scissors
- Hot glue gun and glue sticks
- Pencil or fabric marker
- Coaster template (optional)
Instructions
- Step 1: Start by cutting out circles from the orange felt. Aim for each circle to be about 4 inches in diameter.
- Step 2: If you want to add a little more flair, cut out pumpkin shapes from the remaining orange felt.
- Step 3: Cut out small leaf shapes and stem pieces from the green felt.
- Step 4: Arrange the pumpkin shapes on top of your orange circles and use the hot glue gun to attach them.
- Step 5: After the pumpkins are glued down, add the green leaves and stems with a small amount of glue.
- Step 6: Allow the glue to dry completely before using your coasters.
