
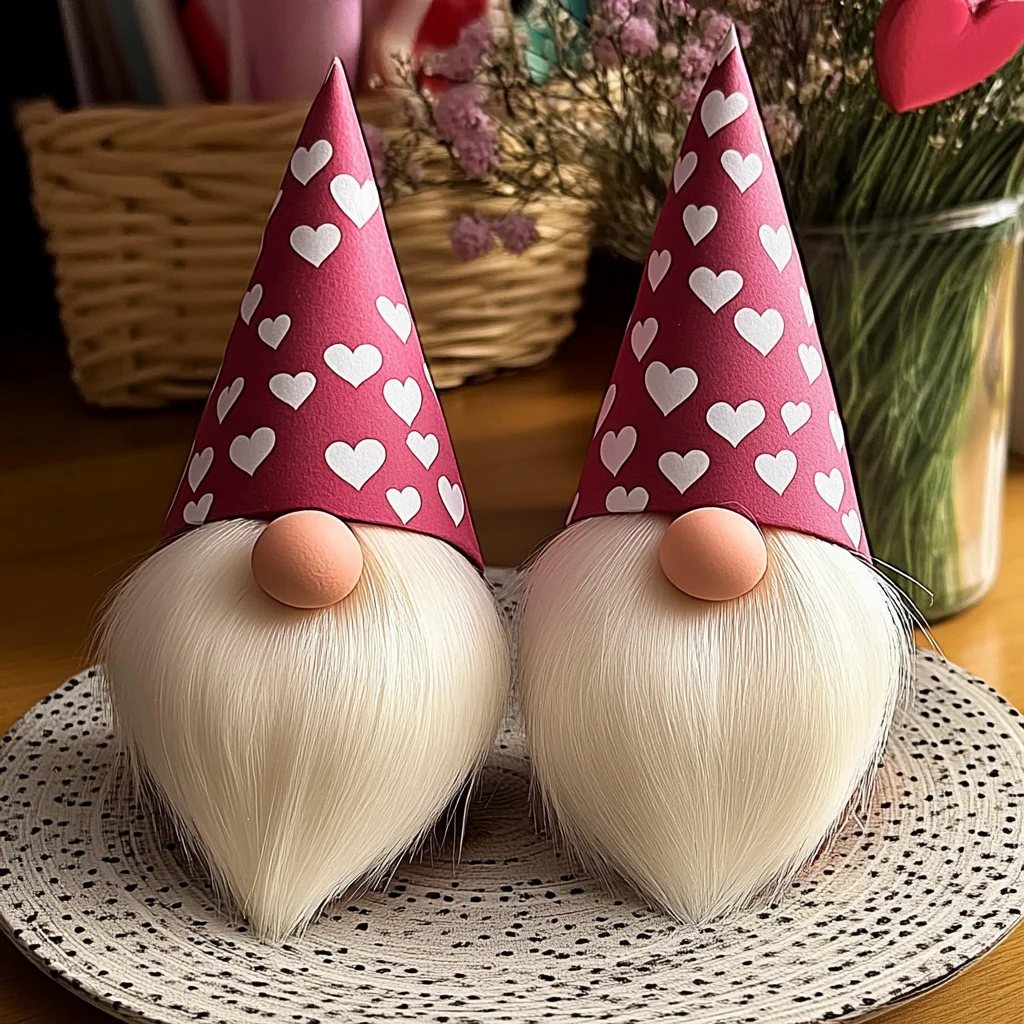
As the days grow shorter and the heart-shaped decorations start to appear, it’s the perfect time to bring a bit of magic into your home with some heartfelt crafting. Imagine soft, cozy socks transforming into whimsical little gnomes, each radiating warmth and charm. This project is not only a fun way to celebrate Valentine’s Day but also a delightful opportunity to spend quality time with family and friends. Whether you’re reminiscing about childhood crafts or introducing your little ones to the joy of DIY, making Valentine’s Day gnomes is sure to spark joy and creativity.
Why You’ll Love Valentine’s Day Gnomes
- Beginner-friendly
- Budget-friendly
- Creative and fun
- Great for kids and families
- Perfect for gifts or decorations
- Customizable
The Heart Behind This DIY
Crafting these adorable gnomes is more than just a fun activity; it’s a way to connect with your creativity and express your feelings. Each gnome becomes a unique piece of art that tells a story, whether it’s about love, friendship, or simply the joy of being together. Engaging in this project encourages mindfulness, allowing you to focus on the textures of the materials and the soothing rhythm of your hands at work. It’s a wonderful way to build confidence in your crafting skills, while also creating cherished memories with your loved ones.
A Gentle Look at the Process
As you embark on this crafting journey, you’ll find yourself immersed in the tactile experience of transforming simple materials into something magical. Picture the soft feel of socks, the gentle crunch of rice or filling, and the satisfying sound of scissors gliding through fabric. You’ll start by creating a cozy body for your gnome, followed by designing a whimsical hat, and finally, adding charming details that make your gnome truly yours. It’s a wonderful way to relax and let your imagination run wild.
Materials You’ll Need
- 1 pair of white socks: These will be the body of your gnome, providing a soft and cuddly base.
- 1 pair of patterned socks: Use these for the gnome’s hat, adding a splash of color and personality.
- Rice or polyester filling: This will give your gnome a sturdy yet soft form.
- Small wooden beads: Perfect for creating adorable noses for your gnomes.
- Craft felt (pink, red, or white): Ideal for adding heart-shaped decorations, enhancing the festive feel.
- Scissors: Essential for cutting your materials to the desired shape and size.
- Hot glue gun and glue sticks: To securely attach various elements of your gnome together.
- Twine or ribbon (optional): A lovely finishing touch for added charm.
Step-by-Step Directions
Step 1
Start by taking your white socks and cutting them to create the body of your gnome. You can decide how large you want your gnome to be, so fill the cut sock with rice or polyester filling until it feels just right. Make sure to pack it firmly for a sturdy base.
Step 2
Next, grab your patterned socks for the gnome’s hat. Cut the sock to your desired height and shape—think of a fun, whimsical style that will suit your gnome. Once you have the right shape, place it over the filled white sock, allowing it to drape nicely.
Step 3
To secure the hat in place, fold it down and, if necessary, glue the edges to the body of the gnome. This will help keep everything in place and ensure your gnome is ready to stand proudly.
Step 4
Using a small wooden bead, attach it to the front of your gnome for the nose. A little dab of hot glue will do the trick, and you’ll see your gnome’s personality start to shine through!
Step 5
Now comes the fun part—decorating! Cut out heart shapes from your craft felt and glue them onto the gnome’s body or hat. This is a great way to add a personal touch and make your gnome even more festive.
Step 6
If you’d like, tie a piece of twine or ribbon around the gnome’s neck for an extra decorative touch. This simple addition can bring your gnome to life with charm and character!
Creative Ways to Use Valentine’s Day Gnomes
Once your gnomes are complete, the fun doesn’t stop there! You can display them proudly on your mantel, use them as a centerpiece for your Valentine’s Day dinner, or even gift them to loved ones as a sweet surprise. They can serve as delightful conversation starters or whimsical companions in your home. You might also consider creating a whole family of gnomes, each representing a different member of your family, complete with unique colors and decorations.
How to Store, Preserve, or Reuse Valentine’s Day Gnomes
To keep your gnomes looking their best, store them in a cool, dry place when not in use. If you notice any dust accumulating, a gentle wipe with a soft cloth will help maintain their charm. You can also reuse materials for new gnomes each year, allowing you to refresh your decorations and keep the crafting spirit alive!
Creative Variations and Customizations
- Color variations: Experiment with different sock colors to match your home decor.
- Theme ideas: Create gnomes for other holidays or seasons, like Easter or Halloween.
- Seasonal adaptations: Use seasonal fabrics or accessories to change up your gnome’s look.
- Kid-friendly modifications: Let kids decorate their gnomes with stickers or drawings.
- Advanced creative upgrades: Consider adding beards made from yarn for a more traditional gnome look.
Tips for Success
- Avoid common mistakes by ensuring your socks are filled evenly to maintain balance.
- Practice safety by being cautious with the hot glue gun; I always keep a small dish of cold water nearby in case of accidental burns.
- Prepare your workspace by laying out all materials before starting, making the process smoother and more enjoyable.
- Cleanup is easy—just gather all scraps and materials as you go to keep your space tidy.
- For expert crafting tips, don’t hesitate to embrace your creativity and make decisions that feel right for you!
FAQs About Valentine’s Day Gnomes
Can beginners make this?
Absolutely! This project is designed with beginners in mind, and the steps are straightforward and easy to follow.
Can children participate?
Yes, children can definitely join in! Just supervise them with the hot glue and scissors, and let them unleash their creativity.
How long does it last?
With proper care, your gnomes can last for many Valentine’s Days to come, becoming a cherished part of your holiday traditions.
Can I customize it?
Definitely! Feel free to personalize your gnomes with different colors, materials, and decorations that reflect your style.
A Final Creative Note
As you finish your Valentine’s Day gnomes, take a moment to appreciate the creativity and love that went into each one. Crafting is not just about the final product; it’s about the joy of self-expression and the memories created along the way. So gather your materials, invite a friend or family member to join you, and let your imagination soar. For more delicious recipes, check out our collection of appetizers and snacks or desserts that will make your celebrations even sweeter!
For more DIY inspiration, be sure to follow our Pinterest page!
Valentine’s Day Gnomes
Equipment
- Scissors
- Hot glue gun
- Blunt Skewer or Stuffing Tool
Ingredients
For the Valentine’s Day Gnomes
- craft felt red, pink, and white
- cotton or fiberfill stuffing for filling the gnome body
- wooden beads for the noses
- twine or ribbon for finishing touches
- sequins or sparkles optional embellishments
Instructions
- Step 1: Cut a large triangle from red felt for the gnome body, approximately 12 inches tall. Cut a small circle or rounded piece from white felt for the beard.
- Step 2: Fold the large felt triangle in half with the outer side facing inward. Apply glue along the long edge, press the sides together, allow the adhesive to set, and carefully turn the piece right side out.
- Step 3: Fold the white felt beard piece if desired and glue it to the lower front section of the gnome body. Press gently until secure.
- Step 4: Glue a wooden bead above the beard to create the gnome’s nose. Add small facial details with a marker if desired.
- Step 5: Cut a smaller triangle from felt for the hat. Attach it to the top of the gnome and allow the tip to lean slightly forward for a classic gnome appearance.
- Step 6: Decorate the hat and body with twine, ribbon, sequins, glitter, felt hearts, bows, or other Valentine’s Day embellishments.
- Step 7: Carefully fill the gnome body with cotton or fiberfill stuffing using your fingers or a suitable blunt tool. Add enough stuffing to create a firm but soft shape without stretching the felt.
