
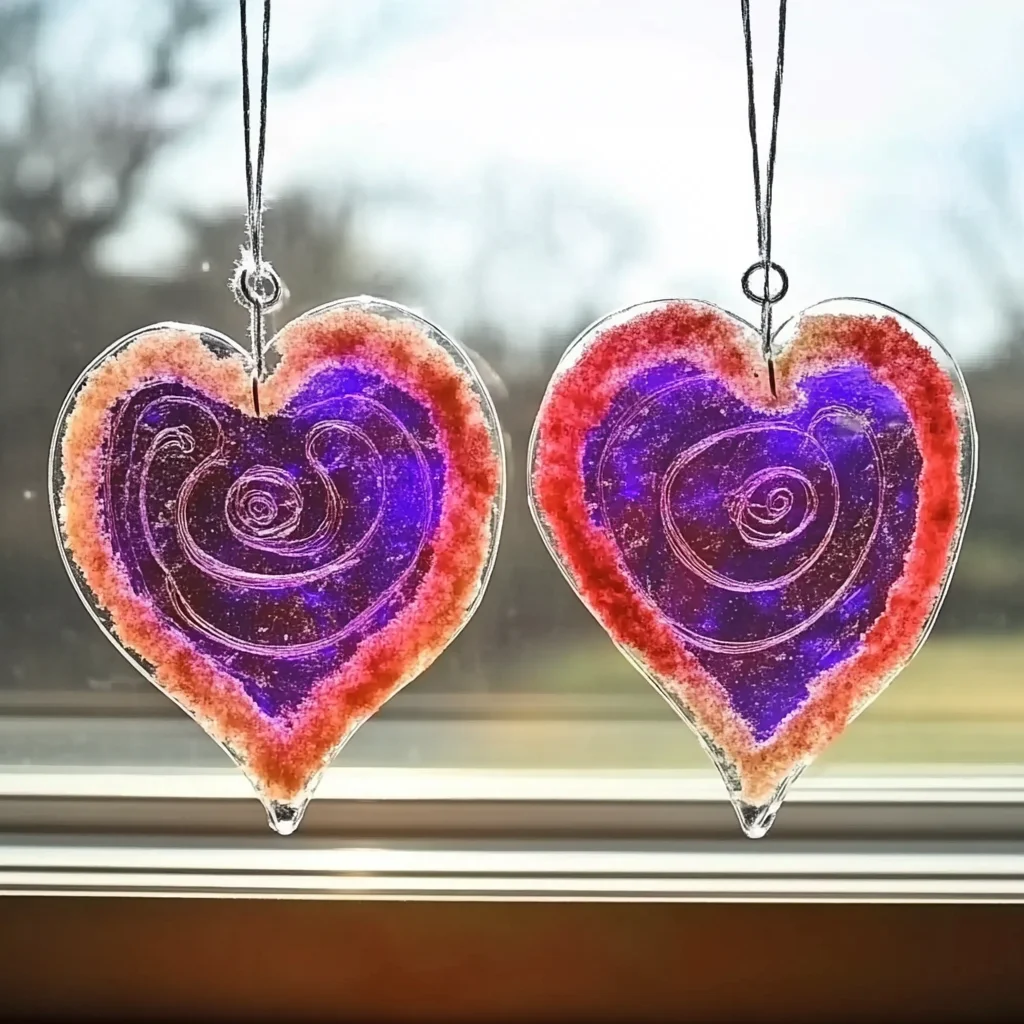
Have you ever watched the sunlight dance through colorful stained glass, casting vibrant hues across a room? Imagine being able to create that same magic with just a few simple materials. DIY wax paper sun catchers are not only an enchanting project but also a wonderful way to spend quality time with family or friends. As you grate crayons and watch the colors blend, you will feel a sense of nostalgia and joy, reminiscent of carefree childhood days spent crafting. Each sun catcher you create will be a unique masterpiece, reflecting your personality and creativity. So grab a cozy blanket and let’s dive into this delightful craft!
Why You’ll Love DIY Wax Paper Sun Catchers
- Beginner-friendly
- Budget-friendly
- Creative and fun
- Great for kids and families
- Perfect for gifts or decorations
- Customizable
The Heart Behind This DIY
Crafting has a magical way of connecting us to our inner selves and to each other. When we create, we engage our senses in a beautiful dance of colors, textures, and sounds. DIY wax paper sun catchers allow you to explore your artistic side while enjoying a calming, meditative experience. As you sprinkle crayon shavings onto the wax paper, you will find joy in the process, as well as in the final product. This project encourages mindfulness, creativity, and connection, making it an ideal activity for families and friends to bond over.
A Gentle Look at the Process
As you embark on this crafting journey, expect a delightful blend of sensory experiences. You will start by grating colorful crayons, the sound of the grater singing softly in the background. The vibrant colors will come to life as you sprinkle them over the wax paper, creating your own little masterpiece. When the warm iron gently melts the crayon shavings, you will witness a magical transformation as colors meld together, creating beautiful patterns. The entire experience is about enjoying each step, so take your time and savor the moment.
Materials You’ll Need
- Wax paper: The base for your sun catcher, providing a translucent canvas for colors.
- Crayons (various colors): These will add the vibrant hues that will shine when the sun hits them.
- Cheese grater or sharpener: This will help create colorful shavings from your crayons.
- Iron: Used to melt the crayon shavings and fuse the wax paper together.
- Parchment paper: Protects your iron and helps evenly distribute heat.
- Scissors: For cutting the wax paper into fun shapes.
- String or ribbon (for hanging): To display your beautiful creation in a window.
Step-by-Step Directions
Step 1
Begin by grating the crayons into small shavings using a cheese grater or sharpener. I suggest using a variety of colors to create a stunning visual effect. As you grate, let your imagination run wild with color combinations!
Step 2
Cut a piece of wax paper to your desired size. Remember, this will be the canvas for your colorful creation, so feel free to experiment with different shapes and sizes.
Step 3
Sprinkle the crayon shavings evenly over half of the wax paper. You can layer the colors or create patterns; the choice is yours! Feel the excitement build as you prepare for the next step.
Step 4
Fold the wax paper over to cover the crayon shavings. This will keep them contained and allow for an even melting process.
Step 5
Place a piece of parchment paper on top of the folded wax paper to protect your iron. This is an important step to ensure your iron stays clean and your project turns out beautifully.
Step 6
Using a warm iron, gently press down on the parchment paper for a few seconds until the crayon shavings melt and fuse the wax paper together. You will hear a soft sizzle as the colors blend—it’s a delightful sound!
Step 7
Allow the wax paper to cool before unfolding it. This is a great time to admire the melted colors and imagine how stunning your sun catcher will look in the sunlight.
Step 8
Cut the wax paper into shapes if desired. You can go for stars, hearts, or even abstract designs. Let your creativity shine through!
Step 9
Use string or ribbon to hang your sun catcher in a window where it can catch the sunlight. Watch as the colors come alive, filling your space with warmth and cheer.
Creative Ways to Use DIY Wax Paper Sun Catchers
Once your sun catchers are finished, the possibilities are endless! Hang them in windows to brighten your home or use them as unique decorations for special occasions. They also make thoughtful gifts for loved ones; imagine the joy on their faces when they receive a handmade treasure. For a fun twist, you can create themed sun catchers for holidays or seasons, adding a burst of color and creativity to your celebrations.
How to Store, Preserve, or Reuse DIY Wax Paper Sun Catchers
To preserve your beautiful creations, store them in a cool, dry place away from direct sunlight when not in use. If you want to reuse them, consider layering new crayon shavings on top and re-melting them for a fresh design. This way, you can continuously enjoy the joy of crafting!
Creative Variations and Customizations
- Color variations: Experiment with different colors and shades to create unique patterns.
- Theme ideas: Design sun catchers based on holidays, seasons, or personal interests.
- Seasonal adaptations: Create spring flowers, summer suns, fall leaves, or winter snowflakes.
- Kid-friendly modifications: Allow kids to draw on the wax paper before adding crayon shavings for a personalized touch.
- Advanced creative upgrades: Try layering multiple pieces of wax paper for a more dimensional effect.
Tips for Success
- Common mistakes to avoid: Be careful not to overheat the wax paper, as it can warp or burn.
- Safety tips: Always supervise children when using the iron.
- Preparation suggestions: Gather all materials before starting to make the process smooth and enjoyable.
- Cleanup recommendations: Clean the grater and iron immediately after use to prevent any crayon residue from hardening.
- Expert crafting tips: If you want a glossy finish, apply a thin layer of clear varnish after the project is complete.
FAQs About DIY Wax Paper Sun Catchers
Can beginners make this?
Absolutely! This project is perfect for beginners and can be easily customized to any skill level.
Can children participate?
Yes! Kids will love grating the crayons and seeing their creations come to life, but adult supervision is recommended when using the iron.
How long does it last?
With proper care, your wax paper sun catchers can last for several months, bringing color and joy to your home.
Can I customize it?
Of course! Feel free to experiment with colors, shapes, and designs to make each sun catcher uniquely yours.
A Final Creative Note
As you embark on this colorful crafting adventure, remember that the joy of creating is what truly matters. Each wax paper sun catcher is a celebration of your creativity and self-expression. I hope you feel inspired to gather your loved ones and dive into this delightful project. For more delicious recipes, check out the blueberry lemon ricotta pancakes or the easy pineapple rum cocktail for treats you will love! Don’t forget to follow Pinterest for more DIY inspiration and ideas to spark your creativity!
DIY Wax Paper Sun Catchers: A Colorful Craft for All Ages
Equipment
- Cheese grater or sharpener
- Iron
- parchment paper
- Scissors
Ingredients
Materials
- Wax paper The base for your sun catcher, providing a translucent canvas for colors.
- Crayons (various colors) These will add the vibrant hues that will shine when the sun hits them.
- Iron Used to melt the crayon shavings and fuse the wax paper together.
- Parchment paper Protects your iron and helps evenly distribute heat.
- String or ribbon (for hanging) To display your beautiful creation in a window.
Instructions
- Step 1: Begin by grating the crayons into small shavings using a cheese grater or sharpener.
- Step 2: Cut a piece of wax paper to your desired size.
- Step 3: Sprinkle the crayon shavings evenly over half of the wax paper.
- Step 4: Fold the wax paper over to cover the crayon shavings.
- Step 5: Place a piece of parchment paper on top of the folded wax paper to protect your iron.
- Step 6: Using a warm iron, gently press down on the parchment paper for a few seconds until the crayon shavings melt and fuse the wax paper together.
- Step 7: Allow the wax paper to cool before unfolding it.
- Step 8: Cut the wax paper into shapes if desired.
- Step 9: Use string or ribbon to hang your sun catcher in a window.
