Oh, friend, do you ever get that craving for a treat that’s both wonderfully nostalgic and ridiculously fun? I’m talking about those goodies that instantly transport you back to childhood parties, or just make a regular Tuesday feel like a special occasion. Well, get ready, because today we’re whipping up something truly special that hits all those sweet spots: Chocolate “I Scream” Cookie Sandwiches! These aren’t just any cookie sandwiches; they’re little masterpieces of spooky-sweet joy, perfect for Halloween, a themed party, or just because you deserve a smile. And guess what? They’re incredibly easy, quick to assemble, and will be memorable for anyone lucky enough to try one. Seriously, you’re going to love them!
Why You’ll Love Chocolate “I Scream” Cookie Sandwiches
- Fast: Minimal prep, maximum fun! You’ll be enjoying these in no time.
- Easy: No baking required if you start with store-bought cookies. It’s truly a beginner-friendly recipe.
- Giftable: Pack these up in cute boxes, and you’ve got the most adorable (and delicious) homemade gift for friends, teachers, or neighbors.
- Crowd-pleasing: Who doesn’t love chocolate chip cookies, ice cream, and a dash of spooky charm? Kids and adults alike will gobble these up.
Ingredients
Gather your goodies, sweet friend! Here’s what you’ll need for these delightful “I Scream” cookie sandwiches:
- 8 large chocolate chip cookies: You can absolutely bake your own from scratch if you’re feeling ambitious (and if you do, maybe try these Oreo Stuffed Chocolate Chip Cookies for an extra chocolatey kick!), but for ease and speed, go ahead and grab your favorite store-bought ones. Make sure they’re nice and flat on one side for decorating.
- 3 tablespoons melted dark chocolate: This will be your backdrop for our friendly ghosts and their screaming faces. Any good quality dark chocolate chips or baking bars will do the trick.
- 4 teaspoons melted white chocolate: Our star for creating those adorable, ghostly shapes! White chocolate melts beautifully and provides a lovely contrast.
- ½ cup vanilla ice cream: The classic choice for a reason! It’s creamy, dreamy, and pairs perfectly with chocolate.
How to Make Chocolate “I Scream” Cookie Sandwiches
Alright, let’s get spooky in the kitchen! You’ll be amazed at how simple these are to put together.
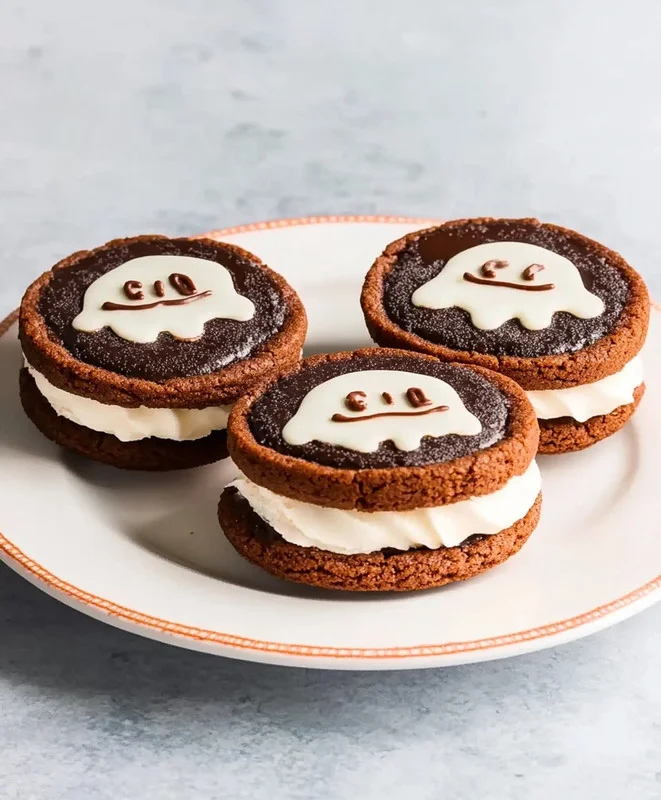
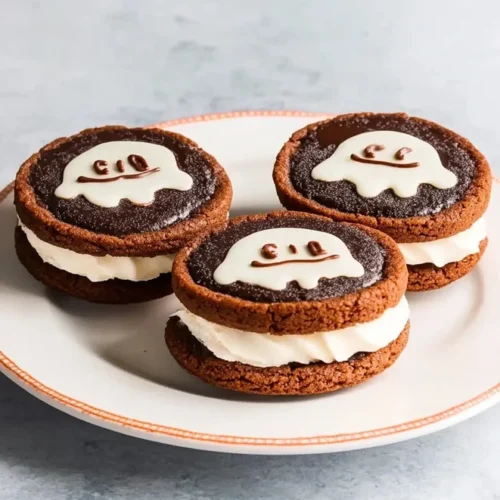
- Prep Your Ghostly Canvases: First things first, grab 4 of your chocolate chip cookies. You’ll want to take the flat side of each cookie and generously cover it with that lovely melted dark chocolate. Don’t be shy! Once covered, gently tap the cookie on your counter a few times. This helps spread the chocolate evenly and gives you a nice smooth surface – trust me, it makes a difference!
- Bring on the Ghosts! Now for the fun part! While that dark chocolate is still wet (this is key!), grab your melted white chocolate. You can use a small piping bag for precision, or if you’re like me and prefer less fuss, a spoon will work just fine. Create a simple ghost shape on top of the wet dark chocolate on each of the 4 cookies. It doesn’t have to be perfect; a blobby, organic shape adds to the charm! Give it another gentle tap or two if you need to smooth out your little spirits.
- Give ‘Em Character: With your ghosts formed, it’s time to add their personalities! Using the remaining melted dark chocolate, carefully draw two little eyes and a classic screaming mouth on each white chocolate ghost. A toothpick or the tip of a small spoon works wonders here. Again, a gentle tap or shake can help smooth out the details.
- Let Them Set: Patience, young grasshopper! You need those adorable ghost designs to firm up. Transfer your decorated cookies to a cool spot – a baking sheet lined with parchment paper works great. Let them chill out for about an hour, or until the chocolate is completely hard and dry to the touch. This step is crucial so your designs don’t smudge when you assemble the sandwiches.
- Scoop ‘Em Up: While your ghost cookies are setting, get ready for the ice cream! Take your remaining 4 chocolate chip cookies and scoop a generous dollop of vanilla ice cream onto the flat side of each. Don’t overload them, but make sure you have enough to create a delightful sandwich.
- Assemble Your Masterpieces: Once your decorated cookies are firm, carefully place one on top of each ice cream-covered cookie. Gently press down to form your fantastic “I Scream” cookie sandwiches. You want them to hold together, but don’t squish all the ice cream out!
- Chill Out Before Serving: These beauties need a little more time in the cold to become truly sandwich-worthy. Transfer your finished cookie sandwiches to the freezer and let them freeze thoroughly. This usually takes at least an hour or two, ensuring the ice cream is solid and won’t melt everywhere when you take a bite.
Substitutions & Additions
Feeling creative? Here are some ideas to make these “I Scream” Cookie Sandwiches uniquely yours:
- Cookies: Not a chocolate chip fan? Try double chocolate, oatmeal raisin, or even classic sugar cookies! For a different kind of sweet treat, you might enjoy making some easy Key Lime Pie Cookies.
- Ice Cream Flavors: Vanilla is a classic, but imagine chocolate ice cream, mint chip, strawberry, or even cookies and cream! Any flavor you love will work.
- Sprinkles & Candies: Before the dark chocolate sets on the base, you could sprinkle on some Halloween-themed sprinkles, crushed Oreos, or mini chocolate chips for extra texture and fun.
- Chocolate Types: Swap out dark chocolate for milk chocolate, or use different colored candy melts for the ghosts! Green or orange ghosts would be super fun.
- Flavor Boost: Add a tiny drop of peppermint extract to your melted dark chocolate for a festive mint-chocolate twist.
Tips for Success
Want to make sure your “I Scream” Cookie Sandwiches are picture-perfect every time? Here are a few pointers:
- Melt Chocolate Carefully: Whether you’re using a microwave or a double boiler, melt your chocolates slowly and stir frequently to prevent burning. If microwaving, do it in short bursts (15-20 seconds) and stir between each.
- Work Quickly with Wet Chocolate: The key to those smooth ghost designs is applying the white chocolate while the dark chocolate base is still wet. This helps them meld together seamlessly.
- Piping Bag Hack: If you don’t have a piping bag, a small Ziploc bag with a tiny corner snipped off makes a fantastic substitute for drawing the ghost faces and details.
- Cookie Choice Matters: Choose cookies that are fairly sturdy and not too crumbly. This makes them easier to handle and ensures your sandwiches hold up well.
- Chill Time is Your Friend: Don’t rush the chilling process for the decorated cookies or the finished sandwiches. Proper chilling ensures everything sets beautifully and prevents a melty mess.
- Prep Ahead: You can decorate the ghost cookies a day or two in advance and store them in an airtight container at room temperature. Then, just assemble with ice cream when you’re ready to serve!
How to Store Chocolate “I Scream” Cookie Sandwiches
These delicious cookie sandwiches are best enjoyed fresh out of the freezer, but you can definitely store them for later!
Once assembled and thoroughly frozen, wrap each sandwich individually in plastic wrap or parchment paper. Then, place them in an airtight freezer-safe container. This helps prevent freezer burn and keeps them tasting great. They’ll stay good in the freezer for up to 2 weeks. Just grab one whenever that sweet craving strikes!
FAQs
Got questions? I’ve got answers!
Can I use homemade chocolate chip cookies?
Absolutely! If you’re feeling ambitious and want to bake from scratch, homemade cookies will make these even more special. Just make sure they’re completely cooled before you start decorating.
My chocolate is too thick to spread/pipe. What should I do?
If your melted chocolate is too thick, you can thin it out with a tiny bit of coconut oil or vegetable oil (about ½ teaspoon at a time). Stir it in well until you reach your desired consistency. Be careful not to add too much!
How long does it take for the chocolate to harden?
Typically, about 1 hour at room temperature or even faster if you pop them in the fridge for about 15-20 minutes. You want the chocolate to be completely firm to the touch so it doesn’t smudge.
Can I make these dairy-free or vegan?
Yes! Simply use your favorite dairy-free chocolate chip cookies, dairy-free melted chocolates, and a delicious non-dairy vanilla ice cream. The method remains exactly the same!
I hope you have the best time making (and devouring!) these fun Chocolate “I Scream” Cookie Sandwiches. They’re such a playful treat that truly brings smiles. Happy baking (or no-baking)!
For more delicious and fun recipe ideas, make sure to follow us on Pinterest!
Chocolate “I Scream” Cookie Sandwiches
Equipment
- Small piping bag (optional)
- spoon
- Toothpick (optional)
- baking sheet
- parchment paper
- Freezer-Safe Container
Ingredients
- 8 cookies large chocolate chip cookies store-bought or homemade; ensure they are flat on one side
- 3 tbsp melted dark chocolate
- 4 tsp melted white chocolate
- 0.5 cup vanilla ice cream
Instructions
- Step 1: Prep Your Ghostly Canvases: Grab 4 of your chocolate chip cookies. Take the flat side of each cookie and generously cover it with the melted dark chocolate. Gently tap the cookie on your counter a few times to spread the chocolate evenly and create a smooth surface.
- Step 2: Bring on the Ghosts! While the dark chocolate is still wet, use your melted white chocolate (from a small piping bag or spoon) to create a simple ghost shape on top of the dark chocolate on each of the 4 cookies. A gentle tap or two can help smooth out the shapes.
- Step 3: Give ‘Em Character: Using the remaining melted dark chocolate, carefully draw two little eyes and a classic screaming mouth on each white chocolate ghost. A toothpick or the tip of a small spoon works well here. A gentle tap or shake can help smooth out the details.
- Step 4: Let Them Set: Transfer your decorated cookies to a baking sheet lined with parchment paper. Let them chill out for about an hour, or until the chocolate is completely hard and dry to the touch. This step is crucial so your designs don’t smudge when you assemble the sandwiches.
- Step 5: Scoop ‘Em Up: While your ghost cookies are setting, take your remaining 4 chocolate chip cookies and scoop a generous dollop of vanilla ice cream onto the flat side of each. Don’t overload them, but ensure enough ice cream to create a delightful sandwich.
- Step 6: Assemble Your Masterpieces: Once your decorated cookies are firm, carefully place one on top of each ice cream-covered cookie. Gently press down to form your fantastic “I Scream” cookie sandwiches, being careful not to squish all the ice cream out.
- Step 7: Chill Out Before Serving: Transfer your finished cookie sandwiches to the freezer and let them freeze thoroughly. This usually takes at least an hour or two, ensuring the ice cream is solid and won’t melt everywhere when you take a bite.