
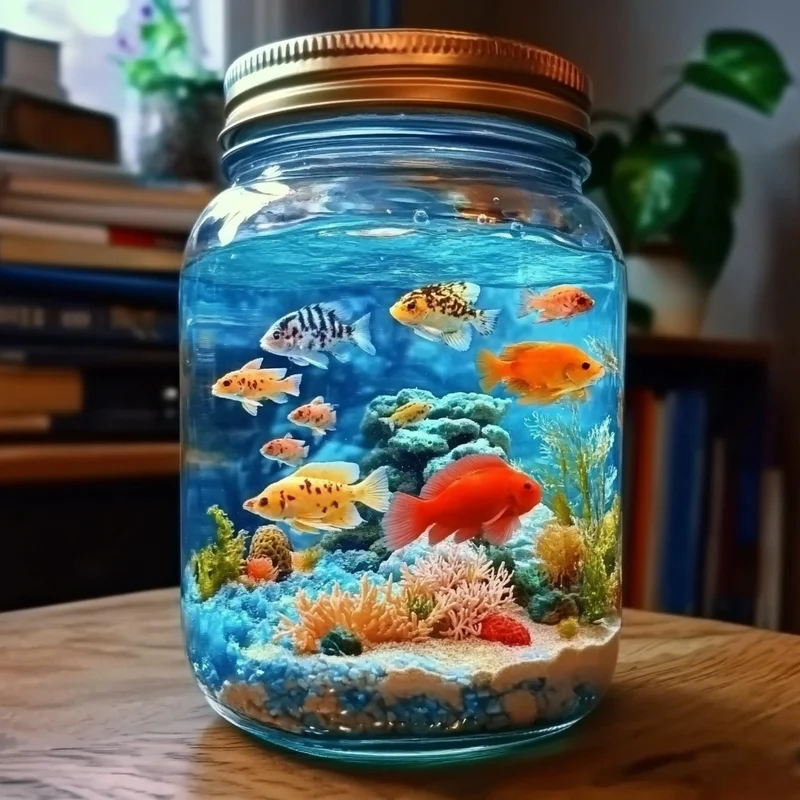
Oh, hey there! Do you ever get that longing for the beach, even when you’re miles away? That feeling of calm when you look at the ocean waves? Well, what if I told you you could capture a little piece of that magic right in your own home? This “Ocean in a Jar” craft is one of those projects that instantly transports you, bringing a smile to your face and a wave of nostalgia. It’s super simple, incredibly fun to make, and the result is just mesmerizing. Whether you’re looking for a rainy day activity with the kiddos, a cute desk accessory, or a thoughtful little handmade gift, this mini ocean wonderland in a jar is absolutely perfect. Trust me, watching the glitter swirl around feels like gazing into a tiny, sparkling sea!
Why You’ll Love Ocean in a Jar
- Fast: Seriously, you can whip one of these up in under 10 minutes. Perfect for instant gratification!
- Easy: No complicated steps or fancy tools required. If you can open a jar, you can make this!
- Giftable: Who wouldn’t love a little jar of ocean serenity? It’s a sweet, personal touch.
- Crowd-pleasing: Kids and adults alike are fascinated by the shimmering, swirling effect.
Ingredients
Okay, let’s gather our treasures for this mini ocean adventure! Most of these are easy to find at a craft store or even around your house.
- Mason Jars: Any size works, but smaller ones are perfect for little hands or desk decor. Make sure they have tight-fitting lids!
- Blue Food Coloring: This is what gives our ocean its beautiful hue. A little goes a long way!
- Filtered Water: Using filtered water helps keep everything clear and sparkling.
- Plastic Sea Figurines or Toy Fish: Time to find those little underwater friends! Think dolphins, turtles, fish, maybe even a tiny treasure chest.
- Aquarium Rocks: These create the seafloor base and help anchor your decorations. Small pebbles or craft stones work too.
- Plastic Plants: Add some vibrant greenery (or other colors!) to mimic seaweed or coral.
- Blue and White Glitter: This is the secret sauce for those shimmering waves! Use fine or chunky glitter, or a mix!
- Glycerin: Just a few drops of this magical stuff helps the glitter float and swirl slowly, giving it that lovely, wave-like movement. You can usually find this in the baking aisle or craft stores.
How to Make Ocean in a Jar
Ready to dive in? Let’s create your own little world!
Making your Ocean in a Jar is honestly as simple as pie… or maybe simpler! Just follow these easy steps, and you’ll have your own mini aquatic scene in no time.
1. Lay the Foundation: First, grab your clean mason jar. Carefully place a layer of aquarium rocks at the bottom. You want enough to cover the base and maybe add a little texture, but not so much that it takes up all your space.
2. Add Your Greenery: Next, tuck in your plastic plants. Arrange them however you like! Maybe a tall one in the back, some shorter ones around. Think about creating a natural-looking underwater garden.
3. Introduce Your Critters: Now for the fun part – adding your plastic sea creatures or toy fish! Nestle them amongst the plants and rocks. This is where your scene really comes to life! If you’re a fan of fun, colorful projects, maybe this reminds you of making Kool-Aid gummy treats – both are all about bringing playful ideas to life!
4. Pour the Water: Gently fill the jar with filtered water. Pour slowly so you don’t disturb your carefully placed scene too much. Leave about an inch of space at the very top – you need room for a little magic later! If you’re craving something refreshing after all this crafting, maybe whip up some homemade watermelon lemonade.
5. Add the Ocean Color: Now, add several drops of blue food coloring to the water. Start with a few drops, seal the jar (just finger-tight for now!), give it a gentle swirl, and see if you like the color. Add more drops until you get the shade of blue ocean you love! It’s kind of like choosing the perfect color for a fun drink like a homemade galaxy grape frappuccino – it’s all about getting that vibrant hue just right!
6. Sprinkle in the Sparkle: It’s glitter time! Sprinkle in your blue and white glitter. How much? That’s totally up to you! More glitter means a sparkling, snowy ocean scene, while less means a clearer view of your creatures. Have fun with it!
7. The Magic Glycerin: Add just a few drops of glycerin to the water. This ingredient is key to making your glitter float and drift slowly when you shake the jar, creating that beautiful, mesmerizing effect.
8. Seal It Tight: Finally, screw the lid onto the jar very tightly. You want to make sure it’s completely sealed to prevent any leaks when you shake it. Give the jar a gentle shake and watch your little ocean come alive!
Substitutions & Additions
Want to customize your mini ocean? Here are some fun ideas:
- Jars: Use old jam jars, sauce jars, or even plastic bottles (though glass looks best!).
- Base: Instead of rocks, you could use craft sand (though it might cloud the water a bit) or even glass gems.
- Decorations: Small plastic shells, tiny beads, or other waterproof miniatures can be added. Make sure everything is non-toxic and waterproof!
- Color: Want a different vibe? Use green for a murky swamp (maybe skip the sea creatures!), or even purple for a fantasy ocean.
- Glitter: Experiment with different colors and sizes of glitter, or even add a little iridescent confetti.
Tips for Success
Making this craft is pretty foolproof, but here are a couple of pointers to make sure yours is perfect:
- Seal it really well: This is the most important tip! You don’t want glittery blue water leaking everywhere. If you’re worried, you can even add a little hot glue around the inside rim of the lid before screwing it on (adult step!).
- Don’t overfill: Leaving that inch of space at the top allows the water and glitter to move and swirl properly when shaken.
- Test the color: Add food coloring gradually until you get the desired shade. You can always add more, but you can’t take it away!
- Cleanliness is key: Make sure your jar and all your additions are clean and dry before you start to prevent cloudy water.
How to Store Ocean in a Jar
Since this isn’t a food item, storing your Ocean in a Jar is super simple! Just keep it upright on a shelf, desk, or windowsill. Avoid direct, prolonged sunlight, as it might cause the food coloring to fade over time. As long as the lid is sealed tightly, this little craft will last indefinitely!
FAQs
Q: Is the Ocean in a Jar safe for kids?
A: Yes, once the jar is sealed tightly, it’s perfectly safe as a sensory or decorative item. However, it is not edible, and small parts inside could be a choking hazard if the jar were broken open. Adult supervision is always recommended during the creation process and for young children handling the sealed jar.
Q: What does the glycerin do?
A: Glycerin is a clear, syrupy liquid that is thicker than water. Adding a few drops increases the viscosity of the water slightly, which makes the glitter fall and swirl much slower, creating a beautiful, flowing effect rather than just sinking quickly.
Q: Can I use real sand or shells?
A: You can use real sand, but it often contains very fine particles that can make the water cloudy. Make sure any sand or shells are thoroughly washed and dried if you decide to use them. Real shells can sometimes be sharp or break easily inside the jar.
Q: How long does the glitter swirl for?
A: After shaking, the glitter will slowly settle over several minutes, thanks to the glycerin. Just give it another shake to restart the ocean magic!
For more fun crafts, delicious recipes, and creative ideas, be sure to follow us on Pinterest!
DIY Ocean in a Jar Craft
Equipment
- Mason Jars
Ingredients
- Mason Jars Any size, with tight-fitting lids
- Blue Food Coloring A little goes a long way
- Filtered Water
- Plastic Sea Figurines or Toy Fish
- Aquarium Rocks Small pebbles or craft stones work too
- Plastic Plants
- Blue and White Glitter Fine, chunky, or a mix
- Glycerin Few drops, helps glitter swirl
Instructions
- Step 1: Lay the Foundation: Grab your clean mason jar. Carefully place a layer of aquarium rocks at the bottom to cover the base and add texture.
- Step 2: Add Your Greenery: Tuck in your plastic plants, arranging them to create an underwater garden scene.
- Step 3: Introduce Your Critters: Nestle your plastic sea creatures or toy fish amongst the plants and rocks.
- Step 4: Pour the Water: Gently fill the jar with filtered water, leaving about an inch of space at the very top.
- Step 5: Add the Ocean Color: Add several drops of blue food coloring to the water. Seal the jar (finger-tight), swirl, and add more drops until you achieve the desired shade of blue.
- Step 6: Sprinkle in the Sparkle: Sprinkle in your blue and white glitter. The amount is up to you – more glitter creates a sparkling, snowy effect.
- Step 7: The Magic Glycerin: Add just a few drops of glycerin to the water to help the glitter float and drift slowly.
- Step 8: Seal It Tight: Screw the lid onto the jar very tightly to prevent leaks. Give the jar a gentle shake to watch your little ocean come alive!