
Oh, the holidays! There’s something truly magical about this time of year, isn’t there? The twinkling lights, the cozy sweaters, and, of course, all those delicious homemade treats! For me, Christmas isn’t complete without a batch of homemade fudge. It instantly transports me back to childhood memories, the scent of vanilla and chocolate filling the air as we waited impatiently for a taste.
But let’s be real, holiday baking can sometimes feel like a marathon. That’s why I absolutely adore this Swirled Christmas Fudge recipe. It’s unbelievably easy, comes together in a snap, and looks like you spent hours crafting a culinary masterpiece. You’ll be amazed at how quickly you can whip up this festive treat, making it perfect for last-minute gifts or a delightful addition to your holiday dessert platter. It’s also a fantastic edible gift, much like my delightful M&M Christmas Cookies, which always disappear fast at parties!
Why You’ll Love Christmas Fudge
- Fast: Ready in minutes (plus chill time!).
- Easy: No candy thermometer or complicated steps required.
- Giftable: Makes a beautiful, thoughtful homemade present.
- Crowd-pleasing: Everyone loves a good piece of fudge, especially when it looks this festive!
Ingredients
- 22 oz (2 11-oz. bags) white chocolate chips: These are the star of our show, melting down to create that rich, smooth fudge base. Don’t skimp on quality here if you can help it!
- 14 ounce can sweetened condensed milk: This is our secret weapon for that perfectly creamy, decadent texture that makes fudge so irresistible.
- 4 tablespoons unsalted butter, cold and cut into small cubes: Adding cold butter helps it melt evenly and contributes to the fudge’s silky consistency.
- ¼-½ teaspoon red gel food coloring: Gel food coloring gives you vibrant color without adding too much liquid to your fudge. Start with ¼ teaspoon and add more if you want a deeper red.
- ¼-½ teaspoon green gel food coloring: Same as the red – gel is key for that bright, festive green.
How to Make Christmas Fudge
Ready to create some holiday magic? Let’s get started!
- First things first, grab an 8×8 straight-sided baking pan. Line it with parchment paper, making sure you leave enough paper hanging over the sides. This little trick is going to make lifting your set fudge out of the pan an absolute breeze!
- Next, take a medium saucepan and place it over medium-low heat. Toss in your white chocolate chips, the entire can of sweetened condensed milk, and those cold cubes of unsalted butter. Now, here’s where your arm strength comes in: stir constantly for about 4-6 minutes. You’re looking for all those chips to melt down and the mixture to become beautifully smooth and glossy. As soon as it’s smooth, take that saucepan right off the heat.
- Now for the fun part: the colors! Carefully spoon about one-third of your melted white chocolate mixture into a small bowl. Add ¼ to ½ teaspoon of red gel food coloring. Stir it gently but thoroughly until the color is fully combined and there are no white streaks left. It should be a uniform, festive red!
- Repeat the process with another one-third of the melted white chocolate mixture in a second small bowl. This time, add ¼ to ½ teaspoon of green gel food coloring, stirring until it’s perfectly incorporated and that vibrant green shines through.
- Now, back to your prepared baking pan! Take dollops of the plain white fudge, then the red, then the green, and drop them randomly into the pan until all your fudge mixtures have been added. Don’t worry too much about perfection here; the randomness makes the swirl unique.
- Grab a wooden skewer or even a butter knife. Gently swirl the white, red, and green fudge together. You’re not mixing it all up into one color, but rather creating beautiful, decorative swirls on top. Think delicate movements, not vigorous stirring!
- Once you’re happy with your festive swirl pattern, grab a small piece of clean parchment paper. Gently press down on the top of the fudge while it’s still soft. This will give it a nice, smooth top surface without messing up your pretty swirls.
- Finally, pop that pan into the refrigerator. Let it chill there for 2-3 hours, or until it’s completely set and firm. Patience is a virtue, especially when delicious fudge is involved!
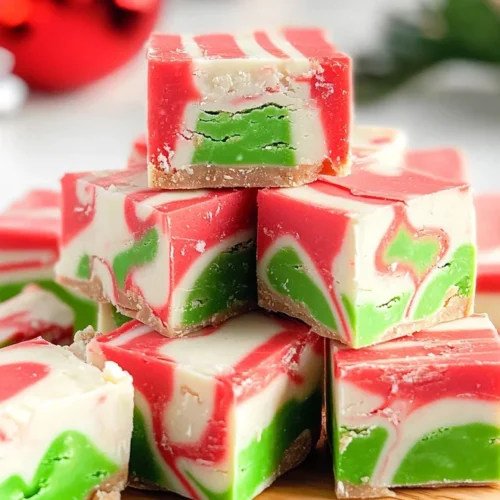
- Once it’s perfectly set, take the fudge out of the fridge. Use those parchment paper overhangs to gently lift the entire block of fudge out of the pan and onto a cutting board. Now, for the grand finale: slice it into 64 1×1 inch pieces. Serve immediately and watch them disappear!
Substitutions & Additions
One of the best things about fudge is how versatile it is! Here are a few ideas to customize your Christmas Fudge:
- Chocolate Choices: While white chocolate is classic here, you can easily swap one of the white chocolate bags for milk chocolate or semi-sweet chocolate chips for a different flavor profile. Just note that the colors might not be as vibrant against a darker base.
- Flavor Boosts: Add ½ teaspoon of peppermint extract for a minty twist, or a teaspoon of vanilla bean paste for an extra rich vanilla flavor. If you’re looking to explore more easy fudge recipes, you might enjoy my easy 3-ingredient lemon fudge for a zesty alternative!
- Festive Toppings: Before the fudge sets, sprinkle crushed candy canes, holiday sprinkles, chopped nuts (like pecans or walnuts), or even mini marshmallows on top for extra texture and visual appeal.
- Different Holidays: This recipe isn’t just for Christmas! Change the food coloring to orange and black for Halloween, pastels for Easter, or red, white, and blue for the Fourth of July.
Tips for Success
- Use Good Quality Ingredients: Since there are so few ingredients, the quality really shines through. Use your favorite brand of white chocolate chips and good butter.
- Don’t Overheat: Keep that heat on medium-low and stir constantly. Overheating can cause the chocolate to seize or become grainy.
- Parchment Paper is Your Best Friend: Seriously, don’t skip it! It makes cleanup and removal incredibly simple.
- Gel Food Coloring is Key: Unlike liquid food coloring, gel won’t thin out your fudge mixture, ensuring vibrant colors and the right consistency.
- Gentle Swirling: For the prettiest marble effect, swirl gently. Over-swirling will blend the colors too much, making them muddy.
- Chill Time is Crucial: Don’t rush the chilling process. The fudge needs to be completely firm before cutting for clean, neat squares.
How to Store Christmas Fudge
Once your beautiful Christmas Fudge is made, you’ll want to store it properly to keep it fresh and delicious!
- Airtight Container: Always store your fudge in an airtight container to prevent it from drying out.
- Room Temperature: If your home is cool (below 70°F), you can store the fudge at room temperature for up to 1 week.
- Refrigerator: For longer storage or if your kitchen is warm, keep the fudge in the refrigerator for up to 2-3 weeks. Just let it sit out for a few minutes before serving to soften slightly.
- Freezing: Yes, you can freeze fudge! Wrap individual pieces tightly in plastic wrap, then place them in a freezer-safe bag or container. It will keep for up to 3 months. Thaw in the refrigerator overnight or at room temperature for a few hours.
FAQs
Can I use regular liquid food coloring instead of gel?
While you can use liquid food coloring, I highly recommend gel food coloring. Liquid coloring adds more moisture, which can affect the fudge’s texture, and you might not achieve the same vibrant colors.
Can I make this Christmas Fudge ahead of time?
Absolutely! This fudge is a fantastic make-ahead treat. You can prepare it up to two weeks in advance and store it in the refrigerator. It’s perfect for getting a jump start on your holiday baking!
My fudge isn’t setting. What went wrong?
Usually, if fudge isn’t setting, it needs more chilling time. Ensure it’s in the coldest part of your fridge for at least 2-3 hours, or even longer if your ingredients weren’t fully integrated or if your kitchen was very warm when you made it.
Can I double the recipe?
Yes, you can easily double this recipe! Just be sure to use a larger pan (like a 9×13 inch baking pan) and give it adequate time to chill and set.
For more delicious recipes and kitchen inspiration, be sure to follow us on Pinterest!
The Easiest Christmas Fudge You'll Ever Make: A Swirled Holiday Delight!
Equipment
- 8x8 straight-sided baking pan
- parchment paper
- Medium saucepan
- Small bowls 2
- Wooden skewer or butter knife
Ingredients
- 22 oz white chocolate chips 2 11-oz. bags
- 14 ounce sweetened condensed milk can
- 4 tablespoons unsalted butter cold and cut into small cubes
- ¼-½ teaspoon red gel food coloring
- ¼-½ teaspoon green gel food coloring
Instructions
- Step 1: First things first, grab an 8x8 straight-sided baking pan. Line it with parchment paper, making sure you leave enough paper hanging over the sides. This little trick is going to make lifting your set fudge out of the pan an absolute breeze!
- Step 2: Next, take a medium saucepan and place it over medium-low heat. Toss in your white chocolate chips, the entire can of sweetened condensed milk, and those cold cubes of unsalted butter. Now, here's where your arm strength comes in: stir constantly for about 4-6 minutes. You're looking for all those chips to melt down and the mixture to become beautifully smooth and glossy. As soon as it's smooth, take that saucepan right off the heat.
- Step 3: Now for the fun part: the colors! Carefully spoon about one-third of your melted white chocolate mixture into a small bowl. Add ¼ to ½ teaspoon of red gel food coloring. Stir it gently but thoroughly until the color is fully combined and there are no white streaks left. It should be a uniform, festive red!
- Step 4: Repeat the process with another one-third of the melted white chocolate mixture in a second small bowl. This time, add ¼ to ½ teaspoon of green gel food coloring, stirring until it's perfectly incorporated and that vibrant green shines through.
- Step 5: Now, back to your prepared baking pan! Take dollops of the plain white fudge, then the red, then the green, and drop them randomly into the pan until all your fudge mixtures have been added. Don't worry too much about perfection here; the randomness makes the swirl unique.
- Step 6: Grab a wooden skewer or even a butter knife. Gently swirl the white, red, and green fudge together. You're not mixing it all up into one color, but rather creating beautiful, decorative swirls on top. Think delicate movements, not vigorous stirring!
- Step 7: Once you're happy with your festive swirl pattern, grab a small piece of clean parchment paper. Gently press down on the top of the fudge while it's still soft. This will give it a nice, smooth top surface without messing up your pretty swirls.
- Step 8: Finally, pop that pan into the refrigerator. Let it chill there for 2-3 hours, or until it's completely set and firm. Patience is a virtue, especially when delicious fudge is involved!
- Step 9: Once it's perfectly set, take the fudge out of the fridge. Use those parchment paper overhangs to gently lift the entire block of fudge out of the pan and onto a cutting board. Now, for the grand finale: slice it into 64 1x1 inch pieces. Serve immediately and watch them disappear!