
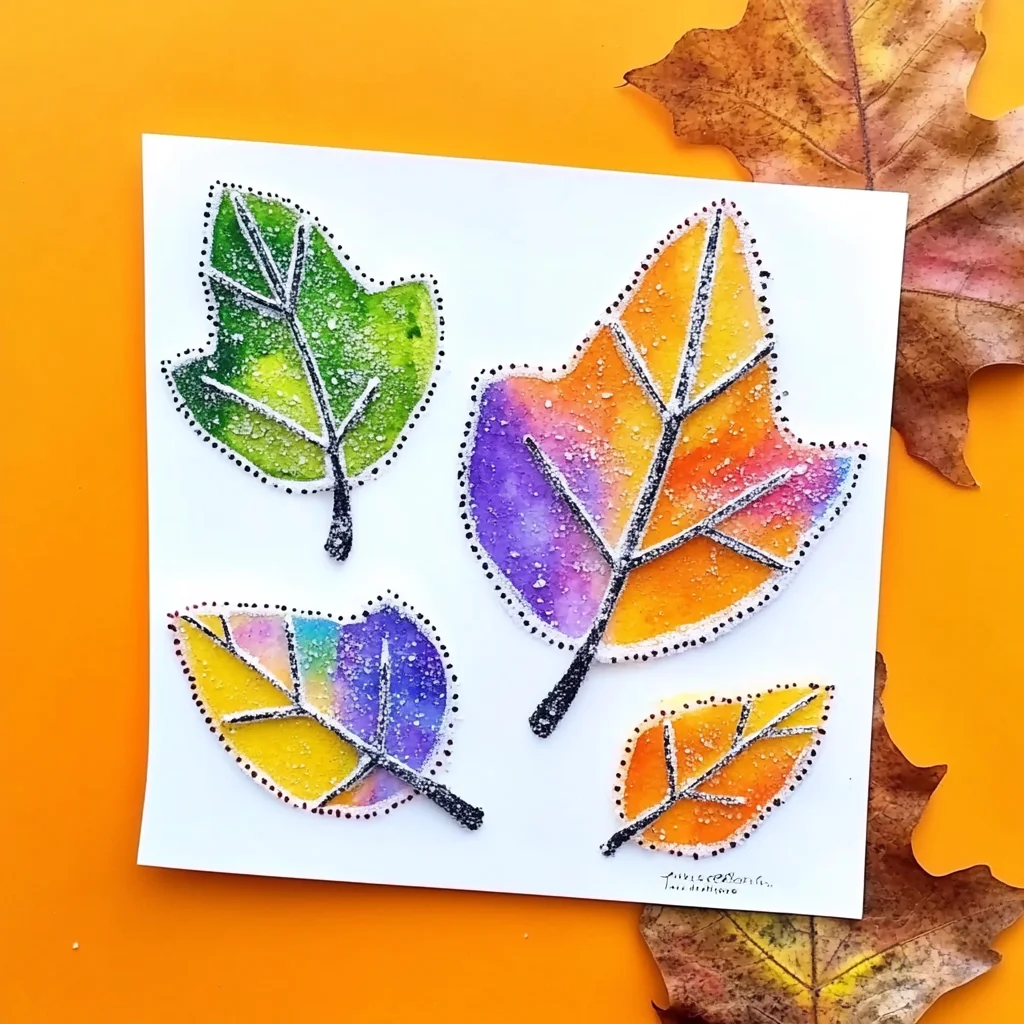
Have you ever found yourself wandering through a sunlit forest or a vibrant park, marveling at the beauty of nature? The leaves, with their intricate shapes and hues, hold a special kind of magic. Today, I want to share a delightful DIY project that captures this essence beautifully: Salt Painted Leaves. This project is not just about creating art; it’s about connecting with nature, exploring your creativity, and enjoying a relaxing crafting session. Imagine the satisfaction of seeing your unique, colorful creations come to life, all while breathing in the fresh air and feeling the textures of the leaves between your fingers.
Why You’ll Love How To Make Salt Painted Leaves
- Beginner-friendly
- Budget-friendly
- Creative and fun
- Great for kids and families
- Perfect for gifts or decorations
- Customizable
The Heart Behind This DIY
Crafting is a beautiful way to express ourselves and unwind. Making Salt Painted Leaves allows you to engage with the natural world while nurturing your creativity. As you mix the salt and water, you can feel the grainy texture in your hands, and when you paint the leaves, you can watch the colors dance and blend together. This project encourages mindfulness, inviting you to focus on each step and appreciate the simple beauty of your surroundings. Plus, it’s a wonderful way to connect with family and friends, sharing laughs and creativity along the way.
A Gentle Look at the Process
The process of making Salt Painted Leaves is as refreshing as a gentle breeze. You will start by collecting fresh leaves, which brings a sense of adventure as you explore your garden or a nearby park. Then, you will create a salt paste, applying it to the leaves with a paintbrush. The joy comes in watching the colors spread across the salt-coated surface, transforming each leaf into a unique piece of art. With each brushstroke, you’ll feel the meditative rhythm of creativity flowing through you.
Materials You’ll Need
- Fresh leaves (various shapes and sizes) – These serve as your canvas, each one offering a different texture and form.
- Salt – This is the magical ingredient that creates a beautiful, textured surface for your paint.
- Water – You’ll mix this with salt to form a paste.
- Food coloring or liquid watercolors – These vibrant colors will bring your leaves to life.
- Paintbrush – A medium-sized brush works best for applying the salt paste and paint.
- Bowl – To mix your salt and water.
- Paper or canvas for painting – This is where your leaves will reveal their stunning designs.
Step-by-Step Directions
Step 1
In a bowl, mix together equal parts salt and water to create a thick paste. The texture should be similar to a creamy frosting. This is where the fun begins, as the salty scent fills the air, reminding you of the ocean!
Step 2
Using your paintbrush, apply the salt paste generously onto the surface of the fresh leaves. Ensure an even coating, and don’t be afraid to get a little messy! The salt will cling to the leaves, creating a fascinating texture that will be exciting to paint later.
Step 3
Allow the salt-coated leaves to dry completely. You can set them aside and enjoy a cup of tea or coffee while you wait, soaking in the anticipation of your colorful creations.
Step 4
Once the leaves are dry, use your paintbrush to apply food coloring or liquid watercolors onto the leaves. Allow the colors to blend and spread, creating beautiful patterns. You might find yourself lost in the moment, marveling at how the colors dance together.
Step 5
Let the painted leaves dry completely. As they dry, you will notice the vibrant colors becoming more pronounced, and the textures of the salt will create a stunning contrast.
Step 6
Finally, once everything is dry, carefully remove the leaves from the paper or canvas to reveal the salt-painted design. This reveal is pure joy, showcasing your unique artwork that you created with your own hands!
Creative Ways to Use How To Make Salt Painted Leaves
Now that you’ve created your beautiful Salt Painted Leaves, you may be wondering how to use them. They can be displayed as colorful wall art, turned into unique greeting cards, or even used as bookmarks. Imagine gifting a friend a card adorned with your stunning leaves or decorating your home with nature-inspired art. The possibilities are endless and can spark even more creative ideas!
How to Store, Preserve, or Reuse How To Make Salt Painted Leaves
To preserve your Salt Painted Leaves, store them in a cool, dry place away from direct sunlight. You can also frame them in glass to protect them while showcasing their beauty. If you want to reuse them, consider painting over them with new colors or using them as stencils for other projects.
Creative Variations and Customizations
- Color variations – Experiment with different shades of food coloring or watercolors.
- Theme ideas – Create seasonal designs, like autumn leaves or spring blooms.
- Seasonal adaptations – Use leaves from different seasons to showcase a variety of colors.
- Kid-friendly modifications – Let children use their favorite colors and get creative with patterns.
- Advanced creative upgrades – Try layering colors or adding glitter for extra sparkle!
Tips for Success
- Common mistakes to avoid – Ensure the salt paste is thick enough; if it’s too runny, it won’t stick to the leaves.
- Safety tips if applicable – Always supervise children, especially when using paints.
- Preparation suggestions – Gather all materials before starting to keep the process smooth.
- Cleanup recommendations – Keep wet wipes or paper towels handy for easy cleanup.
- Expert crafting tips – Have fun with it! There’s no right or wrong way to create your art.
FAQs About How To Make Salt Painted Leaves
Can beginners make this?
Absolutely! This project is perfect for beginners and requires minimal materials.
Can children participate?
Yes! Kids will love the hands-on aspect and the colorful results.
How long does it last?
If stored properly, your salt-painted leaves can last for several months, making them wonderful keepsakes.
Can I customize it?
Definitely! Feel free to explore different colors and patterns to make it your own.
A Final Creative Note
As you embark on your Salt Painted Leaves journey, remember that the most important part is to enjoy the process. Crafting is not just about the end result; it’s about the creativity, the memories made, and the joy of making something with your hands. So gather your materials, invite a friend or family member, and let your creativity flow! For more delicious recipes, check out the delightful Blueberry Lemon Ricotta Pancakes or the fun Kool-Aid Gummy Treats for treats you will love!
If you’re looking for more DIY inspiration, be sure to follow us on Pinterest!
Salt Painted Leaves
Equipment
- Small Dish or Tray
- Paintbrush or Dropper
- Paper towels
Ingredients
For the Salt Painted Leaves
- fresh leaves variety of shapes and sizes
- 1 tbsp table salt or another fine-grain salt
- 1-2 tbsp water adjust as needed to create a thick paste
- liquid food coloring or watercolor paints use one or more colors
- paper towels for drying
Instructions
- Step 1: Collect fresh leaves, table salt, water, liquid food coloring or watercolor paints, a small dish, a paintbrush or dropper, and paper towels. Choose leaves with interesting shapes and natural vein patterns.
- Step 2: Mix 1 tablespoon of salt with 1 to 2 tablespoons of water in a small dish until a thick paste forms. Adjust the water as needed so the mixture is spreadable but not runny.
- Step 3: Place a fresh leaf on your work surface and gently coat one side with the salt paste. Apply enough to create a visible layer while allowing some of the natural leaf texture to remain visible.
- Step 4: Use a paintbrush or dropper to apply liquid food coloring or watercolor paint to the salted surface. Watch as the colors spread through the salt and follow the natural texture of the leaf.
- Step 5: Carefully place the painted leaves flat on a paper towel or tray and allow them to dry completely. Drying may take several hours. A fan or warm, dry area can help speed up the process.
- Step 6: Once completely dry, display your salt painted leaves as artwork, use them in handmade crafts, or give them as thoughtful handmade gifts.
