
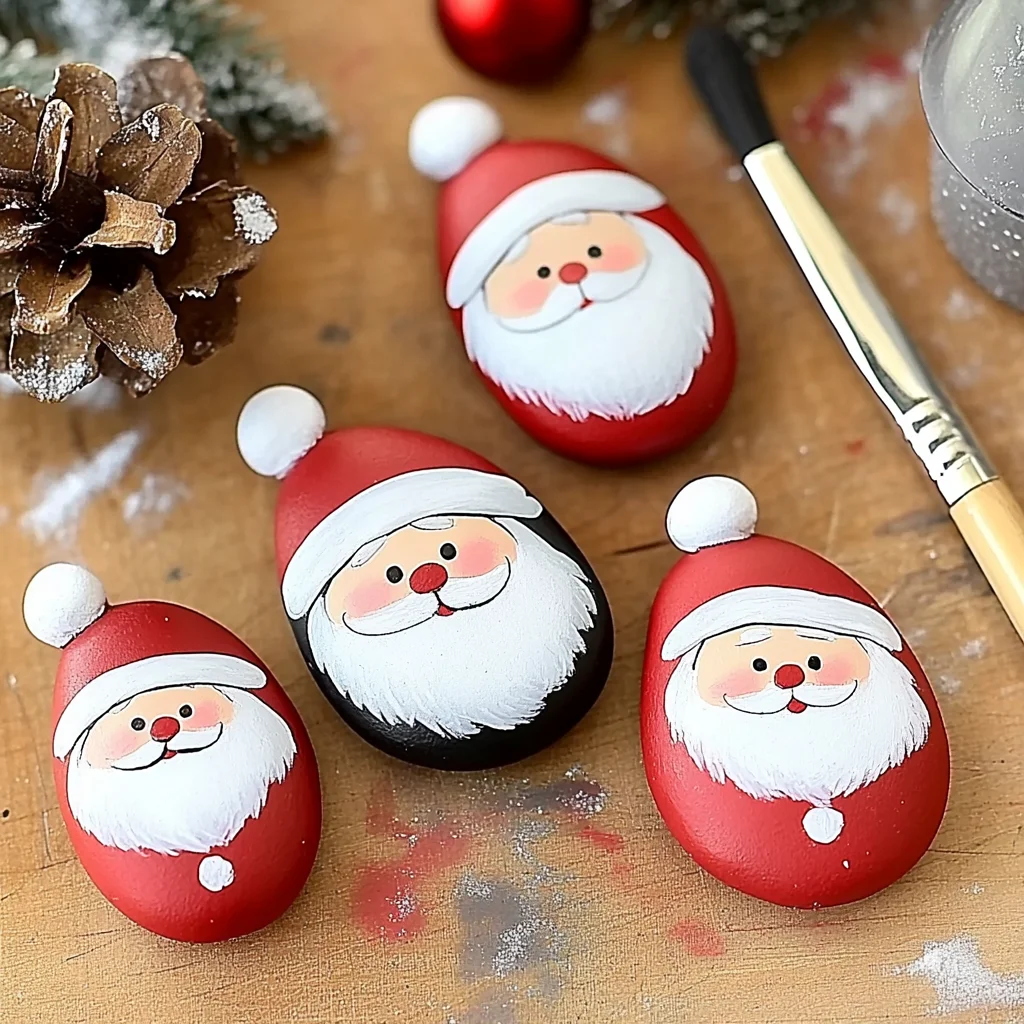
As the holiday season approaches, the air fills with warmth and joy, and what better way to celebrate than by diving into a delightful DIY project? Imagine gathering around your kitchen table with loved ones, paintbrushes in hand, creating whimsical Santa rocks that will bring smiles to faces young and old. This project isn’t just about crafting; it’s about making memories, sharing laughter, and embracing the spirit of the season. Picture the finished creation – a charming Santa rock that captures the essence of joy, brightening up your home or making a perfect gift for a friend. Let’s embark on this creative journey together!
Why You’ll Love Santa Rock Painting
- Beginner-friendly
- Budget-friendly
- Creative and fun
- Great for kids and families
- Perfect for gifts or decorations
- Customizable
The Heart Behind This DIY
Santa rock painting is more than just a fun activity; it’s a creative outlet that allows you to express yourself while connecting with family and friends. The simple act of painting can be incredibly soothing, encouraging mindfulness as you focus on each stroke and color choice. Crafting fosters creativity and boosts confidence, providing a sense of accomplishment as you bring your vision to life. Plus, the sensory experience of mixing vibrant paints and feeling the smooth rocks under your fingertips makes for a truly magical moment. It’s a chance to step away from the hustle and bustle and create something beautiful together.
A Gentle Look at the Process
You can look forward to a delightful experience as we transform ordinary rocks into festive holiday decor. We’ll begin by selecting smooth, clean rocks that feel just right in your hands. Then, we’ll layer on white paint, setting the stage for Santa’s iconic look. With each stroke of red, black, and white, you’ll see your Santa come to life. The joy of watching your creation evolve is nothing short of enchanting, and I can’t wait for you to experience it!
Materials You’ll Need
- Smooth, clean rocks – these will be your canvas for creativity.
- Acrylic paints (red, white, black, and orange) – the colors that will bring Santa to life.
- Paintbrushes (various sizes) – for applying different details.
- Palette or paper plate for mixing paints – to keep your workspace organized.
- Water container for rinsing brushes – to keep your brushes clean and ready.
- Paper towels or cloth for drying brushes – a handy tool for quick clean-up.
- Sealer (optional, for finishing) – to protect your artwork for years to come.
Step-by-Step Directions
Step 1
Start by choosing smooth, clean rocks that will serve as your canvas. Hold them in your hands and feel the texture; this will be your foundation for creativity.
Step 2
Using a paintbrush, apply a base coat of white paint to the rock. This will give you a lovely background for Santa’s face and hat. Allow it to dry completely before moving on to the next step.
Step 3
Once the white base is dry, it’s time to paint Santa’s hat! Grab your red paint and cover the upper portion of the rock, making sure to leave space for Santa’s face below. Let the red paint dry completely.
Step 4
Now, let’s bring Santa’s face to life! Use black paint to create his eyes, and apply orange paint for his adorable nose. As you paint, imagine Santa’s cheerful expression lighting up the room.
Step 5
Next, use white paint to add Santa’s fluffy beard and the pom-pom on his hat. The contrast of the white against the red and black will make your Santa truly pop.
Step 6
Allow the paint to dry completely before handling your rock. This is a great time to clean your brushes and tidy up your workspace!
Step 7
If you want to ensure your Santa rock lasts for years to come, consider applying a clear sealer. This will protect your artwork and enhance its durability.
Step 8
Finally, find a special spot to display your Santa rock or gift it to someone who would love a little holiday cheer. The joy of giving handmade gifts is truly magical!
Creative Ways to Use Santa Rock Painting
Once your Santa rock is complete, the possibilities are endless! You can display it on your mantel, use it as a festive table centerpiece, or even hide it in your garden for a whimsical touch. These rocks also make wonderful gifts for friends and family, bringing a personal, heartfelt touch to your holiday exchanges. If you have kids, they can turn this into a fun treasure hunt, hiding the painted rocks around your home or yard for others to find. The joy of seeing someone discover your creation is just delightful!
How to Store, Preserve, or Reuse Santa Rock Painting
To keep your Santa rock looking its best, store it in a cool, dry place away from direct sunlight. If you choose to use a sealer, it will help protect the paint from fading and chipping. If you ever want to refresh your design, simply paint over it with a new layer of acrylic paint, and let your creativity flow again!
Creative Variations and Customizations
- Color variations – try different colors for Santa’s hat and face.
- Theme ideas – create a whole family of holiday characters using the same technique.
- Seasonal adaptations – adapt the design for other holidays like Easter or Halloween.
- Kid-friendly modifications – let kids add their own fun features like glasses or a silly smile.
- Advanced creative upgrades – add glitter, sequins, or other embellishments for extra flair.
Tips for Success
- Common mistakes to avoid – make sure your base coat is dry before adding new colors to prevent smudging.
- Safety tips if applicable – use non-toxic paints and supervise young children during the project.
- Preparation suggestions – cover your workspace with newspaper or a plastic tablecloth for easy cleanup.
- Cleanup recommendations – wash brushes immediately after use to prolong their life.
- Expert crafting tips – don’t rush! Enjoy the process and take your time with each step.
FAQs About Santa Rock Painting
Can beginners make this?
Absolutely! This project is perfect for beginners and requires no special skills. Just have fun with it!
Can children participate?
Yes! This is a fantastic project for kids, with adult supervision to help with the paint and sealing steps.
How long does it last?
With a protective sealer, your Santa rock can last for years, bringing holiday cheer each season!
Can I customize it?
Definitely! Feel free to use different colors or add your own personal touches to make it unique.
A Final Creative Note
As we wrap up this joyful crafting session, I hope you feel inspired to create your own Santa rock and share the magic of the season with those around you. Remember, crafting is not just about the finished product; it’s about the creativity, the connections, and the memories you make along the way. For more delightful recipes, check out the blueberry cheesecake swirl rolls or apricot sugar cookie hand pies for treats you will love! Happy crafting, and may your holiday season be filled with joy and creativity!
Don’t forget to follow Pinterest for more DIY inspiration!
Get Creative with Santa Rock Painting: A Fun Holiday DIY Project
Equipment
- Paintbrushes
- Palette or Paper Plate
- Water Container
- Paper Towels or Cloth
- Sealer
Ingredients
Materials You'll Need
- smooth, clean rocks
- acrylic paints (red, white, black, and orange)
- paintbrushes (various sizes)
- palette or paper plate for mixing paints
- water container for rinsing brushes
- paper towels or cloth for drying brushes
- sealer (optional, for finishing)
Instructions
- Step 1: Start by choosing smooth, clean rocks that will serve as your canvas. Hold them in your hands and feel the texture; this will be your foundation for creativity.
- Step 2: Using a paintbrush, apply a base coat of white paint to the rock. This will give you a lovely background for Santa's face and hat. Allow it to dry completely before moving on to the next step.
- Step 3: Once the white base is dry, it’s time to paint Santa's hat! Grab your red paint and cover the upper portion of the rock, making sure to leave space for Santa’s face below. Let the red paint dry completely.
- Step 4: Now, let’s bring Santa’s face to life! Use black paint to create his eyes, and apply orange paint for his adorable nose. As you paint, imagine Santa’s cheerful expression lighting up the room.
- Step 5: Next, use white paint to add Santa’s fluffy beard and the pom-pom on his hat. The contrast of the white against the red and black will make your Santa truly pop.
- Step 6: Allow the paint to dry completely before handling your rock. This is a great time to clean your brushes and tidy up your workspace!
- Step 7: If you want to ensure your Santa rock lasts for years to come, consider applying a clear sealer. This will protect your artwork and enhance its durability.
- Step 8: Finally, find a special spot to display your Santa rock or gift it to someone who would love a little holiday cheer. The joy of giving handmade gifts is truly magical!
