
Remember those magical moments in the kitchen when you were little, maybe helping a grandparent or a parent bake something special? The scent of sugar and butter filling the air, the quiet hum of anticipation… that’s the feeling I get every time I make these adorable Owl Cookies. They’re not just cookies; they’re little edible works of art that bring a smile to everyone’s face. And the best part? They’re surprisingly easy and quick to whip up, making them perfect for last-minute baking emergencies or just a fun afternoon project with the kids. Get ready to create some hoot-worthy treats!
Why You’ll Love Owl Cookies
- Fast: You can have these delightful cookies ready to bake in no time!
- Easy: Simple steps mean even beginner bakers can succeed.
- Giftable: Package them up, and they make the most charming homemade gifts.
- Crowd-pleasing: Who can resist a cute owl cookie? They’re a guaranteed hit at parties and bake sales.
Ingredients
Here’s what you’ll need to bring these little owls to life:
- 1 ¼ cups candy-coated milk chocolate pieces (these will be our adorable eyes!)
- 2 tablespoons milk (just a splash to help melt our chocolate)
- 24 ounces dry sugar cookie mix (the base for our sweet dough)
- 1 cup cashew halves (perfect for little beaks!)
How to Make Owl Cookies
Let’s get our hands a little messy and create some magic!
-
Melt the Chocolate for the Eyes
Grab a small saucepan and combine 3/4 cup of your candy-coated milk chocolate pieces with the milk. Gently melt them over low heat, stirring constantly until you have a smooth, luscious chocolate mixture. Once it’s all smooth and melty, take it off the heat.
-
Prepare the Cookie Dough
Now, prepare your dry sugar cookie mix according to the package instructions. It’s usually as simple as adding butter and an egg. Once your dough is ready, stir that lovely melted chocolate mixture into about half of the prepared dough. You’ll have one plain dough and one chocolate-infused dough!
-
Form the Chocolate Rolls
Take the chocolate-infused dough and divide it into two equal portions. Roll each portion into a log that’s about 12 inches long and roughly 1 inch in diameter. Think of these as the bodies of our owls. Wrap each log tightly in wax paper or foil and pop them into the fridge to chill until they’re firm, which usually takes about 2 hours. This chilling step is super important for easy handling later!
-
Prepare the Plain Dough
While the chocolate logs are chilling, let’s work on the plain dough. Divide the remaining plain dough in half. On a surface lightly dusted with flour, roll out each half into a rectangle that measures about 12 x 6 inches. These will be the outer layers of our owl cookies.
-
Assemble the Owl Rolls
Now for the fun part! Take one of your chilled chocolate logs and lay it along the long edge of one of the plain dough rectangles. Gently roll the plain dough up and around the chocolate log, making sure to press the dough together so the plain dough completely encases the chocolate roll. It’s like giving the chocolate a cozy blanket! Repeat this process with the other plain dough rectangle and the remaining chocolate log.
-
Chill Again
Once your owl-shaped rolls are assembled, wrap them up again in wax paper or foil. Pop them back into the refrigerator for another 2 hours, or until they are nice and firm. This second chill will make slicing them a breeze.
-
Preheat Your Oven
Time to get the oven ready! Preheat it to 375°F (190°C). Make sure your oven rack is in the center position.
-
Slice the Rolls
Carefully unwrap your chilled owl rolls. Using a sharp knife, cut each roll into 1/4-inch thick slices. These are going to be the base of our owl faces!
-
Arrange on Baking Sheets
Lightly grease your baking sheets. Place two of the cookie slices onto each baking sheet so that their cut edges are touching. They’ll look like two little chocolatey circles ready to become owl faces.
-
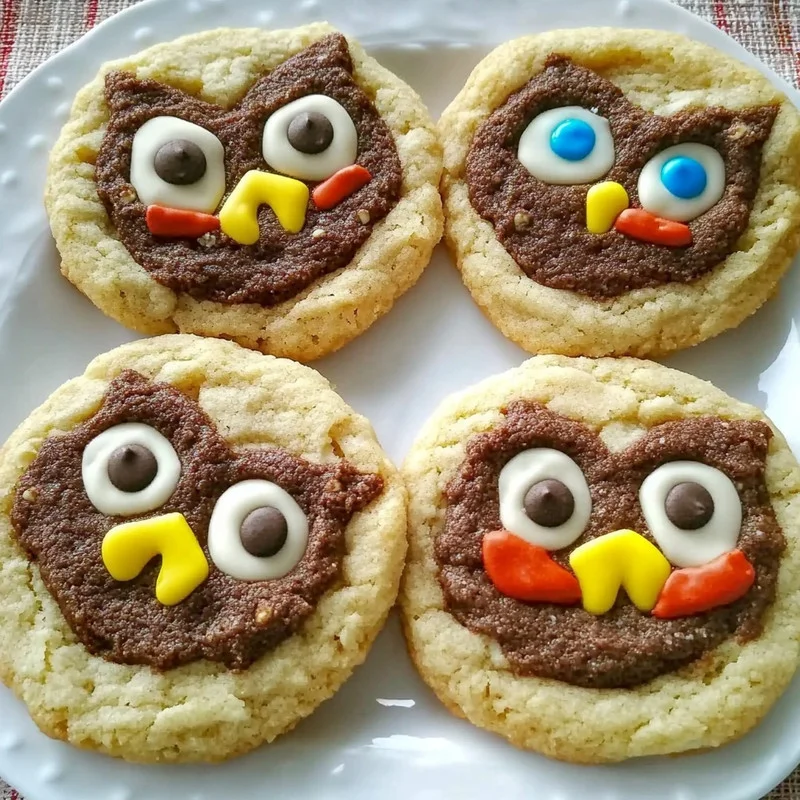
Add the Eyes
In the very center of where the two chocolate slices meet, place one of the remaining candy-coated milk chocolate pieces. These are going to be the adorable, wide eyes of your owls! I like to use candies that are a different color than the cookie dough for a nice contrast.
-
Place the Beak
Now, look at where the two cookie slices are touching in the middle, just below the eyes. Gently press a cashew half into this spot to create a perfect little beak. Isn’t that clever?
-
Bake to Perfection
Bake the cookies in your preheated oven for 8 to 10 minutes. You’re looking for the plain cookie portion to be lightly golden brown. Keep an eye on them, as ovens can vary!
-
Cool and Enjoy!
Let the cookies cool on the baking sheets for about 2 to 3 minutes. This helps them set up a bit. Then, carefully transfer them to wire racks to cool completely. And there you have it – a batch of irresistibly cute Owl Cookies!
Substitutions & Additions
Feel free to get creative with your owl cookies! Here are a few ideas:
- Different Nuts: If cashews aren’t your favorite, try slivered almonds for a pointier beak, or even small pretzel pieces for a salty crunch.
- Chocolate Variety: Instead of milk chocolate candy pieces, you could use dark chocolate or even white chocolate. For the dough, you could also try adding a touch of espresso powder to the chocolate dough for a mocha flavor, or perhaps some cinnamon. If you’re a fan of fruity flavors, a little bit of lemon zest could add a bright note, similar to what you’d find in my blueberry lemon ricotta pancakes.
- Decorations: Once cooled, you could pipe on tiny black dots with edible marker or black frosting for pupils to make the eyes even more expressive.
- Fun Shapes: While these are owl cookies, the double roll technique could be adapted for other fun shapes too! Think about log rolls or even small jelly rolls.
Tips for Success
A few little tricks can make your baking journey even smoother:
- Don’t Overwork the Dough: When combining the chocolate into the dough, mix just until incorporated. Overmixing can make cookies tough.
- Chill, Chill, Chill: The chilling steps are crucial! They firm up the dough, making it easier to roll and slice without the cookies spreading too much or losing their shape. If your dough gets too soft while you’re working with it, pop it back in the fridge for a bit.
- Even Slices: Try to get your slices as even as possible for consistent baking. A serrated knife can sometimes help with cleaner cuts on chilled dough.
- Prep Ahead: You can make the chocolate logs and the plain dough logs up to a day in advance and keep them wrapped in the refrigerator. Just bring them to room temperature slightly before rolling them together.
- Oven Temperature: Make sure your oven is fully preheated. This helps ensure the cookies bake evenly and don’t spread too much.
How to Store Owl Cookies
Once your adorable owl cookies have completely cooled, you can store them in an airtight container at room temperature. They should stay fresh and delicious for about 3-5 days. If you’re lucky enough to have any left!
FAQs
Here are some common questions about these fun cookies:
Can I use a different type of chocolate for the eyes?
Absolutely! You can use any candy-coated chocolate pieces you like, or even small candies that will hold their shape when baked. Just make sure they are melt-resistant.
Can I make these cookies gluten-free?
Yes! You can use a good quality gluten-free sugar cookie mix. Just follow the package directions for that specific mix. The rest of the recipe should work wonderfully.
My cookies spread too much. What went wrong?
This usually happens if the dough wasn’t chilled enough before baking, or if your oven temperature was too low. Make sure to follow the chilling times closely and double-check your oven’s calibration if you suspect it runs cool.
We hope you have as much fun making and enjoying these Owl Cookies as we do! If you’re looking for more sweet inspiration, be sure to check out our Pinterest account for a treasure trove of recipes!

Whimsical Owl Cookies
Equipment
- Small saucepan
- Mixing bowls
- Rolling pin
- Wax paper or foil
- Baking sheets
- Wire racks
- sharp knife
Ingredients
For the Owl Eyes
- 1.25 cups candy-coated milk chocolate pieces for eyes
- 2 tablespoons milk for melting chocolate
For the Cookie Dough
- 24 ounces dry sugar cookie mix prepare according to package instructions
- Additional ingredients for cookie mix e.g., butter, egg (as per package instructions)
For the Owl Beaks
- 1 cup cashew halves for beaks
Instructions
- Step 1: Combine 3/4 cup of candy-coated milk chocolate pieces with 2 tablespoons of milk in a small saucepan. Gently melt over low heat, stirring constantly until smooth. Remove from heat.
- Step 2: Prepare the sugar cookie mix according to package directions. Stir the melted chocolate mixture into about half of the prepared dough, creating a chocolate-infused dough and a plain dough.
- Step 3: Divide the chocolate dough into two portions. Roll each into a 12-inch long, 1-inch diameter log. Wrap each log tightly and chill in the refrigerator for 2 hours until firm.
- Step 4: Divide the plain dough in half. Roll each half into a 12x6 inch rectangle on a lightly floured surface.
- Step 5: Place one chilled chocolate log along the long edge of a plain dough rectangle. Gently roll the plain dough around the chocolate log, ensuring it's completely encased. Repeat with the other chocolate log and plain dough rectangle.
- Step 6: Wrap the assembled owl rolls tightly and chill in the refrigerator for another 2 hours until firm.
- Step 7: Preheat oven to 375°F (190°C). Line baking sheets with parchment paper or lightly grease them.
- Step 8: Unwrap the chilled owl rolls and slice each into 1/4-inch thick slices.
- Step 9: Place two cookie slices onto each prepared baking sheet so their cut edges are touching.
- Step 10: In the center where the two cookie slices meet, place one candy-coated milk chocolate piece for the eyes.
- Step 11: Gently press a cashew half into the space just below the eyes to create a beak.
- Step 12: Bake for 8 to 10 minutes, or until the plain cookie portion is lightly golden brown.
- Step 13: Let cookies cool on baking sheets for 2-3 minutes, then transfer to wire racks to cool completely.