There’s something magical about Halloween, isn’t there? The crisp air, the rustle of leaves, and the sweet anticipation of all things spooky and delicious! This year, I’ve whipped up a recipe that’s guaranteed to be a hit with ghouls and goblins of all ages – Meringue Bones and Ghosts. They’re so simple to make, you’ll be wondering why you haven’t tried them before!
These little treats are not only adorable but incredibly light and airy, melting in your mouth like a sweet whisper. Perfect for a Halloween party, a fun afternoon with the kids, or even as a delightful homemade gift for your favorite trick-or-treaters. Trust me, they’re a breeze to whip up and will disappear faster than you can say “Boo!”
Why You’ll Love Meringue Bones and Ghosts
- Fast: Ready in under an hour of active time!
- Easy: Simple ingredients and straightforward steps.
- Giftable: Package them up for a charming Halloween surprise.
- Crowd-pleasing: Loved by kids and adults alike.
Ingredients
- 2 large egg whites: Make sure they’re at room temperature for the best volume!
- 2 drops fresh lemon juice: This little bit of acid helps stabilize the egg whites and gives them a lovely lift.
- 7 tablespoons white sugar: Granulated sugar is perfect here. It dissolves beautifully into the meringue.
- 2 chocolate chips, melted: For those adorable ghost eyes! You can use dark, milk, or white chocolate – whatever you fancy!
How to Make Meringue Bones and Ghosts
Let’s get baking! You’ll be amazed at how these simple ingredients transform into delicate, spooky treats.
- Prep your oven and pans: First things first, preheat your oven to a low temperature of 225 degrees F (110 degrees C). This slow bake is key to getting perfectly crisp meringues. Line two baking sheets with silicone baking mats or parchment paper. This will prevent any sticking.
- Whip up the meringue: In a clean, dry bowl, whisk together your egg whites and the two drops of lemon juice. Keep whisking until they become thick, white, and foamy. Now, it’s time to add the sugar. Gradually add it in, a spoonful at a time, while you continue to whisk. You’re aiming for a meringue that’s shiny, thick, and holds its shape when you lift the whisk – that’s called stiff peaks!
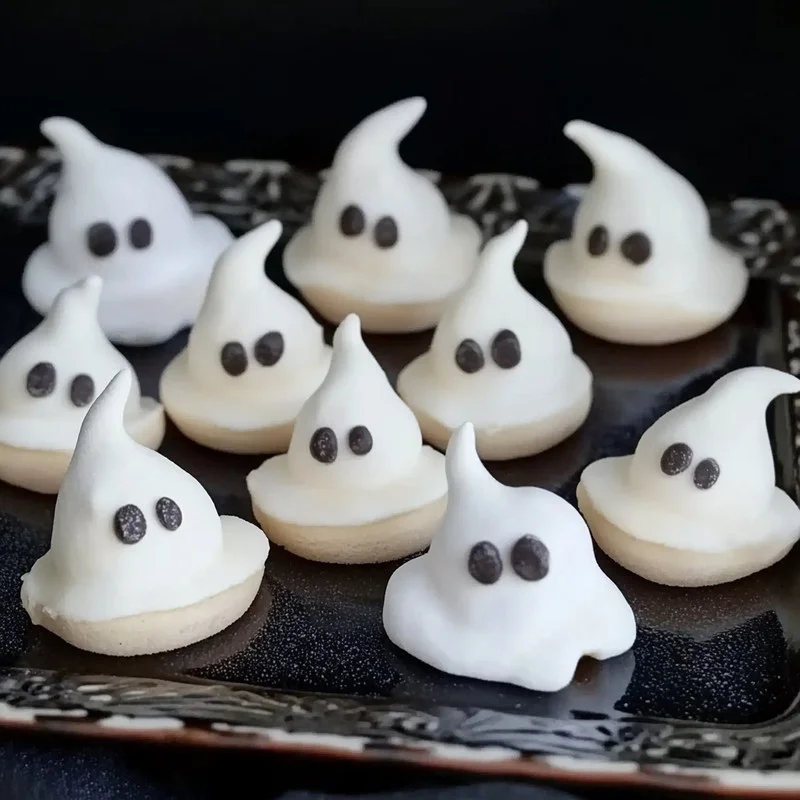
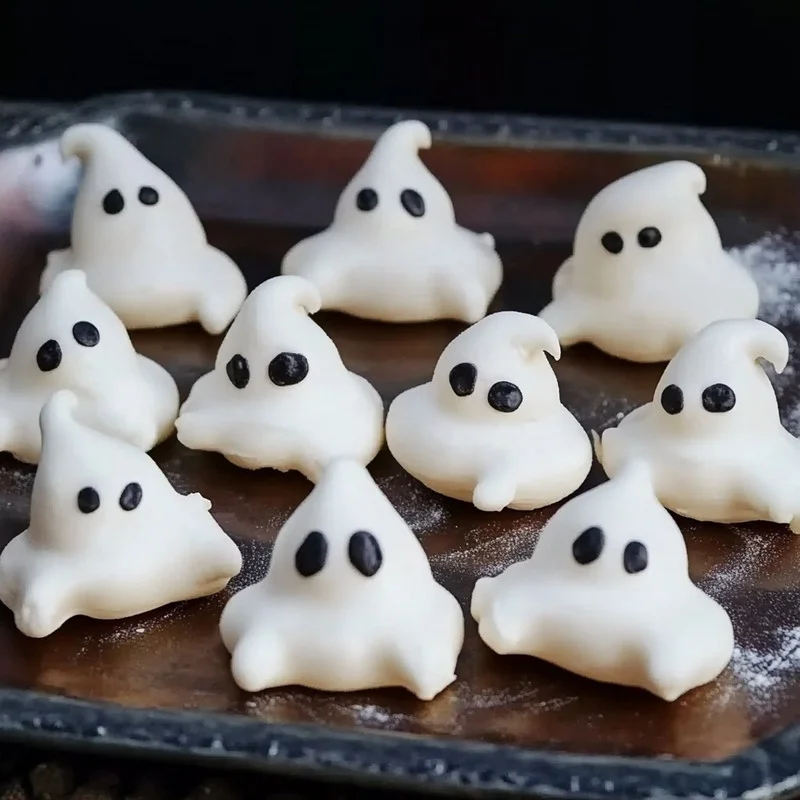
- Shape your spooky friends: Transfer your beautiful meringue to a piping bag fitted with your favorite tip. I like using a simple round tip for the bones and a slightly larger one for the ghost puffs. On one prepared baking sheet, pipe out 12 cute bone shapes. On the other sheet, pipe out 12 little puffy shapes that will look like ghosts. Don’t worry if they aren’t perfect; a little rustic charm is part of their appeal!
- Bake and cool: Place your baking sheets in the preheated oven and bake for about 1 hour. You want them to be dried out and firm to the touch. Once the hour is up, turn off the oven, but leave the meringues inside with the door closed. Let them cool down completely for at least another hour. This slow cooling process prevents them from cracking.
- Add the finishing touches: Once your meringues are completely cool and firm, it’s time for the fun part – decorating! Melt your chocolate chips. You can do this in the microwave in short bursts, stirring in between, or over a double boiler. Dip the tip of a toothpick into the melted chocolate and carefully dot on “eyes” onto each of your ghostly meringues. Instant personality!
Substitutions & Additions
Feeling a little creative? These meringues are a great canvas for your imagination!
- Flavor Boost: Add a tiny drop of vanilla extract or almond extract to the meringue mixture for a subtle flavor.
- Color Play: For even more festive fun, you could divide your meringue and add a drop of food coloring to each portion before piping. Think Halloween colors like orange, black, or purple!
- Different Shapes: Beyond bones and ghosts, you could try piping little pumpkins, bats, or even tiny skulls. If you’re not comfortable with a piping bag, you can also just drop spoonfuls onto the baking sheet and shape them gently with a spoon.
- Chocolate Drizzle: Instead of just eyes, you could drizzle melted chocolate all over the bones for a spooky, cobweb-like effect.
For more sweet inspiration, check out these easy cake mix toffee bars or these delightful easy key lime pie cookies for a taste of something different!
Tips for Success
A few little tricks can make all the difference when it comes to perfect meringues.
- Cleanliness is key: Make sure your bowl and whisk are absolutely free of any grease or fat. Even a tiny bit can prevent your egg whites from whipping up properly.
- Room temperature eggs: Cold eggs don’t whip as well as room-temperature eggs. If you forget to take them out, a quick trick is to place them in a bowl of warm water for about 5-10 minutes.
- Don’t rush the sugar: Adding the sugar gradually is crucial for a stable meringue. It allows the sugar to dissolve properly and create that glossy, firm texture.
- Low and slow: Baking at a low temperature ensures the meringues dry out without browning. Patience is rewarded here!
- Humidity is the enemy: Meringues are sensitive to moisture. Try to make these on a dry day if possible, as high humidity can make them sticky.
- Prep ahead: Meringues can be made a day or two in advance and stored in an airtight container at room temperature. Just add the chocolate eyes right before serving to prevent the chocolate from melting or sweating.
How to Store Meringue Bones and Ghosts
Once your beautiful creations are completely cooled and decorated, you’ll want to store them properly to maintain their crispness.
Store your meringue bones and ghosts in an airtight container at room temperature. Avoid refrigerating them, as the moisture can make them soft and sticky. If stored correctly, they should stay delightfully crisp for about 1 to 2 weeks. They’re best enjoyed fresh, though, so don’t wait too long to gobble them up!
FAQs
Q: My meringue looks grainy. What went wrong?
A: This usually happens if the sugar wasn’t added gradually enough or if you didn’t whisk long enough. Make sure to add the sugar slowly and whisk until the mixture feels smooth between your fingers (like there’s no gritty sugar left).
Q: My meringues are cracking. Is that okay?
A: A little cracking is totally normal and part of the charm! It usually happens if the oven temperature is too high or if they cool down too quickly. Lowering the oven temperature slightly or ensuring a slow, gradual cool-down in the oven can help minimize cracking.
Q: Can I make these ahead of time?
A: Absolutely! Meringues are fantastic for making ahead. Store them in an airtight container at room temperature. I recommend adding the chocolate eyes just before serving to keep them looking their best.
Want to see more of our delicious creations? Follow our Pinterest account for endless culinary inspiration!

Meringue Bones & Ghosts
Equipment
- oven
- Baking sheets
- Silicone baking mats or parchment paper
- Clean, dry bowl
- whisk
- Piping bag with tips
- Toothpicks
Ingredients
- 2 large egg whites at room temperature
- 2 drops fresh lemon juice
- 7 tablespoons white sugar granulated
- 2 chocolate chips melted, for eyes
Instructions
- Step 1: Preheat your oven to 225 degrees F (110 degrees C). Line two baking sheets with silicone baking mats or parchment paper.
- Step 2: In a clean, dry bowl, whisk together egg whites and lemon juice until thick, white, and foamy. Gradually add sugar, a spoonful at a time, while continuing to whisk until the meringue is shiny, thick, and holds stiff peaks.
- Step 3: Transfer meringue to a piping bag. On one baking sheet, pipe 12 bone shapes. On the other, pipe 12 puffy ghost shapes.
- Step 4: Bake for about 1 hour, until dried out and firm. Turn off the oven, leave meringues inside with the door closed, and let cool completely for at least another hour.
- Step 5: Melt chocolate chips. Dip a toothpick into the melted chocolate and dot on eyes onto each ghost meringue.