
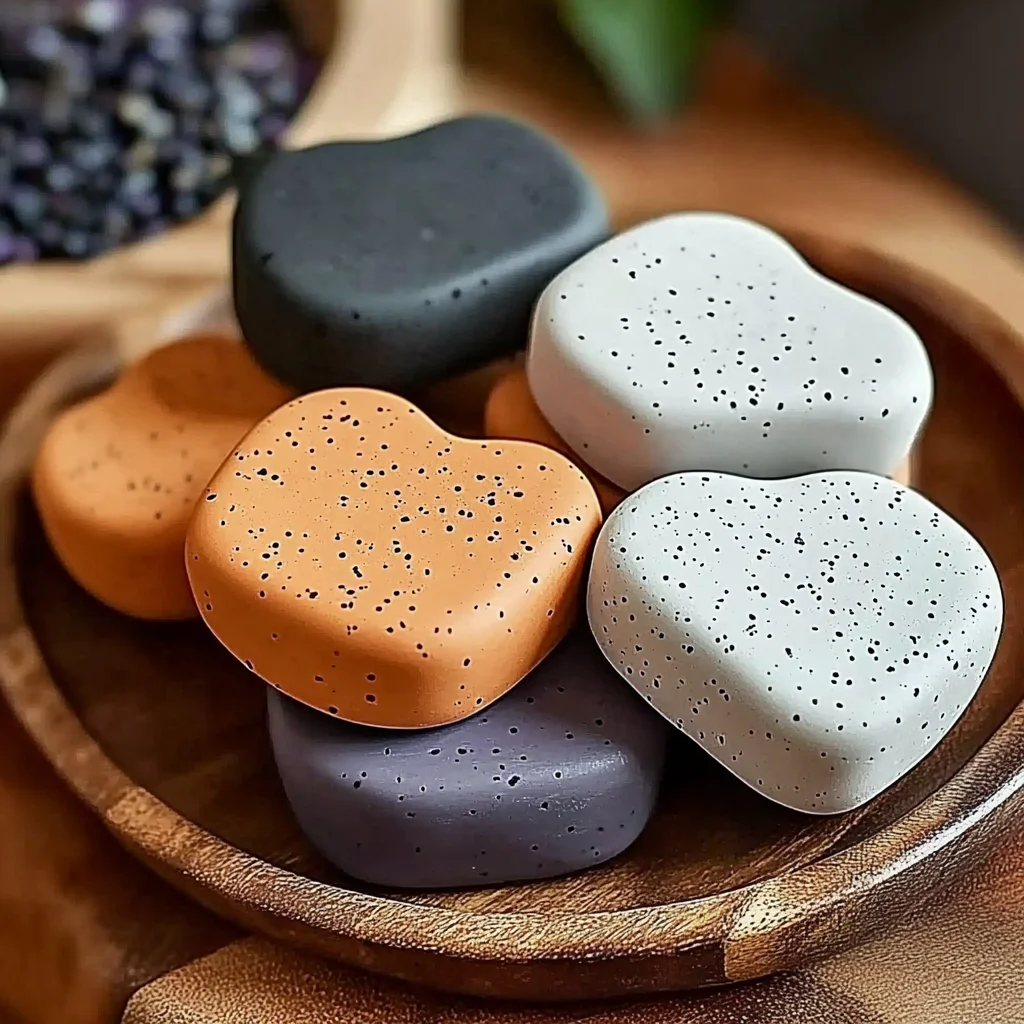
Imagine sitting in your cozy living room, the soft glow of afternoon light filtering through the curtains. The delightful scent of your favorite essential oils drifts through the air, creating an atmosphere that feels both calming and invigorating. With DIY clay diffuser stones, you can immerse yourself in this sensory experience while crafting a beautiful piece of art for your home. This project is not just about creating a functional item; it’s about indulging in the joy of making something with your own hands, filling your space with your unique scent, and enjoying a moment of creativity.
Why You’ll Love DIY Clay Diffuser Stones
- Beginner-friendly
- Budget-friendly
- Creative and fun
- Great for kids and families
- Perfect for gifts or decorations
- Customizable
The Heart Behind This DIY
Crafting your own clay diffuser stones is more than just a fun activity; it’s a wonderful way to unwind and express your creativity. The process of shaping the clay with your hands can be incredibly therapeutic, allowing you to connect with the present moment. As you roll the dough, cut out your shapes, and infuse them with scents, you’re engaging all your senses. This project encourages mindfulness, helping you to focus on the task at hand and letting go of the day’s stresses. Plus, creating something beautiful can boost your confidence and inspire you to tackle more projects.
A Gentle Look at the Process
In this DIY project, you can expect a delightful journey from start to finish. You will roll out the clay, choose shapes that resonate with you, and infuse each piece with your favorite essential oils. As you craft, you will feel the textures of the clay and the soothing aromas filling the air. It’s a process that invites you to slow down, enjoy each moment, and let your creativity flow freely.
Materials You’ll Need
- Air-dry clay – easy to work with and requires no baking
- Essential oils – choose scents that uplift or calm you
- Baking sheet – for drying or baking your creations
- Parchment paper – to prevent sticking
- Rolling pin – for rolling out the clay
- Cookie cutter or mold – for shaping your stones
- Straw (optional) – for making holes if you want to hang them
- Clear sealant (optional) – for added durability
Step-by-Step Directions
Step 1: Prepare Your Workspace
Start by preheating your oven if you’re using oven-bake clay. If you’re working with air-dry clay, simply find a clean, flat surface to set up your crafting station. Lay down some parchment paper to keep everything tidy and easy to clean.
Step 2: Roll Out the Clay
Take your block of air-dry clay and knead it for a minute to soften it. Then, using your rolling pin, roll it out to about 1/4 inch thickness. As you roll, the clay will become smooth and pliable, which is a satisfying experience in itself.
Step 3: Cut Your Shapes
Using your cookie cutter or mold, cut out various shapes from the rolled clay. You might choose hearts, stars, or even simple circles—whatever speaks to you! If you want to hang your stones, take a straw and press it through the center of each shape to create a hole.
Step 4: Dry Your Shapes
Place your shapes on the baking sheet lined with parchment paper. If you are using oven-bake clay, follow the package instructions for baking. If you are using air-dry clay, simply let your creations sit until they are completely dry.
Step 5: Seal and Scent
Once your stones are dry, you can apply a clear sealant if you’d like them to last longer. After the sealant dries, it’s time for the fun part! Add a few drops of your chosen essential oils to each stone. The scent will slowly release into the air, creating a soothing atmosphere in your space.
Step 6: Enjoy Your Creation
Find special spots around your home to place your diffuser stones. Whether on a shelf, near your bed, or in the bathroom, they will not only provide a lovely aroma but also serve as unique decorative pieces.
Creative Ways to Use DIY Clay Diffuser Stones
Your clay diffuser stones can be used in various ways! Place them throughout your home for a continuous fragrance, or create a beautiful display on a tray. They make lovely gifts for friends and family, especially when personalized with their favorite scents. You can even use them during special occasions, adding a fragrant touch to your celebrations. The possibilities are endless!
How to Store, Preserve, or Reuse DIY Clay Diffuser Stones
To keep your diffuser stones fresh and fragrant, store them in a cool, dry place. If the scent fades over time, simply add a few more drops of essential oil to rejuvenate them. You can also reuse the stones by changing the essential oils and refreshing your space’s aroma whenever you like.
Creative Variations and Customizations
- Color variations – add color to your clay for a vibrant twist
- Theme ideas – create seasonal shapes for holidays
- Seasonal adaptations – use scents that match the seasons, like cinnamon for winter
- Kid-friendly modifications – let children create their own shapes and scents
- Advanced creative upgrades – experiment with mixed media or embellishments
Tips for Success
- Common mistakes to avoid – ensure your clay is well-kneaded to avoid cracking
- Safety tips – supervise children during crafting to keep them safe
- Preparation suggestions – gather all materials before starting to streamline your process
- Cleanup recommendations – keep a damp cloth nearby to wipe hands and surfaces
- Expert crafting tips – don’t be afraid to experiment with different shapes and scents!
FAQs About DIY Clay Diffuser Stones
Can beginners make this?
Absolutely! This project is beginner-friendly and perfect for anyone looking to explore their creativity.
Can children participate?
Yes! Kids can have a blast shaping the clay and choosing their favorite scents with some supervision.
How long does it last?
With proper care, your diffuser stones can last for months. Just remember to refresh the essential oils as needed.
Can I customize it?
Definitely! You can choose colors, shapes, and scents that reflect your personal style.
A Final Creative Note
Creating DIY clay diffuser stones is a wonderful way to express yourself and bring beauty into your space. Embrace the process, let your imagination soar, and celebrate the joy of crafting. Remember, every piece you create is a reflection of your unique personality. For more delicious recipes and inspiration, check out all recipes or baking ideas for treats you will love! Don’t forget to follow our Pinterest for more DIY inspiration!
DIY Clay Diffuser Stones
Equipment
- baking sheet
- parchment paper
- Rolling pin
- Cookie cutter or mold
- Straw (optional)
- Clear Sealant (optional)
Ingredients
Materials
- Air-dry clay
- Essential oils
Instructions
- Step 1: Prepare your workspace by laying down parchment paper on a clean, flat surface.
- Step 2: Knead the air-dry clay for a minute and roll it out to 1/4 inch thickness with a rolling pin.
- Step 3: Cut out shapes using a cookie cutter or mold, and create holes if you want to hang them.
- Step 4: Place the shapes on a baking sheet lined with parchment paper and let them dry completely.
- Step 5: Optionally apply a clear sealant, then add essential oils to each stone.
- Step 6: Enjoy your diffuser stones by placing them around your home.
