
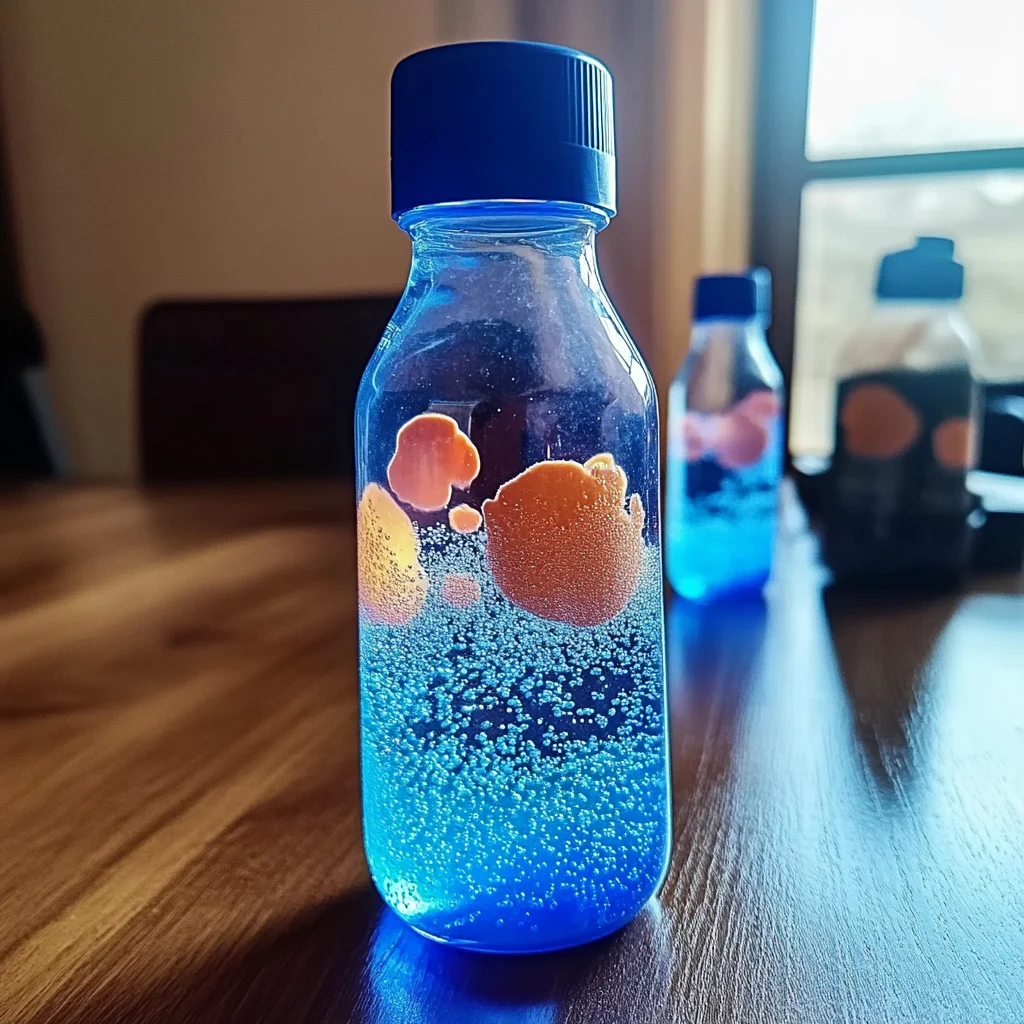
There’s something undeniably magical about watching colorful bubbles float and dance in a lava lamp. It brings back memories of cozy evenings spent in dimly lit rooms, where the soft glow and fluid motion of those vibrant colors seemed to create a world of wonder. Today, I invite you to join me on a delightful crafting adventure as we create our very own DIY lava lamp! This project is not just about the end result; it’s an exploration of creativity and a wonderful way to unwind. Imagine the satisfaction of creating something unique with your own hands, all while enjoying the sensory experience of colors and textures. Let’s dive in!
Why You’ll Love DIY Lava Lamp
- Beginner-friendly
- Budget-friendly
- Creative and fun
- Great for kids and families
- Perfect for gifts or decorations
- Customizable
The Heart Behind This DIY
Creating a DIY lava lamp is more than just a fun activity; it taps into the joy of making and sharing. As you gather your materials and watch the process unfold, you may find yourself feeling more connected to your creativity. This project encourages mindfulness, allowing you to focus on the soothing motions of the bubbles and the vibrant colors. It’s a wonderful way to spark conversations with family or friends, making it an enjoyable bonding experience. Plus, there’s a certain sense of accomplishment that comes with crafting something unique and beautiful!
A Gentle Look at the Process
As we embark on this journey together, you can expect a simple yet captivating experience. First, we will combine water and oil in a plastic bottle, watching them separate in a mesmerizing way. Then, we’ll add some food coloring to infuse our creation with vibrant hues. The magic truly begins when we introduce the effervescent tablets, creating a delightful reaction that brings our lava lamp to life. Get ready to be enchanted by the colors swirling and dancing in your bottle!
Materials You’ll Need
- 1 clear plastic bottle (16 oz) – This will be the canvas for your lava lamp.
- Water – The base that will hold the color and create the magic.
- Vegetable oil – This is what gives that signature lava lamp effect.
- Food coloring – Choose your favorite color for a personal touch.
- Alka-Seltzer tablets – The secret ingredient that creates the bubbling action.
Step-by-Step Directions
Step 1
Start by filling your clear plastic bottle about one-quarter full with water. You can feel the coolness of the water as it settles at the bottom, creating a calm base for your lava lamp.
Step 2
Next, add vegetable oil to the bottle until it is nearly full, leaving some space at the top. Watch as the oil floats on top of the water, creating a beautiful separation between the two liquids. Isn’t it fascinating how they don’t mix?
Step 3
Allow the oil and water to separate completely. This is a great moment to take a deep breath and appreciate the beauty of your creation so far. Once you see a clear distinction, add a few drops of food coloring to the bottle. Watch with joy as the color mixes with the water but not with the oil, creating tiny colored blobs that look like jewels.
Step 4
Now, break an Alka-Seltzer tablet into smaller pieces and drop one piece into the bottle. Watch in awe as bubbles begin to rise and fall, creating the mesmerizing effect of a lava lamp. Feel free to add more pieces of the tablet as needed to keep the bubbles dancing!
Creative Ways to Use DIY Lava Lamp
Once your lava lamp is complete, there are so many fun ways to use and display it. Place it on your desk to inspire creativity while you work, or set it up in your living room as a unique conversation starter. It also makes a wonderful gift for friends or family—imagine their delight as they watch the colorful bubbles dance! You can even use it as a calming nightlight in a child’s room, providing a soft glow that encourages relaxation.
How to Store, Preserve, or Reuse DIY Lava Lamp
To keep your DIY lava lamp looking fresh, store it in a cool, dry place when not in use. If you want to reuse it, simply refill with fresh water and oil and add new effervescent tablets to start the magic all over again. Just remember, the colors may fade over time, so don’t hesitate to add more food coloring for a vibrant refresh!
Creative Variations and Customizations
- Color variations – Experiment with different colors or even create layered colors for a stunning effect.
- Theme ideas – Match colors to holidays or special occasions for a festive display.
- Seasonal adaptations – Use autumnal colors for fall, pastels for spring, or bright hues for summer.
- Kid-friendly modifications – Use safe, non-toxic materials and let kids choose their colors.
- Advanced creative upgrades – Try adding glitter or small decorative items for an extra touch of whimsy.
Tips for Success
- Avoid overfilling the bottle to prevent spills when adding the effervescent tablets.
- Always supervise children when crafting, especially when using effervescent tablets.
- Prepare your workspace to keep it clean and organized for a smooth crafting experience.
- Cleanup is easy—just rinse the bottle with water after use.
- For the best results, use fresh ingredients for optimal bubbling action.
FAQs About DIY Lava Lamp
Can beginners make this?
Absolutely! This project is perfect for beginners, and you will enjoy the process of creating something beautiful.
Can children participate?
Yes! Kids will love watching the bubbles and can help choose the colors. Just make sure to supervise them during the process.
How long does it last?
The bubbles will last as long as the Alka-Seltzer tablets are added. When the reaction stops, you can simply add more tablets to continue the fun!
Can I customize it?
Definitely! You can personalize your lava lamp with different colors, themes, and even decorations inside the bottle.
A Final Creative Note
As we wrap up our DIY lava lamp adventure, I hope you feel inspired to unleash your creativity and share this experience with loved ones. Remember, crafting is not only about the end product; it’s about enjoying the journey and expressing yourself. For more delightful recipes, check out blueberry lemon ricotta pancakes or Kool-Aid gummy treats for treats you will love! Let your creativity flow, and don’t forget to share your creations with friends and family. Happy crafting!
For more DIY inspiration, follow our Pinterest account!
Ingredients
Materials You'll Need
- Water
- Vegetable oil
- Food coloring
- Alka-Seltzer tablets
Instructions
- Step 1: Start by filling your clear plastic bottle about one-quarter full with water.
- Step 2: Next, add vegetable oil to the bottle until it is nearly full, leaving some space at the top.
- Step 3: Once you see a clear distinction, add a few drops of food coloring to the bottle.
- Step 4: Now, break an Alka-Seltzer tablet into smaller pieces and drop one piece into the bottle.
