
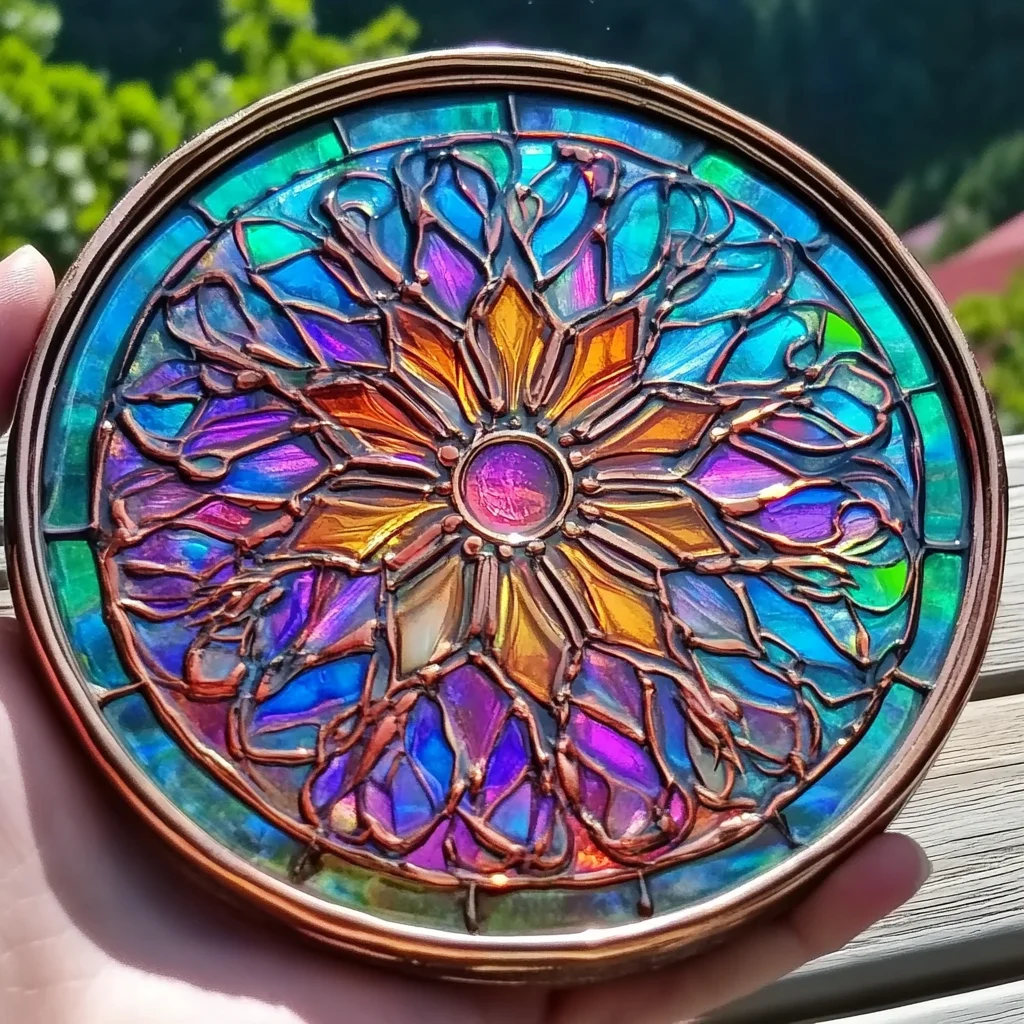
Remember those dazzling suncatchers from your childhood that made the whole room glow? They always felt a little bit like magic, didn’t they? Well, get ready to recreate that wonder right in your own kitchen (or craft room!). Today, we’re diving into a super fun and surprisingly easy project: making your very own Stained Glass Glue Window Art! It’s the perfect way to add a splash of color and a touch of homemade charm to any window, and it’s so simple, you’ll be whipping up a whole collection in no time. Whether you’re looking for a rainy day activity, a way to keep the kids entertained, or just a creative outlet for yourself, this project is a winner.
Why You’ll Love Stained Glass Glue Window Art
- Fast: Once you get going, this craft comes together pretty quickly!
- Easy: Seriously, no fancy skills required. If you can trace a line and drip some glue, you’ve got this!
- Giftable: These make absolutely adorable and thoughtful handmade gifts for friends, family, teachers – everyone!
- Crowd-pleasing: From little ones to grown-ups, everyone gets a kick out of seeing their colorful creations come to life.
Ingredients
Gathering your supplies is half the fun! Here’s what you’ll need to create these beautiful window decorations:
- 1 bottle clear school glue: The backbone of our colorful creations! Make sure it’s clear so the colors can really shine through.
- Clear plastic sheet protectors or plastic page dividers: This is our canvas! You want something smooth and flexible.
- Black craft glue or black puffy paint: This will be our “leading” – the lines that give our stained glass its structure.
- Washable paint or food coloring: To bring our masterpiece to life with vibrant hues.
- Small cups or paint palette: For mixing our colored glue.
- Cotton swabs or fine paintbrushes: These are your tools for filling in the colors.
- Tape: To secure your design and plastic.
- Printable stained glass templates (optional): If drawing isn’t your jam, templates are a lifesaver!
How to Make Stained Glass Glue Window Art
Alright, let’s get crafting! This is where the magic happens.
-
Prep your design: If you’re using a printable template, slide it inside a clear plastic sheet protector. Then, tape the protected design onto a flat surface, like a table or countertop. If you’re feeling artistic, you can also draw your design directly onto the sheet protector using the black craft glue or puffy paint. Just make sure your lines are clear and continuous!
-
Outline with black glue: Carefully trace the outline of your design with the black craft glue or puffy paint. Think of it like drawing the lead lines in real stained glass. You want to create distinct borders between all the different sections. Let this black glue dry completely. This is super important, so give it at least 4–6 hours, or even better, let it dry overnight.
-
Mix your colors: While the black lines are drying, grab your small cups. Add a few drops of washable paint or food coloring to some clear school glue. Mix it up until you get a nice, even color. You can make as many colors as you like! This is a great step to do with kids, and you can even get inspiration from other colorful crafts on our site, like our easy edible aquarium for color ideas!
-
Fill in the color: Once those black glue lines are totally dry and sturdy, it’s time for the fun part! Use your cotton swabs or fine paintbrushes to fill in each section with your colored glue mixtures. Try to fill each section evenly. Don’t worry if it looks a little opaque at first; it will become transparent as it dries!
-
Let it dry completely: This is the hardest part – waiting! You need to let your colorful glue creations dry for a good 12–24 hours. The glue will shrink slightly and become transparent and smooth, just like real stained glass.
-
Peel and reveal: Once everything is thoroughly dry, carefully peel your finished stained glass art from the plastic sheet protector. It should come off cleanly.
-
Hang your masterpiece: To display your beautiful creation, gently press it onto a window. It should stick using static cling. If it doesn’t hold well, a little bit of clear double-sided tape around the edges will do the trick!
Substitutions & Additions
Feeling creative? Here are some ways to mix things up!
- Glitter: Add a little sparkle to your colored glue mixtures before they dry. It’s like adding fairy dust!
- Different Liners: If you don’t have black craft glue, you can try other dark-colored puffy paints or even acrylic paint pens with a fine tip. Just make sure they dry waterproof.
- More Textures: Experiment with adding small beads or sequins into the wet glue for extra dimension.
- Themes: Print out templates for holidays, seasons, or even your favorite animals. You could create some festive 4th of July decorations or cozy Christmas cookies for inspiration!
Tips for Success
A few little tricks can make your stained glass glue art even better:
- Drying is key: Don’t rush the drying process for the black glue. If it’s not fully dry, the colors might bleed together.
- Thin layers are best: While you want to fill each section, avoid making the colored glue layers too thick, as this can increase drying time and might lead to cracking.
- Clean your tools: Wash out your cups and brushes immediately after use, especially if you’re using acrylic paints.
- Prep ahead: You can print and tape your templates the night before to make the actual crafting time even faster.
- Test your colors: Before you fill in a whole section, test a tiny bit of your colored glue on a scrap piece of plastic to ensure the color is right and the glue consistency is good.
How to Store Stained Glass Glue Window Art
Once your beautiful creations are dry, you can carefully peel them off the plastic sheet protector and store them flat between sheets of parchment paper in a large envelope or a folder. This will protect them from dust and prevent them from sticking to each other. They should last for a long time, ready to be displayed whenever you want to add a pop of color!
FAQs
Here are some common questions you might have:
-
Q: Can I reuse the plastic sheet protectors?
A: Yes! Once you’ve carefully peeled your finished art, the plastic sheet protectors can be wiped clean and reused for your next crafting session. -
Q: My black glue is cracking when it dries. What did I do wrong?
A: This usually happens if the black glue line is applied too thickly. Try to apply it in a consistent, medium thickness to avoid cracking. -
Q: Can I use regular markers instead of black glue for the outlines?
A: While you can use markers to sketch your design, they won’t create the raised, defining lines that the black glue does. For the “stained glass” effect, black glue or puffy paint is essential.
There you have it! Your very own DIY Stained Glass Glue Window Art. It’s such a satisfying and beautiful craft. If you enjoyed this, be sure to check out more fun and creative projects on our site. And for even more inspiration and to see what we’re crafting next, follow us on Pinterest!
DIY Stained Glass Glue Window Art
Equipment
- Clear plastic sheet protectors or plastic page dividers
- Black craft glue or black puffy paint
- Washable paint or food coloring
- Small cups or paint palette
- Cotton swabs or fine paintbrushes
- Tape
- Printable stained glass templates (optional)
Ingredients
- 1 bottle clear school glue The backbone of our colorful creations!
- clear plastic sheet protectors or plastic page dividers This is our canvas!
- black craft glue or black puffy paint This will be our "leading"
- washable paint or food coloring To bring our masterpiece to life
- small cups or paint palette for mixing our colored glue
- cotton swabs or fine paintbrushes These are your tools for filling in the colors
- tape To secure your design and plastic
- printable stained glass templates optional
Instructions
- Step 1: If you're using a printable template, slide it inside a clear plastic sheet protector. Then, tape the protected design onto a flat surface, like a table or countertop. If you’re feeling artistic, you can also draw your design directly onto the sheet protector using the black craft glue or puffy paint. Just make sure your lines are clear and continuous!
- Step 2: Carefully trace the outline of your design with the black craft glue or puffy paint. Think of it like drawing the lead lines in real stained glass. You want to create distinct borders between all the different sections. Let this black glue dry completely. This is super important, so give it at least 4–6 hours, or even better, let it dry overnight.
- Step 3: While the black lines are drying, grab your small cups. Add a few drops of washable paint or food coloring to some clear school glue. Mix it up until you get a nice, even color. You can make as many colors as you like!
- Step 4: Once those black glue lines are totally dry and sturdy, it's time for the fun part! Use your cotton swabs or fine paintbrushes to fill in each section with your colored glue mixtures. Try to fill each section evenly. Don't worry if it looks a little opaque at first; it will become transparent as it dries!
- Step 5: This is the hardest part – waiting! You need to let your colorful glue creations dry for a good 12–24 hours. The glue will shrink slightly and become transparent and smooth, just like real stained glass.
- Step 6: Once everything is thoroughly dry, carefully peel your finished stained glass art from the plastic sheet protector. It should come off cleanly.
- Step 7: To display your beautiful creation, gently press it onto a window. It should stick using static cling. If it doesn't hold well, a little bit of clear double-sided tape around the edges will do the trick!