
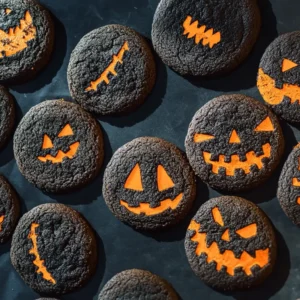
Halloween is that magical time of year when the air gets a little crisp, the leaves start to turn, and our kitchens transform into little hubs of spooky delight. There’s something so special about baking treats that capture the spirit of the season, and today, we’re diving into a recipe that’s guaranteed to be a hit: Black Cocoa Halloween Cookies. These aren’t just any cookies; they’re deeply dark, deliciously rich, and have a touch of eerie charm that makes them perfect for parties, trick-or-treaters, or just a cozy night in. I remember the first time I made these, my kitchen was filled with the most incredible aroma, and the look on everyone’s faces when they saw the deep, dark color was priceless!
Why You’ll Love Black Cocoa Halloween Cookies
This recipe is an absolute winner for so many reasons. They’re:
- Fast: Whip them up in no time, perfect for last-minute baking.
- Easy: Simple steps that anyone can follow, even if you’re new to baking.
- Giftable: Package them up in cute Halloween bags for the perfect edible present.
- Crowd-pleasing: Their unique look and fantastic flavor are sure to impress everyone.
Ingredients
Here’s what you’ll need to create these hauntingly good cookies:
- 10 tablespoons (142g) unsalted butter, at room temperature or cold (using cold butter can give you a slightly crisper cookie, while room temp butter makes them a bit softer)
- 1 cup (198g) granulated sugar
- 1/2 teaspoon table salt (enhances all the flavors)
- 1/4 teaspoon espresso powder (optional, but it really deepens the chocolate flavor without making it taste like coffee!)
- 1 large egg
- 2 teaspoons King Arthur Pure Vanilla Extract (or your favorite vanilla)
- 1 cup (120g) King Arthur Unbleached All-Purpose Flour or King Arthur Gluten-Free Measure for Measure Flour (use what works best for your kitchen!)
- 2/3 cup (56g) black cocoa, sifted if lumpy (this is the secret ingredient for that deep, dark color!)
- 3 tablespoons (21g) cornstarch (for a tender crumb)
- 3/4 teaspoon baking soda (for a little lift)
For the Glaze:
- 1 packet natural orange food coloring (to give them that classic Halloween glow)
- 1 teaspoon King Arthur Pure Vanilla Extract
- 4 to 5 teaspoons water, divided (start with less, you can always add more!)
- 1 cup (113g) confectioners’ sugar, sifted if lumpy (for a smooth finish)
How to Make Black Cocoa Halloween Cookies
Let’s get baking! It’s easier than you think to create these spooky delights.
- Preheat and Prepare: Start by preheating your oven to 325°F (160°C). Line two baking sheets with parchment paper. This is a little trick I learned that makes cleanup a breeze and ensures your cookies don’t stick.
- Cream the Butter and Sugar: In the bowl of your stand mixer (or a large mixing bowl if you’re using a hand mixer), beat the butter, granulated sugar, salt, and espresso powder on medium speed. Keep going until the mixture is smooth and creamy.
- Add Wet Ingredients: Now, add the egg and vanilla extract. Beat them in until everything is wonderfully combined.
- Incorporate Dry Ingredients: It’s time for the dry ingredients! Add the flour, black cocoa, cornstarch, and baking soda to the bowl. Mix on low speed until everything is just incorporated. Be careful not to overmix at this stage!
- Shape the Dough: Scoop the dough by the tablespoonful. Roll each portion into a smooth ball.
- Arrange on Baking Sheets: Place your dough balls onto the prepared baking sheets, making sure to leave about 1 1/2 inches between them. They’ll spread a little as they bake.
- Bake to Perfection: Bake for 28 to 32 minutes. About halfway through, rotate the pans so that your cookies bake evenly. You’ll know they’re done when the edges and centers look firm and crisp.
- Cool Completely: This is a crucial step! Allow the cookies to cool completely on the baking sheets before you even think about decorating. This usually takes about 45 minutes, and it ensures your glaze won’t melt off.
- Make the Orange Glaze: While your cookies are cooling, let’s whip up that vibrant orange glaze. In a small microwave-safe bowl, combine the orange food coloring, vanilla extract, and 2 teaspoons of water. Microwave this mixture in 5-second intervals until it’s dissolved and looks smooth.
- Combine Glaze Ingredients: In a separate bowl, place your sifted confectioners’ sugar. Pour the warm orange liquid mixture over the sugar. Stir it all together until it starts to form a paste.
- Achieve the Perfect Consistency: Now, add the remaining water, just 1/2 teaspoon at a time, stirring after each addition. You’re looking for a thin, paint-like consistency that will brush on smoothly.
- Decorate Your Spooky Treats: Grab a pastry brush and carefully apply a thin coating of the orange glaze to each cooled cookie. Don’t worry if it’s not perfectly smooth; a little rustic charm is part of the fun!
- Let the Glaze Set: Let your beautifully glazed cookies rest at room temperature for about 10 to 15 minutes. This allows the glaze to set up nicely.
Substitutions & Additions
Feeling creative? Here are a few ideas to make these cookies your own:
- No Black Cocoa? If you can’t find black cocoa, regular unsweetened cocoa powder will work, but your cookies won’t be as dramatically dark. You can also add a little extra black food coloring to the dough for a deeper hue.
- Sprinkle Fun: Before the glaze sets, you can add Halloween-themed sprinkles for extra sparkle and fun! Think edible glitter, candy eyes, or spooky shapes.
- Different Glaze Colors: Feel free to experiment with other Halloween colors like purple, green, or even a swirl of white and orange.
- Add Chocolate Chips: Stirring in some dark chocolate chips into the dough before baking adds an extra layer of chocolatey goodness.
Tips for Success
A few little tips to ensure your Black Cocoa Halloween Cookies turn out perfectly every time:
- Room Temperature vs. Cold Butter: As mentioned, the temperature of your butter can affect the cookie’s texture. For a chewier cookie, use softened butter. For a crisper cookie, use cold, cubed butter.
- Don’t Overmix: Once you add the flour, mix only until it’s just combined. Overmixing can lead to tough cookies.
- Sift Your Cocoa and Confectioners’ Sugar: Black cocoa can sometimes be a bit lumpy, and sifting your confectioners’ sugar will prevent a grainy glaze.
- Cooling is Key: Seriously, let those cookies cool completely! It’s the most common mistake and the easiest one to avoid.
- Prep Ahead: You can make the cookie dough a day in advance and store it in the refrigerator. Just let it soften slightly before scooping and baking. The glaze can also be made a few hours ahead and stored in an airtight container at room temperature; you might need to add a tiny bit more water to loosen it up before glazing.
How to Store Black Cocoa Halloween Cookies
Once your cookies are fully cooled and the glaze is set, you’ll want to store them properly to keep them fresh and delicious.
- Store them in an airtight container at room temperature.
- They should stay fresh for about 3-5 days.
- For longer storage, you can freeze them in an airtight container or a freezer bag for up to 2-3 months. Make sure they are completely cooled before freezing.
FAQs
Here are a few questions you might have about these spooky treats:
- Can I use regular cocoa powder instead of black cocoa? Yes, you can! Your cookies won’t be as dark, but they will still taste delicious. You might want to add a drop or two of black food coloring to the dough for a deeper color.
- How do I get the glaze to be smooth? Make sure to sift your confectioners’ sugar and whisk the glaze ingredients thoroughly. Adding the water slowly is also key to achieving the right consistency.
- Can these cookies be made gluten-free? Absolutely! I’ve included King Arthur Gluten-Free Measure for Measure Flour as an option in the ingredients list, and it works beautifully.
Happy baking and have a spooktacular Halloween! Don’t forget to check out our other delicious recipes and crafts on Pinterest!
Easy Black Cocoa Halloween Cookies
Equipment
- Stand Mixer or Hand Mixer
- Large mixing bowl
- Two baking sheets
- parchment paper
- Small Microwave-Safe Bowl
- Pastry Brush
Ingredients
For the Cookies
- 10 tablespoons unsalted butter at room temperature or cold
- 1 cup granulated sugar
- 1/2 teaspoon table salt
- 1/4 teaspoon espresso powder optional
- 1 large egg
- 2 teaspoons vanilla extract
- 1 cup all-purpose flour or gluten-free measure for measure flour
- 2/3 cup black cocoa sifted if lumpy
- 3 tablespoons cornstarch
- 3/4 teaspoon baking soda
For the Glaze
- 1 packet natural orange food coloring
- 1 teaspoon vanilla extract
- 4-5 teaspoons water divided
- 1 cup confectioners’ sugar sifted if lumpy
Instructions
- Step 1: Preheat your oven to 325°F (160°C). Line two baking sheets with parchment paper.
- Step 2: In the bowl of your stand mixer (or a large mixing bowl if using a hand mixer), beat the butter, granulated sugar, salt, and espresso powder on medium speed until smooth and creamy.
- Step 3: Add the egg and vanilla extract. Beat until wonderfully combined.
- Step 4: Add the flour, black cocoa, cornstarch, and baking soda to the bowl. Mix on low speed until just incorporated. Do not overmix.
- Step 5: Scoop the dough by the tablespoonful and roll each portion into a smooth ball.
- Step 6: Place dough balls onto the prepared baking sheets, leaving about 1 1/2 inches between them.
- Step 7: Bake for 28 to 32 minutes, rotating the pans halfway through. Cookies are done when edges and centers look firm and crisp.
- Step 8: Allow cookies to cool completely on the baking sheets (about 45 minutes) before decorating.
- Step 9: While cookies cool, make the glaze. In a small microwave-safe bowl, combine orange food coloring, vanilla extract, and 2 teaspoons of water. Microwave in 5-second intervals until dissolved and smooth.
- Step 10: In a separate bowl, place sifted confectioners’ sugar. Pour the warm orange liquid mixture over the sugar. Stir until it forms a paste.
- Step 11: Add remaining water, 1/2 teaspoon at a time, stirring after each addition, until a thin, paint-like consistency is achieved.
- Step 12: Using a pastry brush, apply a thin coating of glaze to each cooled cookie.
- Step 13: Let the glazed cookies rest at room temperature for 10 to 15 minutes to allow the glaze to set.