
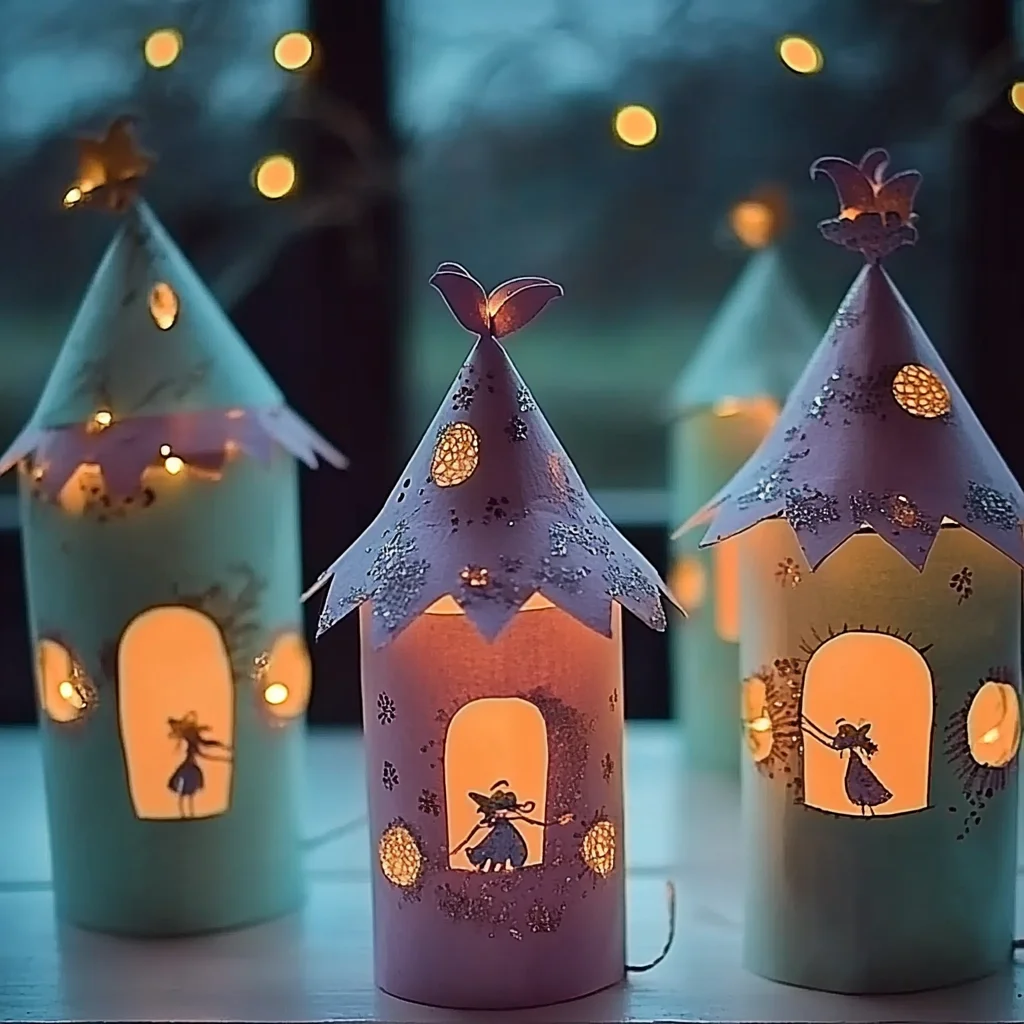
Have you ever gazed at the stars on a clear night, feeling that tingle of magic in the air? Creating your own Paper Roll Fairy Lanterns brings that enchanting feeling right into your home! This delightful project is not only a charming addition to your decor but also a wonderful way to spend quality time with your family or friends. Imagine gathering around a table, paintbrush in hand, sharing laughter and stories while you bring these whimsical lanterns to life. You’ll feel the satisfaction of transforming simple materials into glowing treasures that brighten up any space, creating a cozy and inviting atmosphere.
Why You’ll Love Paper Roll Fairy Lanterns
- Beginner-friendly
- Budget-friendly
- Creative and fun
- Great for kids and families
- Perfect for gifts or decorations
- Customizable
The Heart Behind This DIY
Crafting Paper Roll Fairy Lanterns is a delightful blend of creativity and mindfulness. As you paint and decorate, you become immersed in the colors and textures, allowing your mind to wander freely. This project encourages you to express yourself, sparking joy and confidence as you see your unique designs come to life. Plus, it’s a fantastic way to connect with loved ones, sharing ideas and inspirations. Whether it’s a rainy afternoon or a sunny weekend, this project is an ideal escape into a world of creativity and imagination.
A Gentle Look at the Process
As you embark on this enchanting journey, you can expect a delightful mix of painting, cutting, and decorating. You’ll start by breathing life into your empty toilet paper rolls with vibrant acrylic paints, letting each stroke reflect your personality. The process of cutting out shapes and designs adds an element of surprise, as you unveil the beautiful patterns that will allow the light to dance through. Finally, the magic unfolds as you place battery-operated tea lights inside, illuminating your handcrafted lanterns with a warm, soft glow that transforms your space into a fairy wonderland.
Materials You’ll Need
- Empty toilet paper rolls: These will be the base of your lanterns, ready for transformation.
- Acrylic paint (various colors): Choose bright and cheerful colors to make your lanterns pop.
- Paintbrush: A good paintbrush will help you apply the paint smoothly and evenly.
- Battery-operated tea lights: Safe and easy to use, these will provide a lovely glow.
- Scissors: Perfect for cutting out designs and shapes.
- Craft knife: Use this for more intricate cuts (be careful!).
- Glue or tape: To secure any decorative elements you may add.
- Decorative materials (e.g., glitter, sequins, washi tape): These will add a whimsical touch to your lanterns.
- Optional: Hole puncher, string or ribbon for hanging: If you want to hang your lanterns, this will come in handy.
Step-by-Step Directions
Step 1: Paint the Rolls
Start by painting the outside of your empty toilet paper rolls with acrylic paint in your chosen colors. I love using a variety of colors to create a vibrant effect. Let them dry completely, which can take about 30 minutes.
Step 2: Cut Shapes
Once your rolls are dry, use scissors or a craft knife to carefully cut shapes or designs into the sides. Think about stars, hearts, or even abstract patterns—whatever inspires you! You’ll want to make sure the shapes are big enough for the light to shine through.
Step 3: Add Decorative Touches
If you wish, now is the time to decorate your painted rolls with glitter, sequins, or washi tape. This is where you can really let your creativity shine! Apply glue or tape to secure your decorative materials in place.
Step 4: Add the Tea Lights
Place a battery-operated tea light inside each roll. The soft glow will peek through your beautiful designs, creating a magical ambiance.
Step 5: Optional Hanging Feature
If you’d like to hang your lanterns, take a hole puncher and make a hole at the top of each roll. Thread string or ribbon through the hole, and your lanterns are ready to hang!
Step 6: Arrange and Enjoy
Now, find a special spot to display your fairy lanterns. Whether on a windowsill, a table, or even outside for a garden party, enjoy the warm glow they provide as you bask in the beauty of your creation.
Creative Ways to Use Paper Roll Fairy Lanterns
These enchanting lanterns can be used in so many delightful ways! Arrange them as a centerpiece for a special dinner, place them along your garden path for a whimsical touch, or hang them from trees to create a magical outdoor setting. They also make wonderful gifts for friends or family, especially when personalized with their favorite colors or designs. Imagine lighting them up during a cozy evening of storytelling or enjoying their glow while sipping on a warm cup of cocoa.
How to Store, Preserve, or Reuse Paper Roll Fairy Lanterns
When it comes to storage, keep your lanterns in a cool, dry place away from direct sunlight to preserve their colors and decorations. If you want to reuse them for different occasions, simply refresh the paint or decorations to match the season or theme. These lanterns are versatile and can easily be adapted for holidays or celebrations, brightening up any space with their charm.
Creative Variations and Customizations
- Color variations: Experiment with different color combinations for unique effects.
- Theme ideas: Create lanterns based on holidays, seasons, or favorite characters.
- Seasonal adaptations: Add fall leaves or winter snowflakes for seasonal charm.
- Kid-friendly modifications: Let kids use finger paints or stickers for a more personal touch.
- Advanced creative upgrades: Try adding LED fairy lights for a more vibrant effect.
Tips for Success
- Avoid cutting too close to the edges of the rolls to prevent tears.
- Always supervise children when using scissors or craft knives.
- Prepare your workspace with newspapers or a drop cloth to catch any paint spills.
- For easy cleanup, use washable paints and keep wipes handy.
- Take your time and enjoy the process; there is no rush in creativity!
FAQs About Paper Roll Fairy Lanterns
Can beginners make this?
Absolutely! This project is perfect for beginners and requires only basic crafting skills.
Can children participate?
Yes! It’s a wonderful activity for kids, with adult supervision for cutting. They will love painting and decorating their own lanterns.
How long does it last?
With proper care, your lanterns can last for a long time. Just remember to store them safely when not in use.
Can I customize it?
Definitely! You can personalize your lanterns with different colors, shapes, and decorations to fit your style!
A Final Creative Note
As you embark on this crafting adventure, remember that the heart of DIY is not just about the finished product, but the joy and connection that comes from creating. Celebrate your creativity, honor your self-expression, and cherish the moments spent making something beautiful with your own hands. So gather your materials, invite a friend or family member to join you, and let the magic of crafting unfold! For more delicious recipes, check out the fluffy blueberry lemon ricotta pancakes or easy pineapple rum cocktail for treats you will love!
For even more DIY inspiration, be sure to follow our Pinterest page!
Paper Roll Fairy Lanterns
Equipment
- Scissors or Craft Knife
- Paintbrushes
- Work Surface
Ingredients
Materials
- 2 empty toilet paper rolls clean and dry
- acrylic paint various colors
- 2 paintbrushes
- 1 craft knife or scissors for cutting designs
- 2 LED tealight candles
- string or twine for hanging
- stickers, glitter, washi tape, or decorative elements optional
Instructions
- Step 1: Start with two clean and dry toilet paper rolls. Carefully cut decorative shapes such as stars, moons, hearts, or custom designs into one side of each roll.
- Step 2: Paint the outside of each roll using acrylic paint. Choose bright colors for a playful look or darker shades for a cozy atmosphere.
- Step 3: Decorate the painted rolls with glitter, stickers, washi tape, or any embellishments you like. Allow everything to dry completely.
- Step 4: Place an LED tealight candle inside each decorated roll. Make sure the candle fits securely.
- Step 5: Tie string or twine around the top if you would like to hang the lanterns. Alternatively, place them on a table, shelf, or windowsill.
- Step 6: Turn on the LED candles and enjoy the magical glow of your handmade fairy lanterns.
