
Oh, Halloween! It’s that magical time of year when the air turns crisp, the leaves crunch underfoot, and a little bit of spooky fun fills every corner. Growing up, I always loved the homemade treats that appeared around this time, especially those that looked a little eerie but tasted absolutely divine. If you’re anything like me, you want to whip up something wickedly good for your costume party, trick-or-treaters, or just a cozy night in watching your favorite scary movies, but without spending hours in the kitchen. Well, my friend, you’ve stumbled upon a real gem today! These Halloween Coconut Kiss of Death Bites are not only incredibly easy and quick to make, but they’re also hauntingly delicious and sure to be a memorable addition to your spooky spread. They’re like a ghostly hug for your tastebuds, with a playful “kiss of death” twist!
Why You’ll Love Halloween Coconut Kiss of Death Bites
- Fast: Seriously, these come together in a flash, leaving you more time for costume planning!
- Easy: No complicated techniques or fancy equipment needed. Just mix, roll, and dip!
- Giftable: Package these up in a cute box with a spooky tag for a truly killer hostess gift.
- Crowd-pleasing: Who doesn’t love the dreamy combo of coconut and white chocolate? The “blood” drizzle just adds to the fun!
Ingredients
Gather your ghoulish goodies! Here’s what you’ll need for these chillingly good treats:
- 2 cups shredded sweetened coconut: The star of our show, giving these bites their signature chewy texture and tropical flavor.
- 1 cup powdered sugar: Also known as confectioners’ sugar, this helps bind our coconut mixture and adds a touch of sweetness without being grainy.
- ½ cup sweetened condensed milk: This is our magic binder, making the coconut mixture wonderfully sticky and rich.
- 1 teaspoon vanilla extract: A splash of vanilla brightens all the flavors and adds that classic comforting taste.
- 1 cup white chocolate chips (or white candy melts): The perfect ghostly coating! Candy melts are often easier to work with for dipping, but chips work great too.
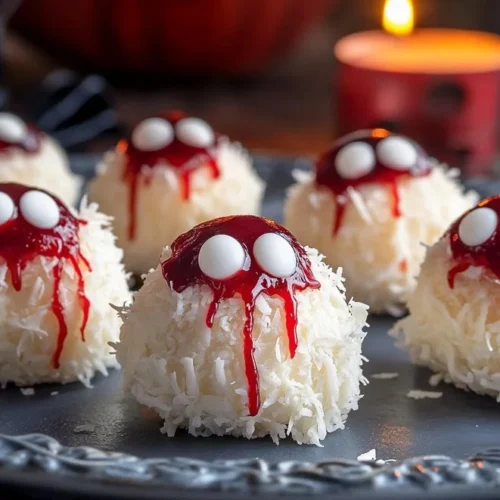
- ½ cup raspberry jam (for “blood” drizzle): This is where the “Kiss of Death” comes in! The vibrant red jam creates a perfectly spooky “blood” effect.
How to Make Halloween Coconut Kiss of Death Bites
Ready to conjure up some magic in the kitchen? Follow these simple steps, and you’ll have a tray of spooky treats in no time!
- Mix Your Base: Grab a large mixing bowl – you want plenty of room to get everything combined. Toss in your shredded coconut, powdered sugar, sweetened condensed milk, and vanilla extract. Now, get in there with a spoon or even your clean hands (which is my favorite way to do it for even mixing!) and stir everything together until you have a sticky, cohesive “dough.” You’ll know it’s right when you can press it together and it holds its shape.
- Roll into Balls: Take small portions of the mixture, about a tablespoon each, and roll them gently between your palms to form neat 1-inch balls. Don’t worry if they’re not perfectly uniform – character is good! Place your completed balls on a baking sheet lined with parchment paper. This parchment paper is your best friend for easy cleanup and preventing sticking.
- Chill Out: Pop that baking sheet into the freezer for about 15-20 minutes. This quick chill helps the coconut balls firm up nicely, making them much easier to dip in chocolate later. It prevents them from falling apart or getting too soft in the warm chocolate.
- Melt the White Chocolate: While your coconut bites are chilling, it’s time to prepare their ghostly coating! Place your white chocolate chips (or candy melts) in a microwave-safe bowl. Heat them in 30-second bursts, stirring really well after each interval. Patience is key here – chocolate can seize up if it gets too hot too fast. Keep stirring until it’s completely smooth and luscious.
- Dip and Coat: Retrieve your firm coconut balls from the freezer. Using a fork or a toothpick, carefully dip each ball into the melted white chocolate. Make sure it’s fully coated! Lift it out, tap gently on the side of the bowl to let any excess chocolate drip off, and then return it to the parchment-lined baking sheet. Repeat until all your bites are beautifully coated. For another fun Halloween treat, you might enjoy making these Creepy Eyeball Donuts, which also use a simple dipping method for their eerie aesthetic!
- Prepare the “Blood” Drizzle: Now for the fun, spooky part! Spoon your raspberry jam into a small microwave-safe bowl. Heat it for just 10-15 seconds in the microwave. You want it warm enough to be pourable, but not so runny that it just slides right off. Stir it to make sure it’s smooth.
- Drizzle the “Kiss of Death”: Get creative here! Use a spoon to haphazardly drizzle the warm raspberry jam over the white chocolate-coated bites. You can make it look like splatters, drips, or creepy spiderweb patterns. If you’re feeling fancy, you can even put the jam in a small piping bag (or a Ziploc bag with the corner snipped off) for more controlled lines.
- Final Chill: Once all your bites are “bloody,” pop the tray back into the refrigerator. Let them chill until the chocolate is completely set and the bites are firm. Then, they’re ready to serve and impress!
Substitutions & Additions
Don’t be afraid to experiment and make these bites your own! Here are a few ideas to get your creative juices flowing:
- Chocolate Swap: Not a fan of white chocolate? You could use dark chocolate for a “black magic” vibe, or even milk chocolate.
- Jam Alternatives: If raspberry isn’t your jam (pun intended!), cherry pie filling or strawberry jam would also work wonderfully for the “blood” effect. Even a little red food coloring mixed into a simple glaze could do the trick!
- Extra Spooky Toppings: Before the white chocolate sets, sprinkle on some black or orange sprinkles, edible glitter, or even tiny candy eyeballs for extra ghoulish charm. You can find similar fun with sprinkles on recipes like No-Bake Pumpkin Cheesecake Balls for another festive treat idea.
- Nutty Twist: For a little crunch, finely chop some almonds or pecans and mix them into the coconut base.
Tips for Success
- Don’t Overheat Chocolate: When melting your white chocolate, go slow! Overheating can make it seize and become clumpy. Stir, stir, stir between each short microwave interval.
- Chill, Chill, Chill: Those freezing steps aren’t just suggestions. Chilling the coconut balls makes them so much easier to handle and ensures a smooth, even chocolate coating.
- Working with Sticky Dough: If the coconut mixture is too sticky to roll, try chilling it for 10 minutes before rolling, or lightly grease your hands with a tiny bit of coconut oil.
- Perfect Drizzle: For really fine “blood” drizzles, use a fork to flick the jam, or a small squeeze bottle if you have one on hand.
How to Store Halloween Coconut Kiss of Death Bites
These spooky treats are best stored in an airtight container in the refrigerator. They’ll stay fresh and delicious for up to 5-7 days. While they’re perfectly fine at room temperature for a party spread, keeping them chilled helps the chocolate stay firm and the coconut mixture maintains its delightful texture. I find they actually taste even better cold!
FAQs
- Can I make these ahead of time?
- Absolutely! These bites are perfect for making in advance. You can prepare them completely up to 2-3 days before your event and store them in an airtight container in the refrigerator.
- What if my white chocolate is too thick for dipping?
- If your melted white chocolate seems too thick, you can thin it out with a tiny bit (about ½ to 1 teaspoon) of coconut oil or vegetable shortening. Stir it in thoroughly until you reach your desired consistency.
- Can I use fresh coconut instead of shredded sweetened coconut?
- While you could, the recipe is designed for sweetened shredded coconut, which is drier and provides the right texture and sweetness. If you use fresh, you might need to adjust the powdered sugar and condensed milk to get the right consistency, and the flavor will be less intensely coconutty.
- Are these bites suitable for kids?
- Definitely! Despite their spooky name, these are just sweet coconut treats with a fun “bloody” drizzle. Kids love helping to roll the balls and, especially, creating the jam “blood” effect! If you’re looking for another fun and festive Halloween activity with the kids, check out these Black Poison Swirl Candy Apples!
For more delicious and spooky recipe ideas, be sure to follow us on Pinterest!
Halloween Coconut Kiss of Death Bites
Equipment
- Large mixing bowl
- baking sheet
- parchment paper
- Microwave-safe bowl
- Fork or toothpick
- spoon
Ingredients
- 2 cups shredded sweetened coconut
- 1 cup powdered sugar also known as confectioners' sugar
- 0.5 cup sweetened condensed milk
- 1 tsp vanilla extract
- 1 cup white chocolate chips or white candy melts
- 0.5 cup raspberry jam for “blood” drizzle
Instructions
- Step 1: Mix Your Base: In a large mixing bowl, combine shredded coconut, powdered sugar, sweetened condensed milk, and vanilla extract. Stir everything together until you have a sticky, cohesive "dough" that holds its shape.
- Step 2: Roll into Balls: Take small portions (about a tablespoon each) of the mixture and roll them gently into neat 1-inch balls. Place them on a baking sheet lined with parchment paper.
- Step 3: Chill Out: Pop the baking sheet into the freezer for about 15-20 minutes. This quick chill helps the coconut balls firm up, making them easier to dip.
- Step 4: Melt the White Chocolate: While the coconut bites are chilling, place white chocolate chips (or candy melts) in a microwave-safe bowl. Heat in 30-second bursts, stirring well after each interval, until completely smooth and luscious.
- Step 5: Dip and Coat: Retrieve the firm coconut balls from the freezer. Using a fork or toothpick, carefully dip each ball into the melted white chocolate, ensuring it's fully coated. Lift, tap gently to remove excess, and return to the parchment-lined baking sheet. Repeat for all bites.
- Step 6: Prepare the "Blood" Drizzle: Spoon raspberry jam into a small microwave-safe bowl. Heat for just 10-15 seconds until warm enough to be pourable but not too runny. Stir to smooth.
- Step 7: Drizzle the "Kiss of Death": Use a spoon to haphazardly drizzle the warm raspberry jam over the white chocolate-coated bites to create splatters, drips, or creepy patterns. For more controlled lines, use a small piping bag or a snipped corner of a Ziploc bag.
- Step 8: Final Chill: Once all bites are "bloody," pop the tray back into the refrigerator. Let them chill until the chocolate is completely set and the bites are firm. Then, they're ready to serve and impress!