
Oh, Halloween! It’s that magical time of year when the leaves turn crisp, the air gets a little spooky, and the kitchen fills with the scent of warm cookies. Do you remember those childhood Halloweens, trick-or-treating and then diving into a big plate of festive treats? I sure do! And today, we’re recreating that cozy magic with a recipe that’s as fun to make as it is to eat: Halloween Skeleton Cookies!
These aren’t just any cookies; they’re little edible skeletons, perfect for parties, goodie bags, or just a fun afternoon activity with the kids. The best part? They are surprisingly simple to whip up, making them a fantastic option for even the busiest Halloween enthusiast. Get ready to impress your friends and family with these delightfully spooky creations!
Why You’ll Love Halloween Skeleton Cookies
- Fast to prepare, especially if you get the dough chilling ahead of time.
- Easy enough for bakers of all skill levels.
- Perfect for gifting to friends, neighbors, or teachers.
- Guaranteed crowd-pleasers for all ages!
Ingredients
Gathering your ingredients is the first step to baking up some Halloween fun! Here’s what you’ll need:
- 1 ½ cups white sugar: The backbone of any good sugar cookie, providing that classic sweetness.
- 1 cup butter, softened: Make sure it’s softened, not melted, for the perfect dough texture.
- 2 large eggs: To bind everything together beautifully.
- 1 ½ teaspoons vanilla extract: For that warm, comforting aroma and flavor.
- 1 ½ teaspoons almond flavoring: This adds a little something extra, a subtle nutty hint that complements the vanilla.
- 3 ½ cups all-purpose flour: The structure of our delightful cookies.
- 1 teaspoon baking powder: To give them just a little lift.
- ½ teaspoon salt: To balance out the sweetness and enhance all the flavors.
- 2 tablespoons confectioners’ sugar: For dusting your surface to prevent sticking.
- 1 cup confectioners’ sugar (for icing): The base for our simple, sweet glaze.
- 2 teaspoons milk, plus more as needed (for icing): To get our icing to the perfect drizzling consistency.
- 2 teaspoons light corn syrup, or more as needed (for icing): This is our secret ingredient for that beautiful, glossy finish!
- ¼ teaspoon vanilla extract (for icing): A little extra vanilla in the icing never hurt anyone!
- 1 (1.5 ounce) tube black decorating gel: For drawing those spooky skeleton details!
How to Make Halloween Skeleton Cookies
Now for the fun part – bringing these little skeletons to life! Don’t worry, it’s a straightforward process that will have you feeling like a baking pro in no time.
- Cream It Up: Grab a large bowl and your electric mixer. Cream together the softened butter and white sugar until the mixture is light and fluffy. This step is key for a tender cookie!
- Add the Wet Ingredients: Now, add in your eggs, the 1 ½ teaspoons of vanilla extract, and the almond flavoring. Mix it all up until it’s well combined and looks smooth.
- Whisk the Dry: In a separate bowl, give your flour, baking powder, and salt a good whisk together. This ensures everything is evenly distributed, preventing any pockets of baking powder or salt.
- Combine It All: Gradually add the dry flour mixture to your creamed butter and egg mixture. Mix on low speed until everything just comes together into a dough. Be careful not to overmix!
- Chill Out: Wrap your cookie dough tightly in plastic wrap. Pop it into the refrigerator for at least 3 to 4 hours, or even better, let it chill overnight. This resting period is crucial for making the dough easier to handle and preventing the cookies from spreading too much.
- Preheat and Prep: When you’re ready to bake, preheat your oven to 350 degrees F (175 degrees C). Line two baking sheets with parchment paper. This makes cleanup a breeze and ensures your cookies don’t stick.
- Roll and Dust: Lightly dust a clean work surface with about 2 tablespoons of confectioners’ sugar. Roll out your chilled cookie dough to about 1/4-inch thickness. Using your favorite cookie cutters, cut out fun shapes.
- Arrange with Care: Carefully place your cut-out cookies onto the prepared baking sheets, leaving a little space between them.
- Bake to Perfection: Pop those baking sheets into the preheated oven and bake for 8 to 10 minutes. You’re looking for the edges to be lightly golden.
- Cool Down: Once baked, let the cookies sit on the baking sheets for a minute or two before carefully transferring them to wire racks to cool completely. This usually takes about 20 minutes.
- Whip Up the Icing: While your cookies cool, let’s make the icing. In a small bowl, stir together 1 cup of confectioners’ sugar and 2 teaspoons of milk until you have a smooth consistency.
- Get that Gloss: Beat in the 2 teaspoons of light corn syrup and the ¼ teaspoon of vanilla extract. Keep beating until the icing is smooth and has a lovely glossy sheen. If it seems too thick, add a tiny bit more corn syrup or milk, a teaspoon at a time, until it’s just right for drizzling.
- Piping Time: Spoon your beautiful icing into a piping bag fitted with a small, plain tip. This will give you control for those intricate skeleton designs.
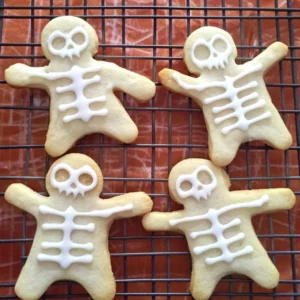
- Skeleton Art: Now for the artistic part! On each cookie, draw a filled-out circle in the center of the head for the skull. Then, draw a skeleton shape on the body, adding three horizontal lines across the chest for the ribs. Let these dry completely, which will take about 2 hours, or even better, let them dry overnight for a firmer base. If you’re short on time and want to speed up your baking process for future events, you might find it helpful to have a batch of easy chicken scampi rice ready for a quick meal.
- Final Touches: Once the icing is dry, use your black decorating gel to draw the eyes, nose, and mouth on each skull. Let these dry again for about an hour. And voilà! Your adorable Halloween Skeleton Cookies are ready to spook and delight!

Substitutions & Additions
Feeling creative? Here are some ideas to make your skeleton cookies even more special:
- Flavor Boost: Instead of almond extract, try a bit of lemon extract for a citrusy twist, or even a pinch of cinnamon for a warm spice note.
- Color Your World: Tint your icing with a drop of orange or purple food coloring for a more vibrant Halloween look.
- Extra Sparkle: Before the icing dries, sprinkle a little edible glitter over the bones for a ghostly shimmer.
- Chocolate Lover’s Dream: Use a chocolate cookie dough recipe, or add a tablespoon of cocoa powder to the dry ingredients for a rich chocolate skeleton. You could even drizzle with melted chocolate!
- Different Shapes: While skeletons are fun, don’t be afraid to use other Halloween cookie cutters like ghosts, bats, or pumpkins and decorate them as skeletons.
Tips for Success
A few little tricks can make a big difference in achieving perfect Halloween Skeleton Cookies:
- Don’t Overwork the Dough: Overmixing the cookie dough can lead to tough cookies. Mix just until combined.
- Chill, Chill, Chill: That chilling time is essential! If your dough gets too warm while you’re cutting out shapes, pop it back in the fridge for a bit.
- Even Thickness: Try to roll your dough to an even thickness so all your cookies bake at the same rate. A rolling pin with guides can be super helpful here.
- Parchment Paper is Your Friend: Seriously, it makes life so much easier, especially for decorating.
- Practice Your Piping: If you’re new to piping, practice on a piece of parchment paper first to get a feel for the pressure and flow of the decorating gel or icing.
- Prep Ahead: You can make the cookie dough a day or two in advance and keep it chilled. The icing can also be made ahead and stored in an airtight container in the fridge; just stir in a little more milk or corn syrup if it thickens too much.
How to Store Halloween Skeleton Cookies
Once your spooky masterpieces are completely dry, it’s time to think about storage. These cookies are best stored in an airtight container at room temperature. They’ll stay fresh and delicious for about 3-5 days. If you stack them, place a layer of parchment paper between each layer to prevent the icing from sticking.
FAQs
Can I make these cookies ahead of time?
Absolutely! The dough can be made and chilled for up to 3 days, or frozen for up to 3 months. The decorated cookies, once fully dry, will keep well at room temperature for several days.
What if I don’t have cookie cutters?
No worries! You can freehand cut shapes with a knife, or use the rim of a glass for circles. For the skeleton, you can even try cutting out a simple gingerbread man shape and decorating it as a skeleton.
How do I get my icing to be the right consistency for decorating?
The key is the corn syrup and milk. Start with the amounts listed, and then add more corn syrup for glossiness or more milk (just a tiny bit at a time!) for a thinner, more drizzly consistency. You want it to be thick enough to hold its shape but fluid enough to pipe easily.
Happy baking and have a spooktacular Halloween!
For more fun baking ideas and inspiration, be sure to follow us on Pinterest!
Halloween Skeleton Cookies
Equipment
- Electric mixer
- large bowl
- Separate bowl
- Plastic wrap
- Baking sheets
- parchment paper
- Rolling pin
- Cookie cutters
- Wire racks
- Small bowl
- Piping Bag
- Small Plain Tip
Ingredients
For the Cookies
- 1.5 cups white sugar
- 1 cup butter softened
- 2 large eggs
- 1.5 teaspoons vanilla extract
- 1.5 teaspoons almond flavoring
- 3.5 cups all-purpose flour
- 1 teaspoon baking powder
- 0.5 teaspoon salt
- 2 tablespoons confectioners’ sugar for dusting surface
For the Icing
- 1 cup confectioners’ sugar
- 2 teaspoons milk plus more as needed
- 2 teaspoons light corn syrup or more as needed
- 0.25 teaspoon vanilla extract
For Decoration
- 1 (1.5 ounce) tube black decorating gel
Instructions
- Step 1: Grab a large bowl and your electric mixer. Cream together the softened butter and white sugar until the mixture is light and fluffy. This step is key for a tender cookie!
- Step 2: Now, add in your eggs, the 1 ½ teaspoons of vanilla extract, and the almond flavoring. Mix it all up until it’s well combined and looks smooth.
- Step 3: In a separate bowl, give your flour, baking powder, and salt a good whisk together. This ensures everything is evenly distributed, preventing any pockets of baking powder or salt.
- Step 4: Gradually add the dry flour mixture to your creamed butter and egg mixture. Mix on low speed until everything just comes together into a dough. Be careful not to overmix!
- Step 5: Wrap your cookie dough tightly in plastic wrap. Pop it into the refrigerator for at least 3 to 4 hours, or even better, let it chill overnight. This resting period is crucial for making the dough easier to handle and preventing the cookies from spreading too much.
- Step 6: When you’re ready to bake, preheat your oven to 350 degrees F (175 degrees C). Line two baking sheets with parchment paper. This makes cleanup a breeze and ensures your cookies don’t stick.
- Step 7: Lightly dust a clean work surface with about 2 tablespoons of confectioners’ sugar. Roll out your chilled cookie dough to about 1/4-inch thickness. Using your favorite cookie cutters, cut out fun shapes.
- Step 8: Carefully place your cut-out cookies onto the prepared baking sheets, leaving a little space between them.
- Step 9: Pop those baking sheets into the preheated oven and bake for 8 to 10 minutes. You’re looking for the edges to be lightly golden.
- Step 10: Once baked, let the cookies sit on the baking sheets for a minute or two before carefully transferring them to wire racks to cool completely. This usually takes about 20 minutes.
- Step 11: While your cookies cool, let’s make the icing. In a small bowl, stir together 1 cup of confectioners’ sugar and 2 teaspoons of milk until you have a smooth consistency.
- Step 12: Beat in the 2 teaspoons of light corn syrup and the ¼ teaspoon of vanilla extract. Keep beating until the icing is smooth and has a lovely glossy sheen. If it seems too thick, add a tiny bit more corn syrup or milk, a teaspoon at a time, until it’s just right for drizzling.
- Step 13: Spoon your beautiful icing into a piping bag fitted with a small, plain tip. This will give you control for those intricate skeleton designs.
- Step 14: Now for the artistic part! On each cookie, draw a filled-out circle in the center of the head for the skull. Then, draw a skeleton shape on the body, adding three horizontal lines across the chest for the ribs. Let these dry completely, which will take about 2 hours, or even better, let them dry overnight for a firmer base. If you’re short on time and want to speed up your baking process for future events, you might find it helpful to have a batch of [easy chicken scampi rice](https://food-knight.com/easy-chicken-scampi-rice/) ready for a quick meal.
- Step 15: Once the icing is dry, use your black decorating gel to draw the eyes, nose, and mouth on each skull. Let these dry again for about an hour. And voilà! Your adorable Halloween Skeleton Cookies are ready to spook and delight!