
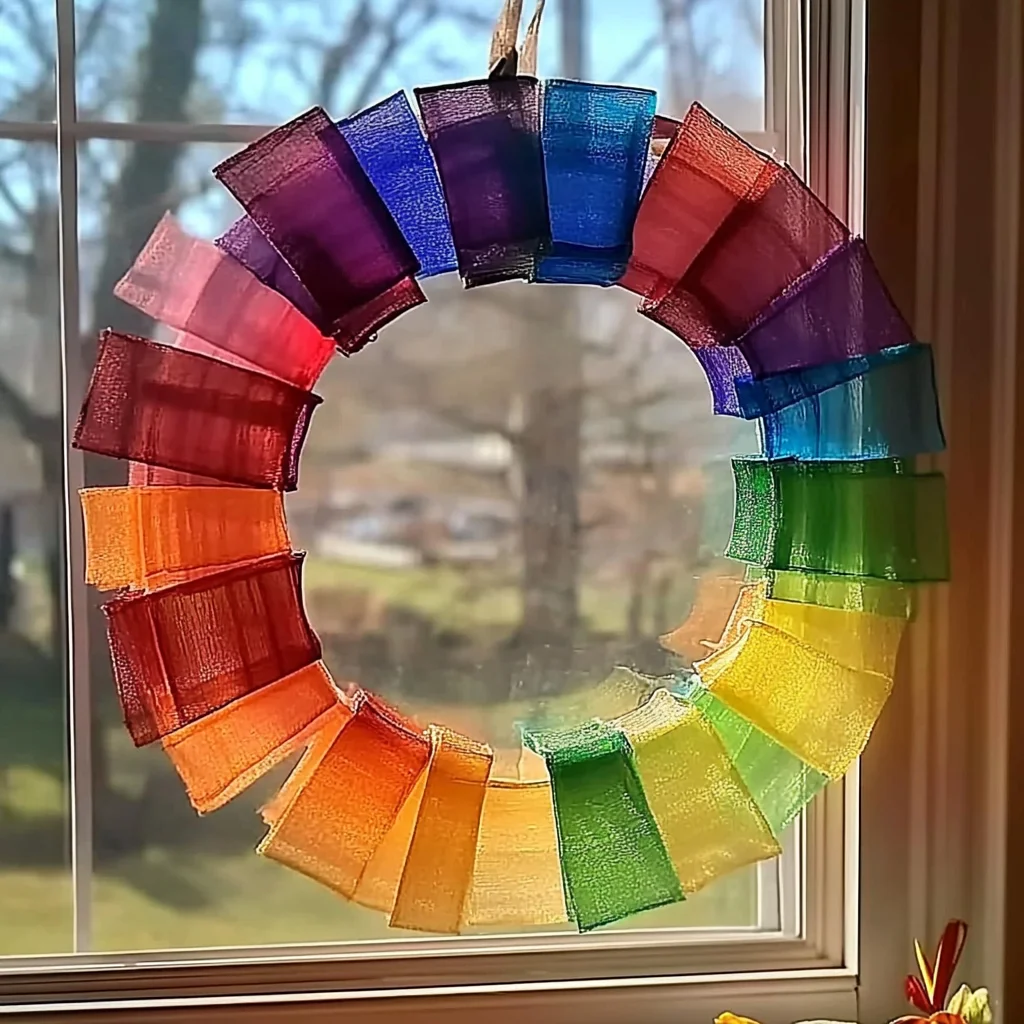
Imagine a warm afternoon, sunlight streaming through your window, casting vibrant colors across your room. There’s something truly magical about creating your own rainbow suncatcher. This DIY project not only fills your space with beautiful hues but also brings a sense of calm and creativity to your day. As you cut and arrange colorful tissue paper, you’ll find yourself lost in the moment, enjoying the tactile experience of crafting with your hands. The joy of seeing your creation come to life as the sunlight dances through the colors is simply unforgettable.
Why You’ll Love DIY Rainbow Suncatcher
- Beginner-friendly
- Budget-friendly
- Creative and fun
- Great for kids and families
- Perfect for gifts or decorations
- Customizable
The Heart Behind This DIY
Crafting a rainbow suncatcher is not just about the end product; it’s about the journey of creation. Engaging in this project allows you to tap into your creativity and express yourself through colors and shapes. The act of cutting and arranging the tissue paper encourages mindfulness, helping you focus on the present moment. Plus, it’s a wonderful way to bond with family or friends, sharing laughter and stories as you create together. Crafting can boost your confidence, allowing you to see the beauty in your handmade creations and feel a sense of accomplishment.
A Gentle Look at the Process
As you embark on this crafting adventure, picture yourself surrounded by an array of colorful tissue papers. You’ll start by cutting the clear contact paper to your desired size, feeling the smooth texture between your fingers. The process is simple yet satisfying: peel, arrange, and seal. With each step, you’ll see your vision come to life, transforming your space into a vibrant display of color and light. It’s a delightful experience that brings a sense of peace and joy, reminding us of the beauty found in everyday moments.
Materials You’ll Need
- Clear contact paper: This will be your canvas, holding all the colorful pieces together.
- Colored tissue paper (various colors): Choose your favorite shades to create a stunning rainbow effect.
- Scissors: Essential for cutting the contact paper and tissue shapes.
- Black construction paper: This will serve as a frame for your suncatcher.
- Craft knife or scissors: Use these for more precise cuts, especially for the frame.
- Tape: To attach your suncatcher to the frame.
- Optional: hole punch and string for hanging: If you want to display your creation, this is an easy addition!
Step-by-Step Directions
Step 1
Cut a piece of clear contact paper to your desired size for the suncatcher, letting your creativity guide you. I like to make mine around 12 inches wide, but feel free to adjust based on your space!
Step 2
Peel the backing off the contact paper and place it sticky side up on a flat surface. Take a moment to admire the clear canvas that will soon be bursting with color!
Step 3
Cut the colored tissue paper into small shapes—squares, circles, or even fun freeform shapes. Let your imagination run wild! The variety will add to the beautiful stained-glass effect.
Step 4
Arrange the tissue paper shapes on the contact paper, leaving some space in between each piece. This will create that lovely stained glass effect when the sunlight shines through.
Step 5
Once you are satisfied with your arrangement, place another piece of clear contact paper over the top to seal the tissue paper in place. Press gently to remove any air bubbles.
Step 6
Trim any excess contact paper around the edges of the suncatcher. This will give it a nice clean look, ready for framing.
Step 7
Cut a shape (such as a sun or a circle) from the black construction paper to frame the suncatcher. This contrast will make your colors pop beautifully!
Step 8
Use tape to attach the suncatcher to the black construction paper frame securely. Make sure it is aligned nicely for a polished finish.
Step 9
Optionally, punch a hole at the top of the suncatcher and attach a string for hanging. This is a simple way to display your artwork proudly!
Step 10
Finally, display your rainbow suncatcher in a sunny window and enjoy the colorful reflections it creates. It’s a wonderful way to brighten up your space!
Creative Ways to Use DIY Rainbow Suncatcher
Once your rainbow suncatcher is complete, the possibilities for display are endless! Hang it in a sunny window to fill your room with vibrant colors. You could also gift it to a loved one, bringing a smile to their face as they enjoy your thoughtful creation. Consider using it as a beautiful decoration for special occasions or even incorporating it into your seasonal decor. Each time the sunlight hits it, you will be reminded of the joy of creating something with your own hands.
How to Store, Preserve, or Reuse DIY Rainbow Suncatcher
To preserve your rainbow suncatcher, keep it in a safe, dry place when not in use. If you want to reuse the materials, gently peel apart the layers and save the tissue paper for another project. The clear contact paper can also be cut and used again for smaller crafts. Remember, these creations are meant to bring joy, so don’t hesitate to refresh or repurpose your designs!
Creative Variations and Customizations
- Color variations: Experiment with different color combinations for various effects.
- Theme ideas: Create suncatchers for holidays like Halloween or Christmas using themed colors.
- Seasonal adaptations: Change your suncatcher with the seasons, using warm colors for fall and cool colors for winter.
- Kid-friendly modifications: Let kids use fun shapes like stars or hearts for a playful touch.
- Advanced creative upgrades: Add embellishments like glitter or beads for a sparkling effect!
Tips for Success
- Common mistakes to avoid: Ensure you press firmly to avoid air bubbles when sealing the layers.
- Safety tips if applicable: Use kid-safe scissors for younger children, and supervise their crafting.
- Preparation suggestions: Gather all your materials before starting to keep the process smooth.
- Cleanup recommendations: Keep a damp cloth handy for any sticky spills while working with contact paper.
- Expert crafting tips: Don’t rush the arrangement; take your time to enjoy the creative process!
FAQs About DIY Rainbow Suncatcher
Can beginners make this?
Absolutely! This project is designed for all skill levels, making it a perfect starting point for beginners.
Can children participate?
Yes, this craft is great for kids! Just supervise the use of scissors and any sharp tools.
How long does it last?
With proper care, your rainbow suncatcher can last for years, brightening your space and reminding you of your creativity.
Can I customize it?
Definitely! Feel free to choose your favorite colors and shapes to create a truly unique piece.
A Final Creative Note
As you finish your rainbow suncatcher, take a moment to appreciate the colors and creativity you’ve poured into your project. Remember, crafting is not just about the final product; it’s about the joy and connection you experience along the way. Celebrate your creativity and share this experience with loved ones—there’s nothing quite like the joy of handmade projects! For more delicious recipes, check out blueberry lemon ricotta pancakes or grilled chicken bites with creamy garlic sauce for treats you will love!
For more DIY inspiration, follow our Pinterest page!
DIY Rainbow Suncatcher
Equipment
- Scissors
- Craft Knife
- Tape
Ingredients
Materials You'll Need
- Clear contact paper
- Colored tissue paper (various colors)
- Black construction paper
- Hole punch (optional)
- String (optional)
Instructions
- Step 1: Cut a piece of clear contact paper to your desired size for the suncatcher, letting your creativity guide you.
- Step 2: Peel the backing off the contact paper and place it sticky side up on a flat surface.
- Step 3: Cut the colored tissue paper into small shapes—squares, circles, or fun freeform shapes.
- Step 4: Arrange the tissue paper shapes on the contact paper, leaving some space in between each piece.
- Step 5: Place another piece of clear contact paper over the top to seal the tissue paper in place.
- Step 6: Trim any excess contact paper around the edges of the suncatcher.
- Step 7: Cut a shape from the black construction paper to frame the suncatcher.
- Step 8: Use tape to attach the suncatcher to the black construction paper frame.
- Step 9: Optionally, punch a hole at the top of the suncatcher and attach a string for hanging.
- Step 10: Display your rainbow suncatcher in a sunny window and enjoy the colorful reflections it creates.
