Hey there, my favorite kitchen adventurer! Can you believe it’s almost time for ghosts, ghouls, and all things gloriously ghoulish? For me, Halloween isn’t just about the costumes and the candy haul; it’s about the cozy, fun traditions we create in the kitchen. There’s something so special about whipping up a batch of treats that are both delicious and delightfully creepy. And if you’re looking for a recipe that ticks all those boxes and more, then you’ve stumbled upon pure gold today!
I remember the first time I made these Halloween Finger Cookies. My little niece shrieked with a mix of horror and glee, which is exactly the reaction you want, right? They look so realistic, yet they’re just sweet, buttery cookies with a hint of nutty goodness. This recipe is an absolute breeze to make, comes together incredibly fast, and trust me, it’s one of those memorable treats that will have everyone talking at your next Halloween party. Forget complicated decorations; these spooky fingers practically decorate themselves!
Why You’ll Love Halloween Finger Cookies
- Fast: From mixing bowl to oven, these cookies are quick to prepare, leaving you more time for costume planning!
- Easy: No fancy techniques here, just simple steps that even beginner bakers can master.
- Giftable: Package these up in a spooky box or bag for a truly unique and delightful Halloween gift for friends and neighbors.
- Crowd-Pleasing: Kids and adults alike get a kick out of these surprisingly delicious (and slightly gross!) treats.
Ingredients
Gathering your ingredients is the first step to any kitchen adventure! Here’s what you’ll need for these chillingly good cookies:
- 1 cup unsalted butter: Make sure it’s softened to room temperature for that perfect creamy texture when you beat it with sugar.
- ¾ cup confectioners’ sugar: Also known as powdered sugar, this gives our cookies a delicate sweetness and a tender crumb.
- 1 teaspoon vanilla extract: The secret to so many delicious baked goods, vanilla adds a warm, inviting flavor.
- ½ teaspoon salt: Just a touch to balance the sweetness and enhance all those lovely flavors.
- 1 ¾ cups all-purpose flour: The backbone of our cookie dough!
- 1 cup ground pecans: This is where the magic happens, adding a fantastic nutty depth that makes these cookies irresistible. You can buy them pre-ground or grind them yourself in a food processor.
- 50 almonds: These are going to be our gruesome “fingernails,” so pick out some nice, whole blanched almonds if you can!
How to Make Halloween Finger Cookies
Ready to get your hands spooky? Let’s dive into making these incredible Halloween Finger Cookies, step by creepy step!
1. First things first, you’ll want to get your oven ready. Preheat your oven to 300 degrees F (150 degrees C). While it’s heating up, grab a large baking sheet and line it with parchment paper. This little trick makes cleanup a breeze and helps prevent your cookies from sticking.
2. In a large bowl, it’s time to bring that lovely butter and sugar together. Using an electric mixer, beat the softened butter and confectioners’ sugar until the mixture is light and fluffy. It should look pale and airy. Next, blend in your vanilla extract and the salt. Now, gradually add in your all-purpose flour and the ground pecans. Mix until just combined – you don’t want to overmix, or your cookies might become tough. The dough will be soft but pliable.
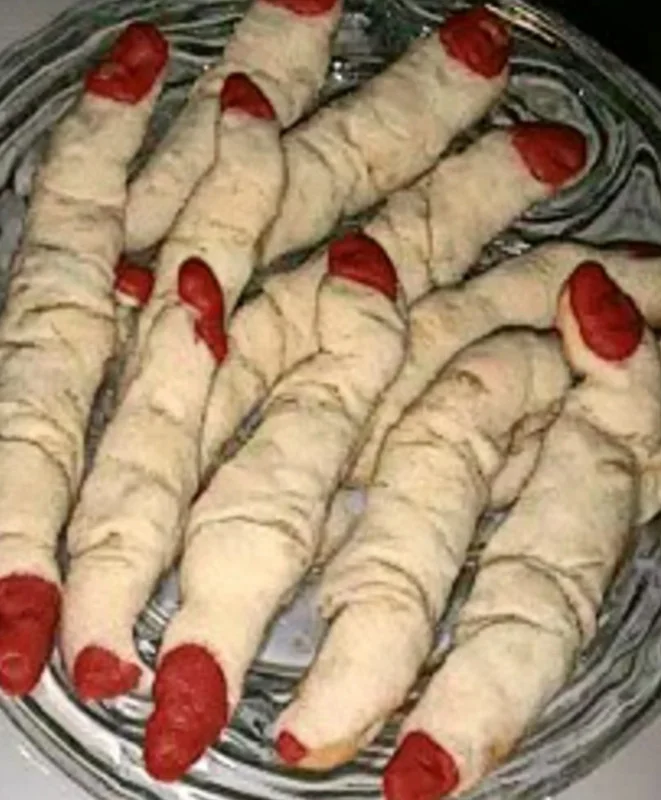
3. Now for the fun, and slightly grotesque, part! Take about 1 tablespoon of dough and roll it between your palms to shape it into a finger. You’re aiming for something around 3 inches long and about ¾ inch wide. Don’t worry about perfection; some crooked fingers just add to the spooky charm! Keep repeating this process until you’ve used up all your dough – you should get roughly 50 fingers.
4. Carefully place your dough fingers onto your prepared baking sheet, making sure they’re about 2 inches apart. They don’t spread much, but a little space is good. Now, press an almond onto one end of each finger to create that perfectly creepy “fingernail.”
5. To make them even more realistic, take a sharp knife and gently score some “knuckles” into the centers of the fingers. A couple of horizontal lines will do the trick! This really sells the illusion and makes them extra fun to look at.
6. Pop your baking sheet into the preheated oven and bake for about 20 minutes, or until they are set and just very lightly browned around the edges. You want them cooked through but still tender. Once they’re done, remove them from the oven and let them cool completely on the baking sheet. They’ll crisp up a bit more as they cool. You can also explore other fun baking projects like making a batch of delightful Apricot Almond Shortbread Cookies if you’re in the mood for more nutty treats after these spooky fingers cool!
Substitutions & Additions
Part of the joy of baking is making a recipe your own! Here are a few ideas to switch things up:
- Nuts: Not a pecan fan? You can easily swap the ground pecans for ground almonds, walnuts, or even hazelnuts for a different nutty flavor. Just be sure they’re finely ground.
- Flavor Boost: For an extra kick, add ½ teaspoon of almond extract along with the vanilla. It really enhances the flavor of the almond “nails”!
- Spooky Colors: A tiny drop of green or purple food coloring in the dough could give your fingers an even more eerie hue!
- Bloody Detail: Once the cookies are cooled, you can dab a bit of red gel icing or melted red candy melts under the almond “nail” for a “bloody” effect. It’s wonderfully gruesome!
- Chocolate Drizzle: Dip the cooled ends of the fingers in melted chocolate (white, dark, or milk!) for an extra touch of sweetness.
Tips for Success
Even though these Halloween Finger Cookies are super easy, a few tricks can make them even better!
- Room Temperature Butter: I can’t stress this enough! Softened butter creams beautifully with sugar, leading to a much better cookie texture. If it’s too cold, it won’t combine properly; too warm, and your dough might be greasy.
- Don’t Overmix: Once you add the flour, mix only until no streaks of flour remain. Overmixing develops the gluten, which can make your cookies tough instead of tender.
- Uniform Size: Try to make your fingers roughly the same size so they bake evenly.
- Chill the Dough (Optional): If your kitchen is warm or your dough feels too soft to shape, pop it in the fridge for 15-20 minutes. This will make it easier to handle.
- Prep Ahead: You can absolutely make the dough a day or two in advance and store it wrapped tightly in the fridge. Just let it soften slightly at room temperature before shaping.
- No Almonds? No Problem! If you can’t find almonds, use pumpkin seeds or even a sliver of dried apricot for the “nails.”
How to Store Halloween Finger Cookies
Once your spooky treats are completely cooled (this is important!), you’ll want to store them properly to keep them fresh and delicious.
Simply place them in an airtight container at room temperature. They’ll stay fresh and tasty for up to 5-7 days. If you’re planning on making them further in advance, you can also freeze the baked and cooled cookies in an airtight freezer-safe container for up to 2 months. Just be sure to layer them with parchment paper to prevent sticking. Thaw them at room temperature when you’re ready to serve your ghoulish delights!
FAQs
Here are some common questions you might have about making these delightful Halloween Finger Cookies:
Q: Can I use different nuts instead of pecans?
A: Absolutely! Ground almonds, walnuts, or even hazelnuts would work wonderfully and add a slightly different flavor profile. Just make sure they’re finely ground.
Q: What if my dough is too crumbly or too sticky?
A: If it’s too crumbly, add a tiny bit more softened butter, a teaspoon at a time, until it comes together. If it’s too sticky, try adding a tablespoon of flour or chilling the dough for 15-20 minutes in the fridge.
Q: Can these cookies be made gluten-free?
A: I haven’t tested this specific recipe with gluten-free flour, but typically, a 1:1 gluten-free baking blend can be substituted for all-purpose flour in shortbread-style cookies with good results. Just be aware that the texture might be slightly different.
Q: Are there other fun Halloween treats I can make?
A: Oh, definitely! If you’re looking for more festive goodies, you might love this recipe for Halloween Puppy Chow, which is another easy and crowd-pleasing snack perfect for parties!
For more delicious recipes and kitchen inspiration, follow us on Pinterest!

Spooktacularly Simple Halloween Finger Cookies: Your New Favorite Creepy Treat!
Equipment
- Electric mixer
- large bowl
- Large Baking Sheet
- parchment paper
- sharp knife
Ingredients
- 1 cup unsalted butter softened to room temperature
- 3/4 cup confectioners’ sugar also known as powdered sugar
- 1 tsp vanilla extract
- 1/2 tsp salt
- 1 3/4 cups all-purpose flour
- 1 cup ground pecans
- 50 almonds whole blanched, for “fingernails”
Instructions
- Step 1: Preheat your oven to 300 degrees F (150 degrees C). Line a large baking sheet with parchment paper.
- Step 2: In a large bowl, using an electric mixer, beat the softened butter and confectioners’ sugar until light and fluffy. Blend in vanilla extract and salt. Gradually add all-purpose flour and ground pecans, mixing until just combined; do not overmix. The dough will be soft but pliable.
- Step 3: Take about 1 tablespoon of dough and roll it between your palms to shape it into a finger, approximately 3 inches long and ¾ inch wide. Repeat this process until all dough is used, you should get roughly 50 fingers.
- Step 4: Carefully place your dough fingers onto your prepared baking sheet, making sure they’re about 2 inches apart. Press an almond onto one end of each finger to create that perfectly creepy “fingernail.”
- Step 5: To make them even more realistic, take a sharp knife and gently score some “knuckles” into the centers of the fingers. A couple of horizontal lines will do the trick!
- Step 6: Pop your baking sheet into the preheated oven and bake for about 20 minutes, or until they are set and just very lightly browned around the edges. Once they’re done, remove them from the oven and let them cool completely on the baking sheet.