
Oh, the holidays! They always bring back such sweet memories, don’t they? For me, it’s the smell of pine needles, the twinkle of lights, and of course, the iconic Little Debbie Christmas Tree Cakes. They’re such a classic part of the season! This year, I’ve found a way to capture that festive flavor in an entirely new, incredibly fun way: Little Debbie Christmas Tree Cake Balls. Seriously, if you’re looking for a treat that’s as delightful to make as it is to eat, and that will impress everyone at your holiday gatherings, you’ve found it.
Why You’ll Love Little Debbie Christmas Tree Cake Balls
- Fast: Perfect for those last-minute holiday parties or when you need a quick sweet fix.
- Easy: Even if you’re new to making cake balls, you’ll find these a breeze.
- Giftable: Package them up in cute little tins or bags for a homemade holiday gift that’s sure to be appreciated.
- Crowd-pleasing: Who can resist the creamy, cakey center covered in sweet chocolate? Everyone loves them!
Ingredients
Gathering your ingredients is half the fun! You might be surprised at how few things you need for these little bundles of holiday joy:
- 10 Little Debbie vanilla Christmas tree snack cakes, unwrapped (the more, the merrier!)
- 8 ounces cream cheese, softened (make sure it’s nice and soft for easy mixing)
- 20 ounces white chocolate melting wafers (these are great because they melt so smoothly)
- 6 ounces red vanilla flavored melting candy wafers (for that festive piping detail!)
- 1 tablespoon green sanding sugar sprinkles (the perfect finishing touch for that Christmas tree sparkle)
How to Make Little Debbie Christmas Tree Cake Balls
Alright, let’s get our hands a little festive and whip up these amazing cake balls. It’s more like playing in the kitchen than actual work!
- First things first, let’s get our baking sheets ready. Line two large baking sheets with parchment paper or a silicone mat. This will make cleanup a breeze, and trust me, nobody wants sticky baking sheets.
- In a large mixing bowl, grab your softened cream cheese. Use a handheld mixer to beat it for about 1-2 minutes on medium speed. You want it to be nice and fluffy and smooth – think airy clouds of creaminess!
- Now, for the star of the show! Break up your Little Debbie Christmas tree snack cakes into smaller pieces and toss them into the bowl with the cream cheese. Turn your mixer to low speed and mix until everything is combined and looks like a delicious, crumbly dough. I like to give it a good scrape down the sides to make sure it’s all incorporated.
- Grab a tablespoon and scoop out some of that lovely cake mixture. Gently roll it between your hands to form a smooth ball. You don’t need to pack it too tightly, just a gentle roll. Place these little beauties onto one of your prepared baking sheets. Keep going until you’ve used up all the mixture.
- Pop those baking sheets into the freezer for about 30-45 minutes. You want them to be completely solid so they don’t fall apart when you dip them. This is a crucial step for perfectly coated cake balls!
- While our cake balls are getting frosty, let’s melt our chocolate. Melt the white chocolate wafers in a medium bowl according to the package directions. You want it smooth and pourable.
- In a separate, smaller bowl, melt your red vanilla flavored candy wafers. Once they’re melted and smooth, transfer them to a small piping bag. If you don’t have a piping bag, a zip-top bag with a tiny corner snipped off works perfectly.
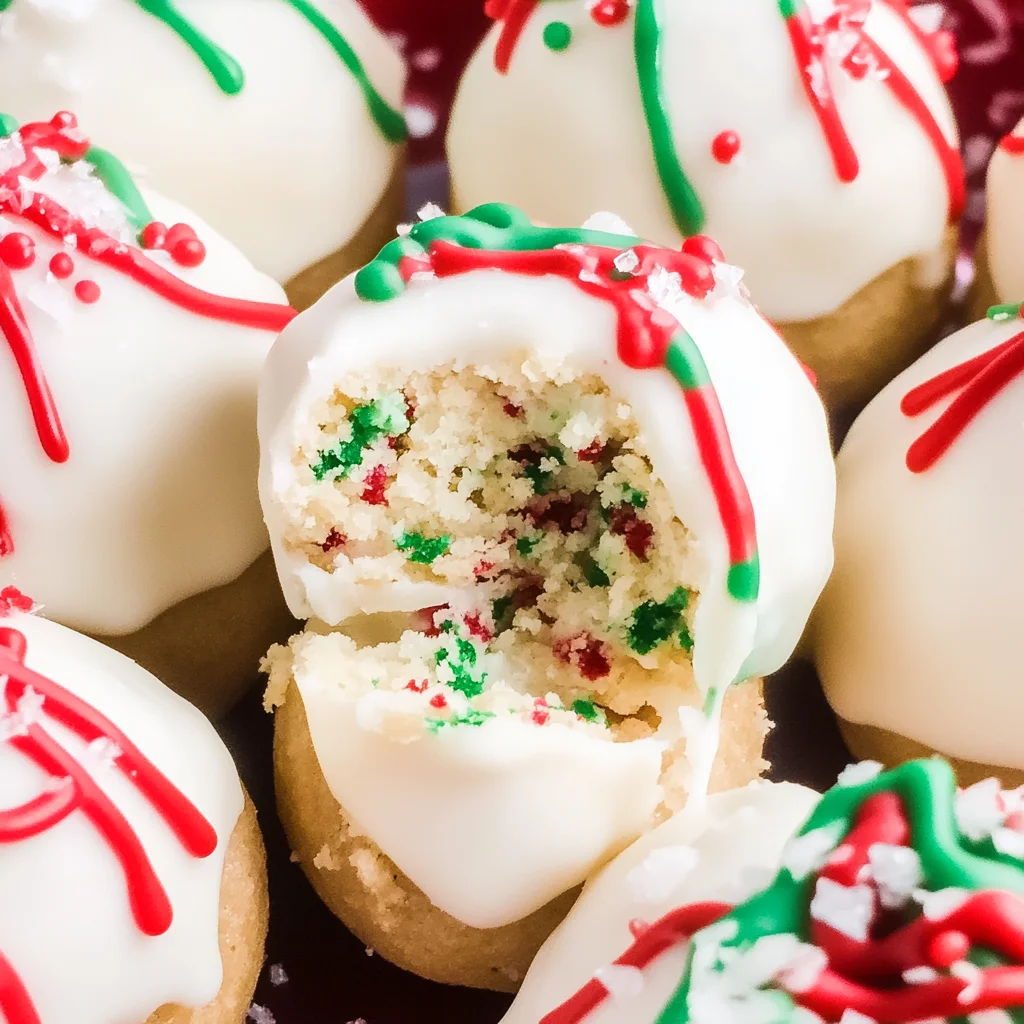
- Now for the fun part – dipping! Take your frozen cake balls out of the freezer. Dip each one into the melted white chocolate, making sure to coat every single side. Use a fork to lift them out, and gently tap the fork on the side of the bowl to let any excess chocolate drip off. This helps create a nice, even coating.
- Place the white chocolate-coated cake ball onto your second prepared baking sheet. Now, grab your piping bag with the melted red candy wafers and pipe a decorative zigzag pattern across the top. If you want to get really authentic, try to mimic the look of the original Little Debbie Christmas Tree Cakes! Sprinkle generously with the green sanding sugar while the red candy is still wet. Repeat this process for all your cake balls.
- Let your festive creations sit at room temperature for about 15-20 minutes, or until the white chocolate coating is firm. And there you have it – your very own homemade Little Debbie Christmas Tree Cake Balls, ready to be devoured!
Substitutions & Additions
Feeling a little creative? You can absolutely play around with this recipe! For a different flavor profile, you could try using Little Debbie Oatmeal Creme Pies or even some of their other seasonal treats. If you don’t have sanding sugar, any festive sprinkles will do the trick. You can also experiment with different colored candy melts for the drizzle, like a classic red and green for Christmas, or even blue and silver for a winter wonderland theme. And if you’re a fan of a little crunch, adding some finely crushed pretzels or cookie crumbs to the cream cheese mixture can add a delightful texture. For an extra pop of flavor, you might consider adding a teaspoon of almond extract to the cream cheese mixture, similar to how some enjoy adding flavor to simple violet sugar for baking.
Tips for Success
Here are a few of my go-to tips to make sure your cake balls turn out perfectly every time:
- Room Temperature Cream Cheese: Make sure your cream cheese is truly softened. If it’s too cold, it will be lumpy and hard to mix, and you might end up with chunks in your cake balls.
- Don’t Overmix: Once the snack cakes are added to the cream cheese, mix just until combined. Overmixing can make the mixture too sticky and difficult to roll.
- Chill Thoroughly: Don’t rush the freezing step! Firm cake balls are essential for easy dipping and a smooth coating.
- Work in Batches: If your kitchen is warm, the white chocolate can melt too quickly. Try dipping only a few cake balls at a time and keeping the rest in the freezer until you’re ready for them.
- Drip, Drip, Drip: Gently tapping the fork on the side of the bowl is key to getting a nice, even coating without too much excess chocolate pooling at the bottom.
How to Store Little Debbie Christmas Tree Cake Balls
Once your masterpieces are ready, you’ll want to store them properly to keep them tasting their best. You can store them in an airtight container in the refrigerator for up to a week. If you stack them, I recommend placing a layer of parchment paper between each layer to prevent them from sticking together. They’re also quite delicious when served chilled, so pulling them out of the fridge about 10-15 minutes before serving is perfect. If you’re making these ahead of time for holiday gifting, they can also be frozen in an airtight container for up to a month – just let them thaw in the refrigerator before enjoying!
FAQs
Here are a few common questions people have about making these festive treats:
Q: Can I use a different type of snack cake?
A: Absolutely! While the vanilla Christmas tree cakes are classic, you can experiment with other Little Debbie treats or even generic versions of vanilla snack cakes. Just ensure they’re not too moist.
Q: Why are my cake balls falling apart when I dip them?
A: This usually happens if they aren’t frozen solid enough, or if the cream cheese wasn’t mixed in thoroughly enough. Make sure to freeze them until they are completely firm.
Q: How can I make the zigzag drizzle look neater?
A: Practice makes perfect! If you’re struggling with the piping bag, try using a fork to gently drizzle the melted candy wafers. You can also try warming the piping bag in your hands a bit to make the candy melt more smoothly.
These Little Debbie Christmas Tree Cake Balls are such a fun and nostalgic way to celebrate the holidays. They’re perfect for cookie exchanges, classroom parties, or just enjoying with a warm mug of hot cocoa. If you enjoyed this recipe, you might also like my Grinch Cake Mix Cookies or these adorable Easy Christmas Pinwheel Cookies for more holiday baking inspiration. Happy baking, friends!
For more delicious recipes and baking inspiration, be sure to follow us on Pinterest!
Nostalgic & Easy Little Debbie Christmas Tree Cake Balls
Equipment
- Baking sheets
- Parchment Paper or Silicone Mats
- Large mixing bowl
- Handheld Mixer
- Tablespoon
- fork
- Medium bowl
- Small bowl
- Piping bag or zip-top bag
Ingredients
- 10 Little Debbie vanilla Christmas tree snack cakes unwrapped
- 8 ounces cream cheese softened
- 20 ounces white chocolate melting wafers
- 6 ounces red vanilla flavored melting candy wafers for festive piping detail
- 1 tablespoon green sanding sugar sprinkles for finishing touch
Instructions
- Line two large baking sheets with parchment paper or a silicone mat.
- Beat softened cream cheese in a large mixing bowl with a handheld mixer for 1-2 minutes until fluffy and smooth.
- Break up Little Debbie Christmas tree snack cakes into smaller pieces and add to the bowl with cream cheese. Mix on low speed until combined and crumbly.
- Scoop out tablespoon-sized portions of the mixture and gently roll into smooth balls. Place on a prepared baking sheet.
- Freeze the cake balls on the baking sheets for 30-45 minutes, or until completely solid.
- Melt the white chocolate wafers in a medium bowl according to package directions until smooth and pourable.
- Melt the red vanilla flavored candy wafers in a separate small bowl until smooth. Transfer to a small piping bag (or zip-top bag with a corner snipped off).
- Dip the frozen cake balls into the melted white chocolate, coating all sides. Use a fork to lift and tap off excess chocolate. Place on the second prepared baking sheet.
- Pipe a zigzag pattern across the top of each white chocolate-coated cake ball with the melted red candy wafers. Sprinkle with green sanding sugar while the red candy is still wet.
- Let the cake balls sit at room temperature for 15-20 minutes, or until the white chocolate coating is firm.