
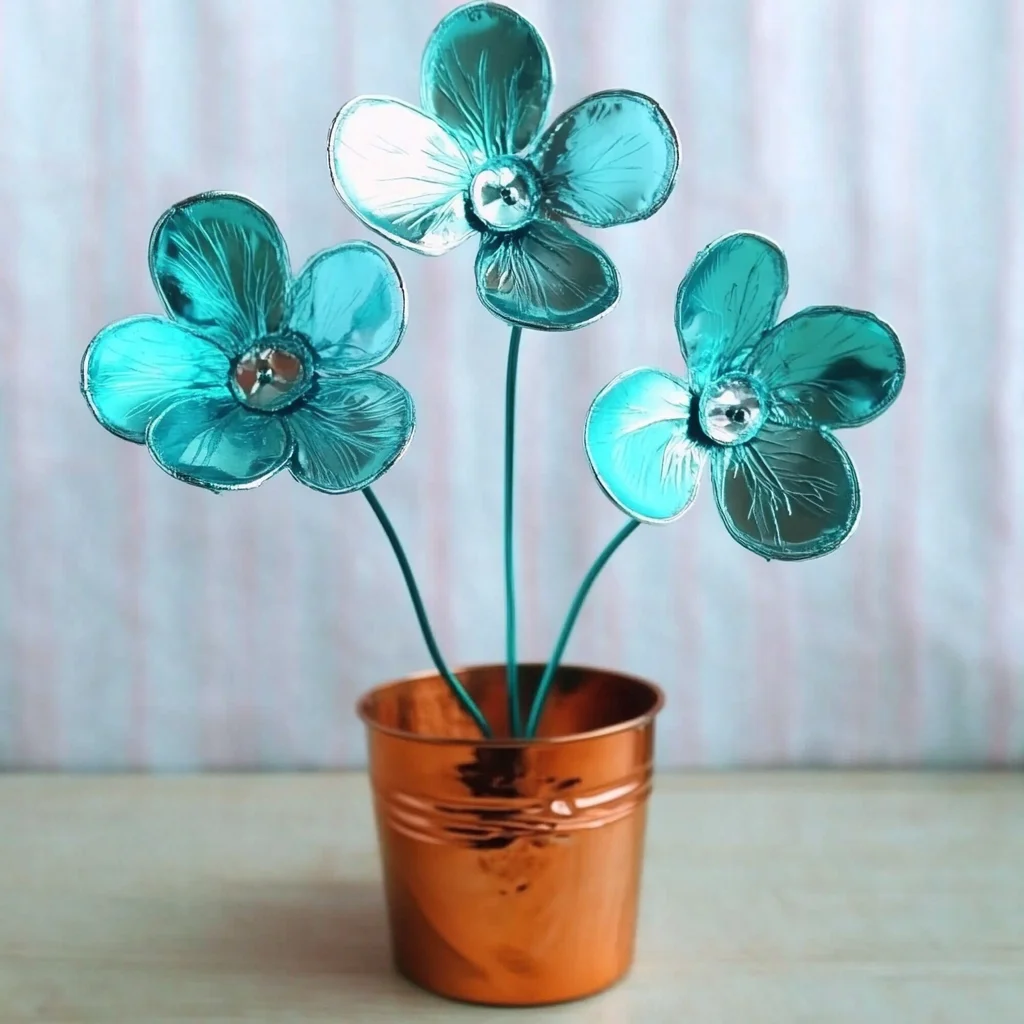
Have you ever found yourself captivated by the beauty of flowers, wishing you could bring that vibrant energy into your home without worrying about wilting petals? Creating your own Nail Polish Wire Flowers is a delightful way to express your creativity while embracing the joy of crafting. Picture this: a bouquet of colorful blooms, each one uniquely crafted by your hands, bringing warmth and charm to any corner of your space. Let’s embark on this fun and relaxing journey together, where each twist of wire and splash of color brings a smile to your face.
Why You’ll Love Nail Polish Wire Flowers
- Beginner-friendly
- Budget-friendly
- Creative and fun
- Great for kids and families
- Perfect for gifts or decorations
- Customizable
The Heart Behind This DIY
Crafting Nail Polish Wire Flowers is not just about making something beautiful; it’s a wonderful way to unwind and connect with your creative side. As you shape the wire and apply the colors, you might find yourself lost in the moment, letting go of the day’s stresses. This project is a feast for the senses—the cool touch of the wire, the vibrant hues of the nail polish, and the satisfying click of scissors as you cut. Engaging in this kind of hands-on activity helps boost mindfulness and confidence, while also providing a perfect opportunity for bonding with family or friends.
A Gentle Look at the Process
Imagine sitting at your crafting table, surrounded by vibrant nail polish bottles like a painter in front of a blank canvas. You’ll start by cutting floral wire into different lengths, shaping them into petals, and bringing them to life with your favorite colors. The process is as enjoyable as the finished product, and you will find joy in each step as you watch your flowers bloom. The best part? There are no strict rules! Let your imagination guide you in this creative journey.
Materials You’ll Need
- Nail polish – Choose various colors to bring your flowers to life!
- Floral wire – This flexible wire will serve as the backbone of your flowers.
- Wire cutters – Essential for cutting the floral wire to your desired lengths.
- Pliers – Handy for shaping the wire and twisting the petals together.
- Scissors – Useful for trimming any excess materials.
- Clear sealant (optional) – To add durability to your finished flowers.
Step-by-Step Directions
Step 1
Start by cutting your floral wire into different lengths for both the stems and petals. You can decide how tall or short you want your flowers to be. I like to make a few longer stems for a nice bouquet effect!
Step 2
Using your pliers, shape the wire into petal forms. Aim for at least three to five petals per flower, depending on how full you want them to look. Don’t worry about perfection; each flower will have its unique character.
Step 3
Now comes the fun part! Apply nail polish to the wire petals, layering different colors for a vibrant look. Let your imagination run wild! I love mixing bright colors with sparkly ones for an extra touch of whimsy.
Step 4
Once you’ve painted your petals, allow the nail polish to dry completely. The sweet scent of polish will fill the air as you wait, making this a sensory experience.
Step 5
After the polish is dry, it’s time to assemble your flower. Gently twist the petals together at the base to form a flower shape. This is where your creation starts to take form!
Step 6
Attach the flower to the floral wire stem by twisting the base of the petals around the stem. This will hold everything in place and give your flower a sturdy base.
Step 7
If you’d like to add a little more durability, spray the finished flowers with a clear sealant, which will help protect your colors and keep them looking fresh.
Step 8
Finally, arrange your beautiful wire flowers in a vase or use them to brighten up a room. You’ll be amazed at how these creations can enhance your space!
Creative Ways to Use Nail Polish Wire Flowers
Once you’ve crafted your stunning Nail Polish Wire Flowers, the possibilities are endless! You can display them in a vase as a cheerful centerpiece, or even use them to decorate a special gift. They make lovely additions to birthday parties or can be used as unique place settings. You might consider gifting them to a friend to brighten their day or placing them in your child’s room as a whimsical touch. The beauty of these flowers is that they can be as playful or as elegant as you want!
How to Store, Preserve, or Reuse Nail Polish Wire Flowers
To keep your flowers looking fabulous, store them in a cool, dry place away from direct sunlight. If you notice any dust collecting on them, a gentle wipe with a soft cloth will do the trick. If you ever want to change their look, simply repaint the petals with new nail polish colors. The beauty of this project is that you can refresh your creations whenever inspiration strikes!
Creative Variations and Customizations
- Color variations – Experiment with different shades or even glow-in-the-dark nail polish!
- Theme ideas – Create flowers for holidays, such as red and green for Christmas or pastel shades for Easter.
- Seasonal adaptations – Make autumn leaves or winter blooms to reflect the changes in nature.
- Kid-friendly modifications – Let children help with the painting while you assist with shaping the wire.
- Advanced creative upgrades – Incorporate beads or sequins for an extra sparkle!
Tips for Success
- Avoid overloading the wire with too much nail polish, as it can become heavy and the petals might droop.
- Be cautious when using wire cutters and pliers; these tools can be sharp.
- Preparation is key—set up a clean workspace to make the crafting process smooth and enjoyable.
- For easy cleanup, keep some paper towels handy to wipe up any spills.
- Don’t hesitate to experiment! Every flower can turn out differently, and that’s what makes them special.
FAQs About Nail Polish Wire Flowers
Can beginners make this?
Absolutely! This project is perfect for beginners, and it’s a great way to dive into crafting.
Can children participate?
Yes! Kids can help with painting the petals while you assist with the wire shaping. It’s a fun family activity!
How long does it last?
With proper care, your Nail Polish Wire Flowers can last for years, making them a lasting keepsake.
Can I customize it?
Definitely! Feel free to mix and match colors and shapes to create flowers that truly represent your style.
A Final Creative Note
As you wrap up your crafting session, take a moment to admire your beautiful Nail Polish Wire Flowers. Remember, every stroke of color and twist of wire is a reflection of your creativity and spirit. I hope this project inspires you to explore even more DIY adventures. For more delicious recipes, check out the delightful blueberry cheesecake swirl rolls or the tasty grilled chicken creamy pasta bowl that you will love! Keep crafting, keep creating, and let your imagination bloom!
For more DIY inspiration, follow us on Pinterest.
Nail Polish Wire Flowers
Equipment
- Floral Wire
- Wire Cutters
- Pliers
- Scissors
- Clear Sealant (optional)
Ingredients
Materials You'll Need
- Nail polish
- Floral wire
- Wire cutters
- Pliers
- Scissors
- Clear sealant (optional)
Instructions
- Step 1: Start by cutting your floral wire into different lengths for both the stems and petals.
- Step 2: Using your pliers, shape the wire into petal forms.
- Step 3: Apply nail polish to the wire petals, layering different colors for a vibrant look.
- Step 4: Allow the nail polish to dry completely.
- Step 5: Assemble your flower by gently twisting the petals together at the base.
- Step 6: Attach the flower to the floral wire stem by twisting the base of the petals around the stem.
- Step 7: Spray the finished flowers with a clear sealant for added durability.
- Step 8: Arrange your beautiful wire flowers in a vase or use them to brighten up a room.
