
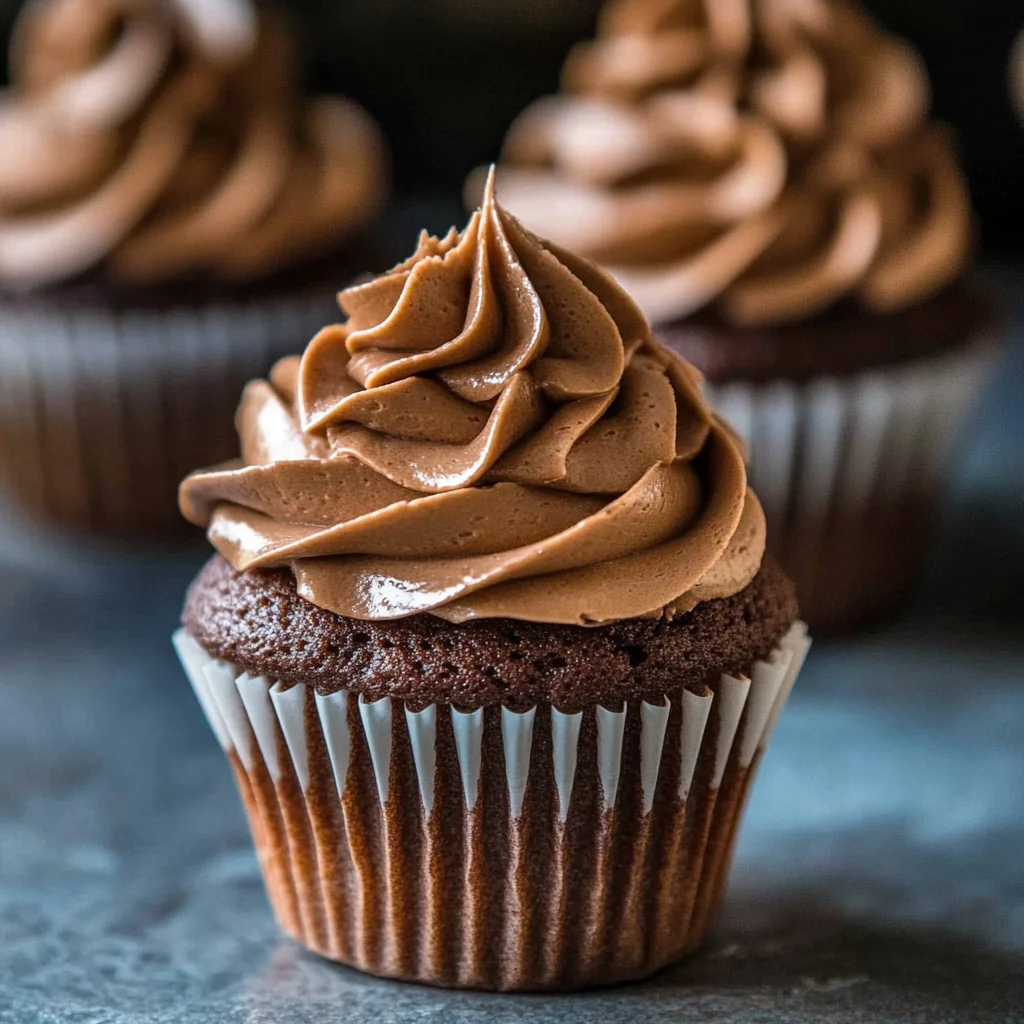
Remember those cozy afternoons, the smell of something sweet baking, and the pure joy of a perfectly frosted cupcake? I’m talking about those childhood memories, the ones that make your heart feel all warm and fuzzy. Well, get ready to relive them, because today we’re making the most incredibly easy, ridiculously moist, and perfectly chocolatey cupcakes that will transport you right back to those happy times. These are so simple, you’ll wonder why you ever bought them from a bakery!
Why You’ll Love Easy Chocolate Cupcakes
- Fast: Whip these up in under 30 minutes, plus baking time!
- Easy: Seriously, minimal effort for maximum deliciousness.
- Giftable: Perfect for bake sales, birthdays, or just because.
- Crowd-pleasing: Everyone, and I mean everyone, loves a good chocolate cupcake.
Ingredients
Gather ’round, bakers! Here’s what you’ll need to make these delightful chocolate wonders:
- 1 1/2 cups all-purpose flour: The base of our beautiful cupcakes.
- 1 cup granulated sugar: For that touch of sweetness.
- 1/3 cup natural unsweetened cocoa powder: This is where the deep chocolate flavor comes from!
- 1 tsp baking soda: Our leavening agent for that perfect rise.
- 1/2 tsp salt: Just a pinch to balance out the sweetness and enhance the chocolate.
- 1 cup warm coffee (or room temperature buttermilk): Coffee is my secret weapon for extra moisture and a deeper chocolate flavor. Buttermilk works wonderfully too!
- 1 Tbsp white distilled vinegar: This helps activate the baking soda for a lighter crumb.
- 1/3 cup light olive oil (or vegetable oil): For that incredible, tender moisture.
- 1 large egg, room temperature: Helps bind everything together.
- 2 tsp vanilla extract: Because vanilla just makes everything better!
How to Make Easy Chocolate Cupcakes
Alright, let’s get baking! Grab your apron, and let’s do this:
- Get the Oven Ready: First things first, preheat your oven to 350°F (175°C). Make sure your oven rack is smack-dab in the center. Then, grab a standard 12-count muffin tin and line it with your favorite cupcake liners.
- Combine the Dry Stuff: In a nice big mixing bowl, toss in your flour, sugar, cocoa powder, baking soda, and salt. Give them a good whisk together to make sure everything is nicely combined.
- Mix the Wet Ingredients: In a separate bowl, whisk together the warm coffee (or buttermilk), vinegar, olive oil, the egg, and the vanilla extract until everything looks nice and smooth.
- Bring It All Together: Now, pour all those lovely wet ingredients into the bowl with your dry ingredients. Whisk them together until they’re just combined. Don’t overmix! A few little lumps are totally okay, and the batter might look a bit thin – that’s exactly what we want for super moist cupcakes.
- Fill ‘Em Up: Divide the batter evenly among your prepared cupcake liners. Fill each one about two-thirds of the way full. This gives them enough room to puff up nicely without overflowing.
- Time to Bake: Pop that muffin tin into the preheated oven and bake for about 18 to 22 minutes. You’ll know they’re ready when a toothpick you stick into the center comes out nice and clean.
- Cool Down: Let those beauties cool in the muffin tin for about 5 minutes. This helps them set up a bit. Then, carefully transfer them to a wire rack to cool completely. This is the hardest part – waiting for them to cool before you can frost or enjoy them!
Substitutions & Additions
Feeling creative? You can totally jazz these up! Here are a few ideas:
- Coffee Swap: If coffee isn’t your thing, you can use hot water, but coffee really does give them that extra chocolatey oomph.
- Add-Ins: Fold in some chocolate chips, a handful of chopped nuts, or even a dollop of raspberry cheesecake filling before baking for an extra special treat.
- Frosting Fun: While these are amazing on their own, they’re even better with frosting! Try a classic chocolate buttercream, a cream cheese frosting, or even a fluffy blueberry cream cheese frosting for a fruity twist.
- Spice It Up: A pinch of cinnamon or a tiny bit of cayenne pepper can add a subtle warmth and depth to the chocolate flavor.
Tips for Success
Want to be a cupcake pro? Here are a few of my go-to tips:
- Room Temperature Ingredients: Make sure your egg is at room temperature. It helps everything emulsify better for a smoother batter.
- Don’t Overmix: Seriously, I can’t stress this enough! Overmixing develops the gluten in the flour, which can lead to tough cupcakes. Mix until just combined.
- Measure Flour Correctly: Spoon your flour into the measuring cup and level it off with a straight edge. Don’t scoop directly from the bag, as this can pack too much flour in, making your cupcakes dry.
- Prep Ahead: You can mix the dry ingredients together a day in advance and store them in an airtight container. Just add the wet ingredients when you’re ready to bake!
How to Store Easy Chocolate Cupcakes
Once your cupcakes have cooled completely, you can store them in an airtight container at room temperature for about 2-3 days. If you’ve frosted them with a cream cheese-based frosting, they’re best stored in the refrigerator. They also freeze beautifully! Wrap them well in plastic wrap and then foil, and they’ll keep in the freezer for up to 2 months.
FAQs
- Can I use milk instead of coffee? Yes, you can use milk or buttermilk. However, coffee truly enhances the chocolate flavor and moisture.
- Can I make these gluten-free? You can try substituting a gluten-free all-purpose flour blend, but the texture might vary slightly.
- How long do they last? They stay moist and delicious at room temperature for about 2-3 days in an airtight container.
These easy chocolate cupcakes are a simple joy, perfect for any occasion or just a Tuesday afternoon. They remind me of when I learned to bake, and it’s always a good idea to have a simple, reliable chocolate cupcake recipe in your back pocket, just like this one. If you’re looking for more delightful baking adventures, be sure to check out our easy homemade maple donut bars or perhaps some blueberry lemon ricotta pancakes for breakfast!
Happy Baking!
Follow us on Pinterest for more delicious recipes and baking inspiration!
EASIEST Chocolate Cupcakes
Equipment
- 12-count muffin tin
- Cupcake Liners
- Large mixing bowl
- Separate bowl
- Wire rack
Ingredients
For the Cupcakes
- 1.5 cups all-purpose flour The base of our beautiful cupcakes.
- 1 cup granulated sugar For that touch of sweetness.
- 1/3 cup natural unsweetened cocoa powder This is where the deep chocolate flavor comes from!
- 1 tsp baking soda Our leavening agent for that perfect rise.
- 1/2 tsp salt Just a pinch to balance out the sweetness and enhance the chocolate.
- 1 cup warm coffee (or room temperature buttermilk) Coffee is my secret weapon for extra moisture and a deeper chocolate flavor. Buttermilk works wonderfully too!
- 1 Tbsp white distilled vinegar This helps activate the baking soda for a lighter crumb.
- 1/3 cup light olive oil (or vegetable oil) For that incredible, tender moisture.
- 1 large egg room temperature: Helps bind everything together.
- 2 tsp vanilla extract Because vanilla just makes everything better!
Instructions
- Step 1: First things first, preheat your oven to 350°F (175°C). Make sure your oven rack is smack-dab in the center. Then, grab a standard 12-count muffin tin and line it with your favorite cupcake liners.
- Step 2: In a nice big mixing bowl, toss in your flour, sugar, cocoa powder, baking soda, and salt. Give them a good whisk together to make sure everything is nicely combined.
- Step 3: In a separate bowl, whisk together the warm coffee (or buttermilk), vinegar, olive oil, the egg, and the vanilla extract until everything looks nice and smooth.
- Step 4: Now, pour all those lovely wet ingredients into the bowl with your dry ingredients. Whisk them together until they're just combined. Don't overmix! A few little lumps are totally okay, and the batter might look a bit thin – that’s exactly what we want for super moist cupcakes.
- Step 5: Divide the batter evenly among your prepared cupcake liners. Fill each one about two-thirds of the way full. This gives them enough room to puff up nicely without overflowing.
- Step 6: Pop that muffin tin into the preheated oven and bake for about 18 to 22 minutes. You’ll know they’re ready when a toothpick you stick into the center comes out nice and clean.
- Step 7: Let those beauties cool in the muffin tin for about 5 minutes. This helps them set up a bit. Then, carefully transfer them to a wire rack to cool completely. This is the hardest part – waiting for them to cool before you can frost or enjoy them!